FLASHBACK
On the night of Jan. 10, 2001, Arlen Ness, Jesse James, Paul Yaffe and I were on different planes to the same destination: the Italian Chopper Custom Bike Show of Padova, near Milan, one of Europe’s most important motorcycle events. I cross the Atlantic a couple times a year, but it had been five years since I walked the streets of Rome, Milan or Firenze. The night flying from one continent to the other is very short because of the six-hour time difference. So when I fly west to east, I never sleep. I am excited like a kid because I love Italy so much. It is the birthplace of so many talented artists who influenced the world with their architecture, fashion and automotive designs. I spend the night drinking too much coffee and chewing peanuts (because I can’t smoke) and reflecting on what my shop has produced during these last months and on what I would like to build the next season. In the U.S., everybody and his brother (plus me!) are building choppers. In Europe, the craze is called bobbers (I would like to make one, too!). But what else to build? I am not supposed to follow trends. I have to surf on them. It’s what people expect from me. Thinking of new projects has always been for me like a sweet torture. So, I torture myself all night.
ESPRESSO ANYONE?
It’s time for breakfast before landing in Milan. “Espresso anyone?” asks the too-sexy Italian-American flight attendant. Espresso at breakfast? Did she say espresso with an S? Or expresso with an X? She said eSpresso. I am thinking eXpresso, like …so Express. That’s it! I’ve got a bike theme. I request my eXpresso, she gives me an eSpresso plus a cool theme for a fast-looking bike. If I weren’t seat belted in because of turbulence, I would jump to kiss her. Hey, of course, it will not be an ode to coffee (although hot java has always been a very good friend when building bikes). A bike with a chopper attitude and a street racer stance. A chopper to race? Attitude and speed would have to be mixed together. Is it possible?
BEFORE DAYTONA – DAYTONA – AFTER DAYTONA.
The time from before to after Daytona is a custom builder’s nightmare. There is too much to do, too much to fix at the last minute, too many people to see at the same time. Expresso is buried in the left side of my brain. The only decision I am able to make is the choice of the frame. It’s an easy choice. Since October, I’ve been teamed up with Peter Penz to market a Softail frame that I named “Kool Kat.”

I sold a lot of frames and rolling chassis, but there’s been no time to produce my full-blown “Kool Kat” custom.
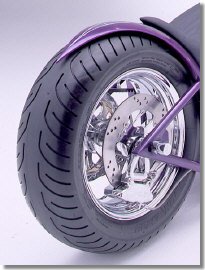
The frame accepts the new Avon 250 mm rear tire with a stock belt. That’s very important when you run a big mill because 1 1/8 belts are a third less strong than 1 ½ inch belts.


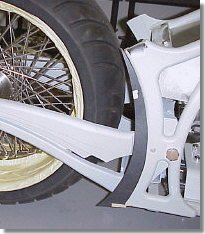
The absence of the middle post and the battery relocated in the swingarm gives a lot of room in the rear, making the bike built on this frame look very agile, exactly what I am looking for. I offer this frame in many different geometries (rake from 36 to 44, stretch from 3 to 6 inches, front leg from minus 2 to plus 6 inches). And if that’s not enough, you can add one of our raked triple trees (3-5-7-degree) and you have your own ultra-custom frame. In my shop, I pick one with a 5-inch stretch and 42-degree rake.
EXPRESSO FIRST SKETCHES

The frame high neck gives Expresso the stance I need to mean attitude. Now I need to express(o) speed. It jumps to my mind that it can come from the swingarm. This part of the bike has long been neglected even on sharp customs. Only during the last few years has the swingarm evolved. A lot of custom builders are now going to the single sided swingarm, which looks very cool. But I want something different. Instead of focusing first on the overall shape of the bike, I try to imagine my “speedy” swingarm. I see it pointed in the rear, reaching far behind the axle, with stepping all along. I love computers but I hate to use CAD programs because the learning curve is very steep and usually it’s much easier and faster for me to use a pen and paper to jot down my ideas. But I know in advance that Bob, my master fabricator, is going to turn me down if I don’t bring him a sketch perfectly scaled (hey, he knows how to protect himself). The swingarm is all drawn in my mind but in a few days my briefing will have to be “engineered” as much as possible. I must CAD design this swingarm. Loading the CAD program on my computer gives me the same chill as filling out my tax return…but I have no choice. I spend about eight hours struggling with the keyboard and designing the Expresso swingarm. It’s not perfect, but in line with what I am looking for. From there I go back to paper and pen to make a first sketch of the bike.

INTERNAL AFFAIRS
I am always somewhat nervous when I present my ideas to my crew. Building bikes is not an exact science. Will they be excited? If not, I know it’s going to be a so-so bike. So, evidently, I will not build it. If they are as excited as I am, it’s going to be a great bike. Keeping the excitement alive from the first day to the time the bike is ridden for the first time is part of my job. Custom shops are horizontal structures. Everybody needs everybody. It’s a team effort. Passion is the cement holding us together for ventures lasting many months. I am the composer. My melodies have to first be approved. Then I will write the orchestration and will transform myself into music director. But that is another story.
Thursday is D-day. The crew in charge of this custom project (Bob, Sean, Brigitte) invades my office. I talk for half an hour, show the sketches, suggest a light …… paint job. (No I will not tell you the color right now because I reserve the right to change my mind, my special privilege. Then they give me the magic words: “Nobody’s done it before. That’s cool. We can do it. Let’s do it. When do we start it?”

Monday, of course. We always start on Monday because weekends are made to go somewhere. And it’s always somewhere out of the office that I find new ideas. And I still need a ton of new ideas to make Expresso a great custom. What I gave them is just the first draft.
Expresso Swingarm
When we start a new custom, there is a tradition that we respect religiously: We always start with what seems to us the most difficult part to fabricate. So, on this Monday morning, the swingarm is the first part of the bike that we lay down on the fabrication table. (a.k.a. the surgery table) The first decisions to make are:
1. The number of steps inside the swingarm.
2. The thickness of each step and which one is thicker (top or bottom?).
3. How the swingarm must look from inside.
It’s my job and responsibility to make these decisions, but I would never obligate my fabricator to do anything without first convincing him, if necessary. Bob is in charge. He agrees immediately with me on the fact that: Steps always look better in odd numbers, so we keep the three steps as they appear on my sketch; The step on top will be higher. Each step must be about half the size of the one just above (to give fluidity to the lines), but the thickness of each step must look the same (as a matter of fact, they have to be a different thickness because they’re welded to the same back plate); Seen from inside the swingarm, no step will be visible because it would visually interfere with the wheel and brake designs.
Our “stock” swingarm is thick. It takes almost an hour for Bob to cut the pieces joining the main tubes of the swingarm — just the time I need to cut cardboard templates of the steps. It’s from these cardboard pieces that Bob cuts three metal pieces that he will adjust inside the swingarm. Then he will duplicate (reversed) these three metal steps for the other side of the swingarm. It’s already 80 degrees at 10 a.m. Bob has a lot of cutting and welding to do and he is already sweating. We close the bay and set the air conditioner at 75. I leave the fabrication room to work on a new chopper that I have to get started. But that’s another story… Bob and I have an agreement: I never come to check what he does. If he is stuck with a problem, he calls me immediately to decide a remedy. But if everything goes fine, he calls me only when the job is done and looks perfect to him. I estimate that the swingarm fabrication is a two-day job, including the cutting, trimming, welding and polishing. Good news — I won’t hear from Bob during these two days, and will resist to the temptation to check the work in progress (which is, for me, very difficult).
Two Days Later
Expresso gets its racy swingarm. We prime it because I hate to see a bike rusting during the fabrication and mockup process. To be sure it’s perfect, we attach it to the frame using Progressive suspension shocks. I immediately see a small imperfection that nobody saw before — a small bump on the lower part of the swingarm, just behind the rear axle. We correct it with a grinder and make a primer touchup. I already dream of mass producing this swingarm in steel or maybe billet aluminum. There’s a typical builder’s dilemma, however: How many need to be CNC machined to make it affordable to the public? How much money can I invest? Low cash flow has always been a custom builder’s main problem…
Expresso Juice
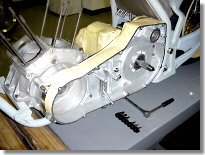
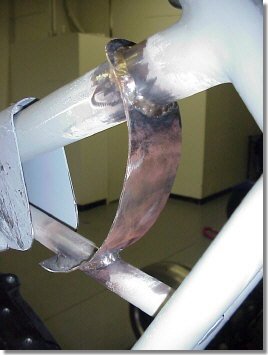
I have always been a fan of small, dry cell batteries. I use them on all my bikes. They can be easily hidden, placed in any position, and in a small package, their cranking power is double that of most standard wet acid batteries. They start big motors when the appropriate starter is used. Most times, I use small Odyssey batteries with 500 CCA and measuring only 6.69 inches long by 7.05 inches wide and 5.04 inches high..
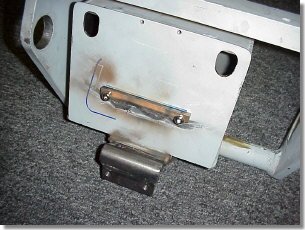
The frame kit that we sell includes a battery bottom plate bolted to the swingarm, and a top cover with slots to make the battery connections accessible. Rubber or metallic straps are enough to hold the battery securely in place inside the swingarm. But the battery still remains visible. Customizing is about hiding what doesn’t deserve to be seen. So, I must make this battery “disappear” as much as possible. I want to conceive a simple system that the motorcycle dealer or individual builder in his garage could easily fabricate.
It doesn’t take more than five minutes to agree with the boys on the kind of battery box to fabricate. Sean volunteers to make it and is already busy measuring the battery again to cut the six steel plates to be used to conceal it from view.
It’s very simple. Instead of using the base plate provided with the frame, the entire box will be bolted to the swingarm. A box is fabricated in such a way that it slides forward. Two small, flat screws will hold it in place. The front plate is conceived in such a way that the connections are not visible. Two holes are made for the battery cables to exit the box. A battery must be charged from time to time, but we don’t need access to the connections to do it. We will charge directly at the starter, which is easier and faster than unbolting the box.
Suddenly I realize that the box must stand perfectly vertical to the ground when the swingarm is in its definitive position with the engine, transmission and primary installed. It means that the portion of the swingarm where the battery box sits must be adjusted to correct the swingarm angle when the bike is on its weight. We postpone this job until we set up the definitive geometry of the frame, which is our next step. We just prime the battery box to keep it rust free.
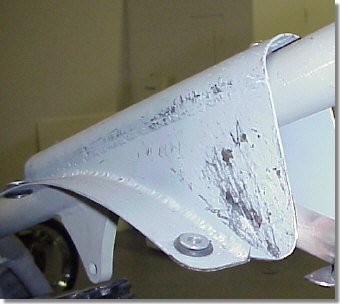
Hiding the Oil Tank
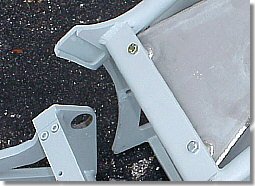
The Kool Kat frame is sold with a custom stainless steel oil tank, small in size but big in capacity (4 quarts because it doesn’t contain the battery).
Four steel plates are also provided. They have to be welded inside the two openings on each side of the frame, making the oil tank disappear from view when the bike is looked at from profile. These side plates are not identical for each side because of the left kick-out of the frame to accept a 250 mm tire on an 18-by-9 rear wheel.
Frame Geometry
The most frequent questions (at least 15 a day) we receive through e-mail and over the phone, are:
1- I have a frame with such stretch, such rake. How long should my tubes be?
2- I lowered the rear of my bike 2 inches. How much should I rake to keep the bike horizontal?
3- I saw a bike in a magazine with a 10-inch over. I want the same look. How much should I rake my bike?
4- Etc…
The answer is: it depends!
Not all frames are born equal. A 5-inch backbone stretch doesn’t mean the same length on the top tube from one brand to the other. (Don’t ask me why.) The neck of different frames doesn’t stand at the same distance from the ground. Front leg stretch, lowered shocks or adjustable air shocks on a Softail are examples of other parameters that affect the geometry of a frame, its distance from the ground, and the overall look of the bike. When people require a 10-inch over front end, it means 10 inches over stock. But stock Harley bikes, depending on the model, have different front end lengths!
So, here’s how I set up the geometry of Expresso. I like my bikes to be a compromise between look and function. It means high enough to be rideable, and low enough to look good. I like them when they sit at 4 3/4 inches from the ground (meaning from the ground to the lower portion of the lower tube of the frame). It’s the distance I want when the bike carries all its components, with a biker of average weight seated on it. When the bike I customize is a dresser with floorboards, I increase this distance to 5 inches minimum. Same when it’s a two-seater.

On this project, I use Progressive Suspension shocks. I attach the swingarm to the frame and bolt the shocks to the frame and swingarm. I install the 18-by-9 rear wheel equipped with an Avon 250-by-40-by-18. (At this stage I am not preoccupied by the fact that the wheel is or is not perfectly centered in the frame) We mock up the bike with cases (our engine is not ready yet), a transmission, a starter, an inner primary and all the main components available in the shop to be close to the weight that the bike will have to carry. I take measurements and I realize that the Kool Kat frame with stock height shocks sits 5 inches from the ground. I know because the lower tube of the frame is parallel to the lift table when we put two pieces of wood, 4-by-4 plus 4-by-1, on the front and back of the frame.

Now we have to figure out the tube length to keep the bike parallel to the ground. First, Sean installs a triple tree. Then we lock a 21-inch wheel in the vise of the lift (with a piece of wood covered with carpet on each side of the tire to avoid scratching the rim). We run one neon tube through one of the holes of the triple tree, and move the frame on the table until the tube crosses the center of the axle of the front wheel (the opposite can be done, not moving the frame, by moving the front wheel back and forth, but it’s difficult to keep the front wheel from moving while taking measurements). Now I measure the total front end required. It’s the distance from the top of the triple tree to the center of the front axle. It’s exactly 34 inches. Now it’s easy to figure out the tube length I need. Because tubes sit about 7 ¾ inches from the bottom of the lower legs, I need tubes 26 1/4 inches long (Front end 34 inches – 7 3/4 inches).

At the shop, we always keep tubes in different lengths. All have internals (springs, seals, etc., pre-installed so that we don’t lose time when mocking up a bike). For information, 26 ¼ inch-long tubes are 2 inches over FXDWG stock tubes (24 ¼ inches).

I install the tubes in the lower legs, slide the front end in the triple tree and lock it. We tie down the bike in front (not under heavy pressure because we need to lift the bike to remove the pieces of wood under the frame). Our last exercise of the day is to jump on the bike to unfreeze the swingarm, and then to “ride” the bike on the lift to check again the distance from the ground. Sean is 195 pounds, quite a few pounds heavier than me. So, he “test rides” the bike while I take measurements. I am all smiles when I realize that the bike sits perfectly at 4.75 inches from the table, front and rear.
It’s 7 p.m. Sean proposes to celebrate with a cup of coffee at Starbucks, not far away from the shop. I know why. It’s this time of the day when pretty secretaries must do last minute photocopies at Kinko’s. And Kinko’s are always located next door to Starbucks. Or the opposite. Whatever. Sean is single again. Let’s make Sean happy. I’m gonna drink my eighth cup of coffee of the day, and probably go back to the shop to read my e-mails. Any questions?
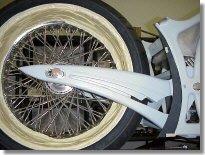
Expresso Rear Fender
It seems that pointed rear fenders became my trademark. Not that I don’t like round fenders, short or long. We fabricate a lot of them, too. But my most recent bikes “Dreamliner” & “High Octane” had pointed fenders that were “imposed” by their themes. Since these 2 bikes are well known, everybody’s thinking: pointed fender = Cyril Huze.
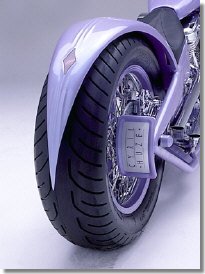
When I think of “Expresso” it’s difficult for me to imagine something else than a sharp fender matching our already fabricated pointed swingarm. So, I guess that when the bike will be finished, I am going to reinforce my stereotype. It’s Ok with me because my next project is going to be very, very different. I like change. The boys too.
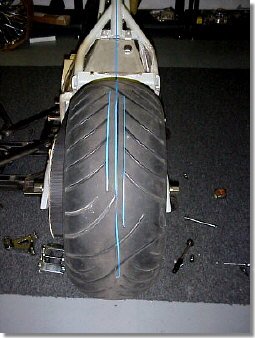
Anyone showing a bike with a pointed fender will tell you the same thing. Everybody, and I repeat everybody, is going to check: 1- if the pointe is centered on the tire 2- Move the fender right and left to see if the fender is strong enough to not vibrate. No way you can cheat with this kind of fender: 1- symmetry must be perfect 2- fender need to be “boxed” not to vibrate and crack the paint.
Before starting fabricating any fender, the most important step, the one conditioning success or failure, is to mock up the bike the way it’s going to ride: with 2 wheels aligned and perfectly centered in the frame. For the rear fender, we must mock up the bike with an engine (fake or not), a primary, a transmission, a rear wheel perfectly centered in the frame, and a belt adjusted at the right tension. Usually it’s the step of bike building when things begin to get scratched. Tape being less expensive than chrome, we tape, tape, and tape again all what is called chrome & polished aluminum. I recommend you do the same. You can trust us about this one.
First, we estimate what is the position of the wheel to be centered in the frame. For this, we mark the center of the 250 mm tire. Then, we run a thin blue (for visibility) painter masking tape along the frame backbone to the center of the tire. Any slight bend, and you know that the wheel is off center, and or turning right or left. When our eyes tell us we are close to the truth (for now it’s only an estimation), we lock the wheel in place and cut a right spacer.
Because we are going to use a drive side pulley rotor by RC Components (where pulley is also the rotor), we bolt it on the wheel, wrap the belt around the pulley, find the right tension of the belt, and lock the wheel in place. We measure the distance from the swingarm pivot to the center of the rear axle. Of course, distance must be the same for both sides (don’t rely on the position of the axle in right and left slot of the swingarm, because some frames can have these slots incorrectly machined and not the same size on both sides). On the left side, we measure the spacing to the pulley/rotor and from the pulley rotor to the wheel. We cut 2 spacers and install again the wheel with its brake drive system. (Later a custom pulley spacer will replace the spacer from pulley to wheel). We reinstall the wheel and pulley brake system, adjust again the belt tension, and measure again the distance from swingarm pivot to rear axle center, on right & left side. Our wheel seems centered. We check again running 2 steel plates on each side on the tire going forward. After being sure that these 2 plates run parallel, using vertical plates against the frame, we measure the distance to the frame, right and left side.
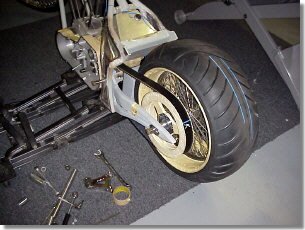
Since we had to mock up the rear of the bike to know the exact position of the wheel before fabricating the rear fender, we take advantage of this mock up to check if our pulley spacing is correct. We lift the rear of the bike with 2 4×4 pieces of wood under the frame, and give the wheel several rotations forward and backward. We observe the belt running on the pulley. It doesn’t want to go off the pulley. Of course, the belt (1 ½ inch) clears the tire on 1 side and the frame left side plate on the other side. Our wheel is perfectly in place. We lock tightly the wheel. (You don’t want it to move during the fabrication process, or be ready for bad surprises: tire too close or too far away from fender, fender not following curve of tire, etc…). Yes, it happens. Trust us again about this one. Now, we can start the rear fender fabrication.
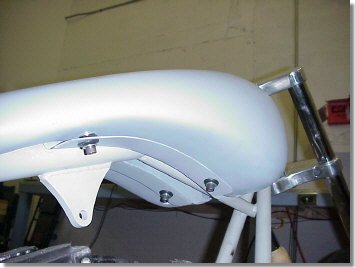
Even when we build a solo seat bike, we make our rear fenders strong enough to carry a passenger. We are very understanding of our clients: we know that may leave alone, then need to ride back with a passenger…Anything wrong with fabricating a fender stronger that it should be for a solo rider. It’s the reason why all our fenders have internal struts. These struts are quite difficult to make for a pointed fender. As starting point, we want to use the slots in the frame where classic parallel struts are supposed to slide in.
But I immediately realize that a curve starting from this position will not follow perfectly the curve of the tire. So, I cut a piece of cardboard extending rearward the frame sideplate. Using a flexible steel rod, and using the tire as a reference, I draw a curve and cut the cardboard to know the extra piece we have to add to the frame side plates. From there, 2 thick rods will be welded and will join each other where I want the rear fender to end: 1 inch behind a vertical line going through the end of the swingarm.
No English wheel to fabricate this fender. No aftermarket fender to start from. Just 2 sheets (because this fender is going to be “double wall”) of 14 gauge steel hammered and hammered during half a day until Sean gets the shape I want.


Not only our fender is very thick, but also Sean reinforces it with 2 steel lips. “Boxed” this way, no chance the fender will ever vibrate or crack the paint. Sean, who was 195 pounds before hammering it, and 190 pounds after, is finally authorized to sit on it. As strong as stone can be. I joke that we are very safe because nobody with such a bike is going to go back home with a girl his weight.

Time for spraying cheap primer. Because as everybody knows: I hate rust.
Pet owners look like their favorite pets. I guess my bikes look like me. A projection of my personality (many sides, meaning many bikes), plus the client input. Expresso is a spec bike. So I can do what I want!
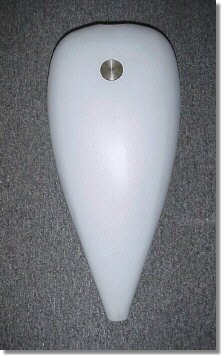
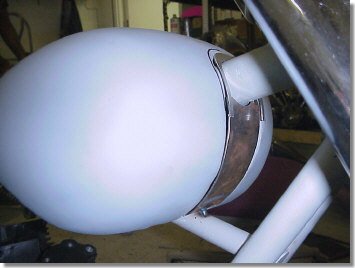
The motorcycle trend is toward FAT. Fat everything: tires, wheels, front ends and gas tanks. But I don’t like fat gas tanks. They make the bike look heavy and destroy the speed effect that everybody is looking for when stretching the bike. I love rear ends muscled by fat wheels & tires, but I think it looks better when the gas tank is slim and stretched to the extreme. Fuel capacity is not my main preoccupation either. So, we are going to fabricate a one-off gas tank narrow, with a lot of arch, stretched as much as we can.
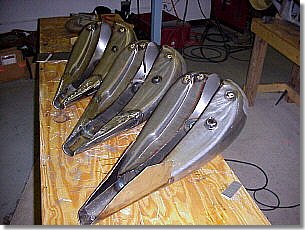
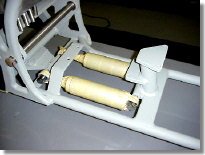
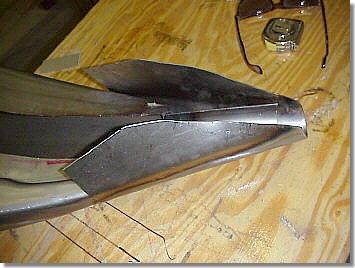
At CHC, we custom make gas tanks in 3 & 5-inch stretch for cruisers and choppers. In the fabrication room, they are laid down upside down on a bench waiting for the last cosmetic welds before being shipped to our clients. Vision of steel seagulls! We pick one in 5 inch stretch and check on the bike to see how much stretch we can add: 1 inch.
Our extension is going to be a “dry” extension, meaning no gas will be in this part of the gas tank. It would be of no interest to make it a “wet” extension because no fuel valve can be installed at such a low place: the petcock would interfere with the rear rocker box!
A Hot Match pop up gas cap is welded and then we do a fast priming of the new gas tank
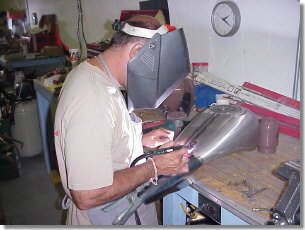
A 16-gauge piece of steel is folded around the lower part of our existing tank, and then formed around the frame top tube, and then tig welded.
Another 16-gauge sheet of steel is U shaped on the top tube to create a 1-piece bracket with a 4-point mount system. A cardboard template is used to match the curve of the bracket with the lower curve of the gas tank.
After checking the definitive position of the gas tank (I like to keep a big open space between the front of the gas tank and the frame neck), 2 holes are tapped on the top of the frame backbone and the bracket is bolted on. The bracket mounting holes are equipped with stock factory rubber grommets.
Most gas tanks look like an added piece on the frame. This is evident when you look at the gas tank from the front. We need to fill the gap between the 2 halves of the tank. A steel piece is cut to fill the gap, then curved and welded to the backbone.
A slight gap is kept between the plate and each side of the tank. Making it perfectly flush at this time would create big problems later when the bike is painted & cleared. Later, at molding time, a perfect fit will be done. Now our custom gas tank looks like it belongs to the bike.
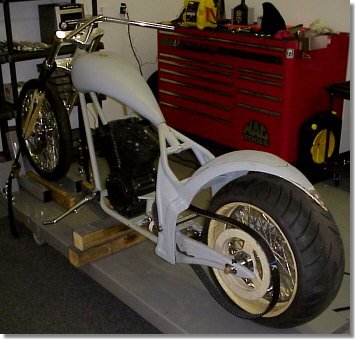
It’s time to compare the bike in progress and the initial sketch. We are on our way…
Seat Pan
One thing I learned when I was head judge in the Rat’s Hole Show in Daytona and Sturgis is that a seat is often the weakest part of many very well built motorcycles. I am not talking about the color used or even the material employed. I am talking about the seat not fitting perfectly to the frame, not being symmetric or being afflicted with wrinkles because of poor seat pan preparation.
Some upholstery shops do seat pans. Others refuse and will do only the pure upholstery job. My opinion is that the bike builder should prepare a pan for a custom seat. A seat pan being “part” of the frame, it’s our responsibility to make it right. Steel pan or fiberglass? It’s very controversial. We do both and each has advantages and disadvantages. Steel pans require metal fabrication skills to make them fit perfectly to the rear fender. The pan must be very smooth when doing thin seats, like on most top custom motorcycles. If not, all imperfections, sooner or later, are going to push the foam (even high-density foam) and create weird wrinkles and crooked stitching lines. Fiberglass seat pans don’t require any particular skills and can be built by any builder working in his garage. Fiberglass can easily be smoothed out to create a perfect base and sanded for perfect adjustments. The danger is that fiberglass seat pans have a tendency to retract when curing (usually the first 48 hours), creating an imperfect fit to the rear fender (back of the seat pan retracting). But there are several ways to avoid or correct this problem. Because this story is about helping the largest number of non-professional builders, we decided to show a fiberglass seat pan fabrication.

To get started, buy 2 gallons of fiberglass at the closest auto store, find two paint brushes (no, you will not be able to reuse them) and a roll of foil. Cut a piece of thin cardboard for the sitting part. Cover it with foil and continue up the fender (no cardboard is used on the fender part of the seat because cardboard will never fit perfectly to a curved shape). Be generous with the foil, covering more than the seat area. Cut pieces of fiberglass cloth to imitate the shape of the seat. Then, using a brush, soak the fiberglass cloth with resin. Let it dry 24 hours. The day after, do a second coat of resin using extra hardener for fast curing. Wait 24 hours more. Then with a thin felt pen, you can draw your seat. To trace a perfect curve for the back seat, I use …my welding rod.
Remove the pan and give it its definitive shape by cutting it with a small cutting wheel. To be certain that the back seat has a perfect symmetry, we cut a piece of paper imitating the back seat. We fold it in half. Right away, we know where the cutting wheel has to work again against the fiberglass. Sand the top of the pan for a smooth finish.


To hold the seat in place, it’s very simple. The pan being installed on the frame, drill two holes in the front at the place where the front tube extends to the seat. Drill through the fiberglass. We drill only one hole through the fiberglass in the back fender. Then we fiberglass three button head bolts into the three holes. Your seat can now be dropped into place. It will never move while riding and it will not need any tool to be removed. Our seat pan fits like a glove.


Each step of the building process is important, but one of the most critical is the frame preparation before the paint job. At this stage, we must check that all parts are fitting together and make any brackets or holes in the frame. Because when the paint is dry, it’s too late to make any modifications. Or it’s going to be very, very costly.
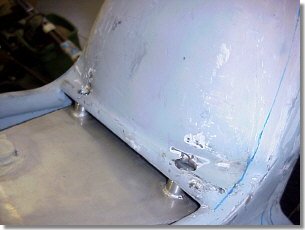
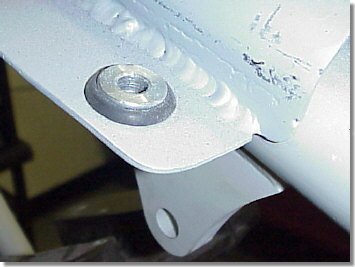
First, we need to make two slots in front of the rear fender to be able to bolt and unbolt the custom oil tank.
I don’t intend to do extra fabrication on the front tubes to hide the voltage regulator. Because I don’t like regulators held on a bracket in front of the engine mount, I decide that it should be “buried” somewhere else.
The best hiding place is in front of the custom battery box that we fabricated. Because the box we made fit the dry cell battery very tightly, we cannot bolt the regulator from inside the box. So we weld a block of steel, tap two holes in it and bolt on the regulator from outside.
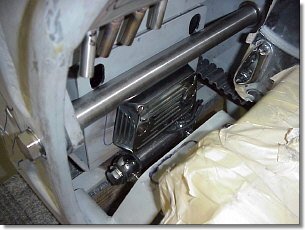
It means that we will have to route the regulator wiring through the left lower frame tube, up to the engine. For this, we drill two holes, one to enter in the frame, one near where the alternator will be plugged to the engine.
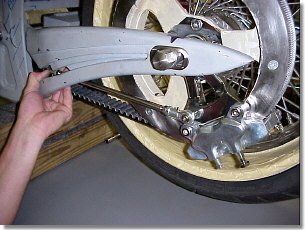
Usually I like rear brakes to be placed in a 12, 3, 6, or 9 PM position around the rotor. Because of the unusual shape of our swingarm, it seems that none of these positions works properly. The rear brake seems to “compete” visually with the flowing lines of the swingarm. After many tries, it seems to me that the 5 PM position is the best. The boys approve. So we custom make an anchor rod running parallel to the belt. A hole is tapped inside the swingarm to connect the brake to the frame.
For the rear brake line, a hole is made near the master cylinder with the line jumping to the left side through the frame cross section and back to the rear brake.
Because the bike will have no turn signals, only a headlight and my new L.E.D side mount tag with a run/brake light (picture of the 1st prototype), the electrical system is quite simple.
The ignition/kill switch will be on the left side incorporated in a coil bracket, and the bike will be started with a switch from Cycle Engineering installed directly on the starter.
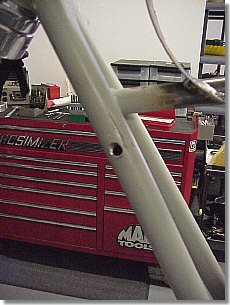
It’s almost time to have the frame molded and prepared for paint. I review the frame in detail, writing all instructions directly on the frame: welds to be grinded, sections to be reworked with filler, shapes to be molded, etc…
For the first time in eight weeks, Expresso is going to leave the shop for a one-week beauty treatment.