|
 I was sittin’ around listening to Bandit and Zebra go at each other again, over some b-s detail, and thinking’ that I’d probably be doin’ the world a favor to just blow both of them away, when it hit me. We’ve all read about the Bikernet West versus Bikernet East build up. We heard about how much trouble Zebra had getting his ride over to Eddie Trotta’s, and Bandit gettin’ the Blue Flame over to Joker machine for a little tweak. I couldn’t help but think, “What’s the guy do whose only got his garage and hand tools?” Whatta ya do when you’re snowed in up in Maine, or there isn’t a high line custom shop within a days ride? I started to get steamed, “Bikernet’s for the rider, dammit!” “We need to show our folks a way to build a cool lookin’ ride when they don’t live close to a famous custom builder.” “Yea, right,” said Zebra, “how’re you gonna manage that?” I jumped to my feet, threw my Pepsi can against the wall, watched it bounce off Snake’s head, and announced, “I can build a hot custom using nothing more than Harley-Davidson’s accessory catalog and my credit card!” Every eye in the garage shifted my way, quiet laid over the shop like a blanket, Bandit fixed me with a cool gaze, “You’re on.” “Oh, crap,” I thought, “now what?” Luckily, I had just made the deal of the century on a 2000 FXST.
 That will be the starting point for what’ll be called Oz’s Garage Build-up. What we’ll attempt to do here is create a custom that anybody would be proud to ride and own, but we’ll do it as if we were living in some remote corner of the country. With no access to anything other than the H-D Accessories and Motor Parts Catalog and the main line shipping companies.
 We’re going to build this thing completely in my garage, no mills, no paint shops, no welders, and see what we can come up with. Wish us luck, if I screw this up I may end up living in Maine!
|
|
Phase one is together and on the road, which is a minor miracle considering the near-flood conditions that have been plaguing us lately. You know, when I started this project, the premise was that we wanted to do a build-up that attempted to duplicate the plight of our brothers and sisters that didn’t live in the custom bike mecca of Southern California, and were forced, either by geography or weather, to do all their work in their garages. Little did I know, when I started, that the weather gods would provide SoCal with a first hand glimpse of what it was like to live in a less hospitable climate, and make my theoretical project into a real life experience. Yesterday was our first day of sunshine in a month, and, as soon as I saw it, I shoved the Softail out of the garage and hit the road for the shakedown run. It ran like a charm, then back to the garage for a few minor adjustments, and down the highway we went. I gotta tell you, I’ve got a new appreciation for you folks that live in rain and snow country, but now let’s get to the build-up. With this first phase we’ve concentrated on basic performance and appearance. We’ve all heard the old saw about “chrome won’t get you home,” but if you’re building a custom it’s hard to get around the fact that shiny stuff makes things look better.
 We replaced the inner and outer primaries, rocker boxes and cam cover and trans top and side covers. As you can see the quality is perfect, and, being from the Motor Company, the fit was exact.
 As far as our initial performance work, we chose the 1450 Stage 1 kit. The kit includes the Screaming Eagle Holley Performance Induction kit, the SE 6200 RPM Ignition, and the SE-II Mufflers. We’re still waiting for the mufflers to arrive, but they’re due in the next few days. We’re planning on doing a more aggressive performance package in the future, so we chose to also install a Screaming Eagle clutch kit at this time.
|
|
We started with the primary first. This operation requires the most work so it made the most sense to begin here. One of the things that will dress up a ride in a hurry is a chrome inner and outer primary. Obviously, first you gotta get the old one off. Remove the outer primary, and the primary chain assembly, clutch and basket.
 This is a little more trouble with a Softail since it’s necessary to remove the oil tank.
 This is the only way to get the starter loose. Moving the starter out of the way will also help when installing the tranny top cover. Bolt the inner primary in place, following the torque pattern in your service manual, and re-assemble the primary drive.
|

Remember to remove the spacers at the rear of the clutch basket before installing the new clutch.

Always lube the plates and friction disks with Primary oil before inserting them into the clutch hub. Finish up with the rest of the drive, according to the manual.

Bolt the outer primary in place, also following the torque pattern, but after installing the tranny top cover and replacing the starter, and this side’s done.

The oil tank can now be replaced. We also went with H-D’s braided oil lines, they fit perfectly and looked very cool.
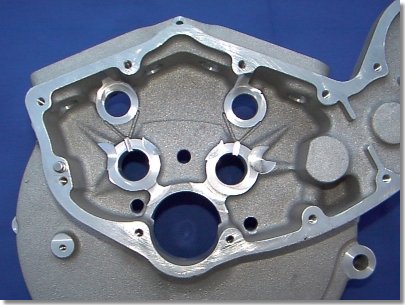
The cam cover, rocker boxes, and tappet covers go on next. These are very straightforward operations, and, as long as you’re careful and clean, you should have no problems.
We now installed the SE Holley kit.

This operation is covered in the Bikernet Garage section in detail, so we won’t go into a step-by-step here. Needless to say, the kit and instructions made this job a breeze. At this time, we changed out the ignition module and coil, also covered in the Garage section.

We wanted to lower this ride so we installed H-D’s Low Profile Rear Suspension. This operation, too, is detailed in the Bikernet Garage.
As we told you at the beginning of this story we took the Softail out and put it through its paces. The Holley performed flawlessly and the bike ran hard.

When we got home we rolled it out to take a few shots so that you all could see the before and after. Low, fast and pretty. I’d say that’s a pretty good start.
Now let’s ride. Oz