

We were flying on this build, one item slammed together after another. We were flying, because I’m at a standstill at this moment waiting on a couple of elements. But that’s another story. Six days until I’m due to pull out for the run to the Badlands. It’s currently looking shaky. We’ll see what happens next.

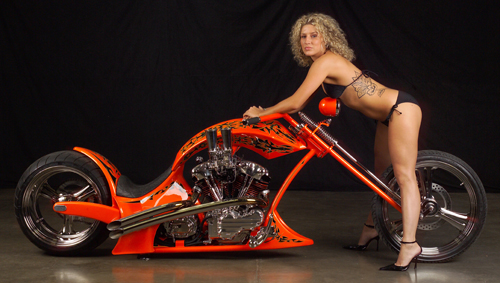
This project has been a rush for the most part. It’s like building a bike to be more performance oriented than any other motorcycle I’ve built. Everything about this V-Bike, by John Reed, of Custom Chrome, is about handling and performance and we took it to another level with this segment. I spoke to a friend, Wil Phillips, of True-Track, the man who designed the first working rubbermounted Softail frame, the Rubbertail. Wil’s complete focus in this industry is handling right now. He developed the True-Track system to take the wobble out of touring Harleys, but his investigative efforts never stop.

When I told Wil I was building a big twin Buell with an Accurate Engineering 120-inch Panhead engine for Bonneville, his handling lights went on. He explained every aspect of the rubbermounted FXR chassis and how to detail the handling for high speeds. Here’s the list:

1. The very latest H-D forward rubbermount

2. Buell side rubbers
3. ¾-inch swingarm axle
4. Brass, self lubricating swingarm bushings
5. Dyna Glide axle adjusters
6. 1-inch axles (we didn’t go there)

7. Stainless steel Heim joints
8. Modified True Track for the V-frame.

Here’s the notion. We needed to eliminate vibration but retain rigid handling, prevent wobbles, flexing in corners or flat out. If you ride a touring bike, you know the drill. The True-Track is the first line of defense for any Touring model. So our first move was boring out the swingarm bushings for the heavier, stronger, H-D swingarm axle. Wil cut off a chunk of his stock Touring True Track and machined the edge on our milling machine to contour the frame member.


Wil had to make his system work with the Custom Chrome frame. He turned to the vast Bikernet Headquarters machine shop and went to work trimming his system and creating a way for it to mount to the CCI frame.


With each move Wil refit the True-Track to the frame over and over for a perfect fit. His extruded True-Track system was a step-up from his original billet machined units that gobbled time and material.


That was the last move before I completely stripped the bike, finished welding brackets and prepared to haul the components to Foremost Powder Coatings in Gardenia, California. During this process, with permission from John Reed, I cut out the kickstand frame member, running between the engine and transmission. This member didn’t exist on stock bikes, so I felt confident. It ran too close to Baker Transmission oil fittings for comfort, so I cut it off and decided to make my own kickstand.

It’s fortunate that I didn’t destroy the actual kickstand bracket. I cut it down and made another kickstand unit out of it and mounted it to the original mid controls mount on the frame. I’ll go into that later.


I divided the powder order into three groups and took photos of each and sent the shots to Don Claypool, at Foremost, so he could keep track of each part. This is critical to getting the job done right the first time.


You’ll have to forgive me if I ramble. The headquarters were just over-run by a bunch of kids and hot babes and they’re feeding me iced Coronas and limes. For SoCal it’s hot, like 96 degrees and 70 percent humidity. It’s warm.

Okay, what’s next? A couple of weeks slipped past and the powder was ready to pick up. I immediately started to assemble parts.

I chased threads, peeled off Powder tape and prepped for assembly. Keep in mind most parts are sand blasted before they’re coated, so there’s shit in the threads.

Here’s a perfect example of preparation. I was excited to slam this bastard together and roll. I started on the rear brake system and discovered they coated the lever axle shaft. I called Sin Wu away from the computer and she stroked my shaft with emery cloth until the powder was gone. I pressed Tephlon bushings from the stock lever into my hand made brake lever and dug the paint out of the clip-ring groove. Some of that was wasted time. If I had indicated to tape off that shaft, I would have saved an hour.

With a pneumatic cut-off saw I cut the steel lip off the Buell rubbermount. I had to be careful with heat, so I worked in shifts and cooled the casting between each operation. I needed to do that to clear part of the frame.


Wil pointed out that casting tabs and lips can form weak spots. He told me to grind them as smooth as possible to prevent cracking.


I needed to install the front end and discovered that the sand blaster blasted the neck bearing races, so I drove them out of the frame and installed a new set. JIMS machine makes a special tool, but I don’t have one. I winged it and spoke to a buddy, Larry Settle, who has owned a shop for 30 years in Harbor City. “I bang ‘em in generally,” Larry said. I tried to press them in, but they don’t want to slip in evenly, so it’s best to tap them until they’re start and press them the remainder of the way.


This is a kick-ass Paoli front end and it slips together easily. However, the entire unit is metric and I had to pay close attention to the fasteners. Since I was replacing bright-plated nuts and bolts with stainless Allens I started to learn the metric thread business. There are at least three thread pitches, not just fine and coarse like I’m used to.


Next, I pressed in the self-lubricating swingarm cleave blocks. They glided in simply and Wil told me to leave 4.5 inches in the center for the transmission. This actually works out easily since the rubbermounts on either side sit flush with the swingarm and hold the bushings centered. With the bushings in place I slipped the swingarm in the frame and snugged it down with two rubbermounts, then frame caps, nuts and washers.


With new stainless ½-inch fasteners I installed the shocks then the rear wheel. I’m still grappling with the chain alignment, but I’ll get there.

All the bolts worked out perfectly, except one. It rode close to the brake caliper anchor bracket. Ultimately, I shifted the flat washer on the back of the swingarm shock bracket to the front and I was golden.


I was anxious to install the dash plate we machine- turned for class. We also installed the digital speedo and padded the back of the dash to protect the wiring and prevent shit from flying into the back of the system. I’m hoping I didn’t interfere with any controls or adjustment screws. We’ll see.


I had to install the Le Pera, classic, gold metalflake seat. Since the bike is rubbermounted and has killer suspension, I didn’t go for any seat springs, but just 1-inch rubbers under the rear of the seat.


I installed the EyecandyCustom’s taillight with new stainless fasteners and started to think about wiring. I was working with Rollin’Sixes Customs and they make a complete set of Iron Cross, Spade and Star grips, pegs and shift and brake pegs. I decided to give them a shot since the back of the taillight sported an Iron Cross. But I’m not giving up the rubber pegs for the ride to Sturgis.


I started to understand the wiring harness that comes with the V-Bike kit from Custom Chrome. I flipped through the manual for the Wire Plus, The Ultimate Wiring System (602) 221-2417. It wasn’t bad. The more I picked through it, the more I understand where I could place electrical components. It comes with it’s own circuit breaker system, flasher for turnsignals and starter relay. Except for the headlight wires the schematic was clear and I went to work.

Next I had to design and mount another kickstand. Kick stands seem until until you jump into the task. They need to lock, so if the bike rolls if won’t topple over. They need to fold up, out of the way and not run into the primary drive or the frame. They need a spring that will control all this activity.
I dug through the trash and found the old Dyna style frame bracket and cut it.

That’s it. I started to install the brake lines, ISR controls from LA ChopRods and make the kickstand. Sturgis is just around the corner and while I wrote this the bastard painter called me to tell me all his fuckin’ woes while I paced the floor waiting on the sheet metal and the engine. Will I make it to Sturgis this year. It’s all up in the air. I’ve never been this close.