Everyone agrees adding an oil cooler to their air cooled Harley-Davidsons motorcycle is a good idea. So which one? Some work better than others. You have the units that look like a little car radiator was added to the down tubes. Though they do the job of cooling, they are not always attractive even with some fancy covers over them.

Some are billet and or chrome and though they do look cool they may not always give the best cooling. I was trying to decide which one I wanted to install on my new 2009 FLHTC Harley when I came across the OIL BUD.
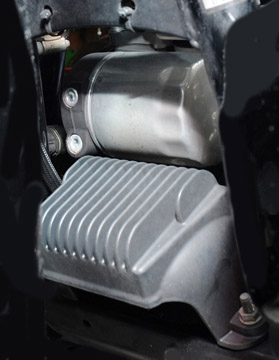
It grabbed my attention because it mounted under the engine and transmission and therefore not easily seen though it would have plenty of air flow over it.
I had some doubts about it being under the motorcycle and the likelihood of something smacking it and causing an oil leak, most likely miles from home. Bud Clarke who designed it was confident enough to let me try one and assured me that once I actually saw the cooler I would not have any doubts about it working. He was right. I was impressed.
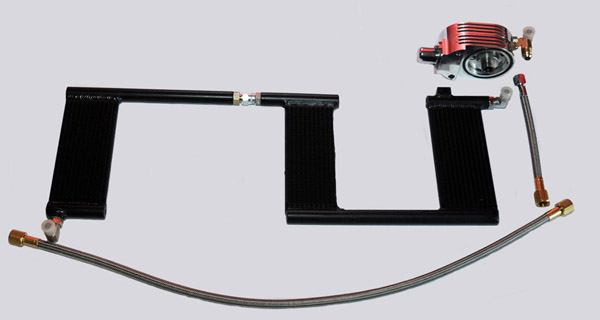
First of all the unit did not look like one of those radiator type coolers. I was later to learn it was made out of extruded aluminum and had tips machined in it that also worked as a heat sink to help cool the oil when the motorcycle was stopped. It does fit up higher than the frame rails and definitely higher than the crossover for the exhaust. This took all my doubts away.
My kit came with a polished aluminum adapter for the external oil lines to hook to. The quality of the workmanship was very evident and made me more convinced to install it.
Installation was rather simple and something that most everyone, who does any work on their ride, can do. As always, I read the instructions through a couple of times to familiarize myself with the operation. Of course, I am going to take you through it now just to be sure. There's another reason to read the directions thoroughly. Sometimes you discover something in the directions, or the warnings, that might hold up the operation. I hate surprises.

I needed just some basic hand tools: A 7/8 deep well socket, an extension and ratchet; a 5/32 Allen wrench; 9/16 open end wrench, ½ open end wrench, and two (2) 11/16 open end wrenches. A pair of pliers and snips were also useful. Also, I dug out an oil filter wrench and a pan to catch a small amount of oil when the filter was removed.
I also ordered a new oil filter, as one was not included in the kit, mainly because people may have a preference. I grabbed a fresh quart of Spectro engine oil. I prefer Spectro synthetic, as it works well for me.

I started off by removing the oil filter and then the nut the filter was threaded against. On a clean surface, I removed the four Allen head bolts that hold the adapter together. I installed the long hose to the part that will mate to the engine case where the original filter went. I tightened this hose at this time, fed the hose under the oil filter housing while holding the adapter. I made sure the hose was routed along the inside of the frame rail and above the frame plate. I made sure it didn't interfere with lines, cables, or wires.


I checked the O-ring placement and lined-up the adapter, making sure I had clearance to remove the O2 sensor if necessary. I inserted the new bolt, supplied in the kit and tightened it snug. Once you have adapter where you want it TORGUE to 40 foot pounds.

I located the wire bundle on the right side of the motorcycle and lace it with the sheath supplied in the kit. It was a planned precaution to protect the wires.

The Oil Bud comes with red Loctite in the mounting hole; I checked to insure it was still there. I brought the right side of the cooler up to about a 45-degree angle and slide it into the space in the frame. I hefted the left side of the cooler up into place and insert the bolt and lock washer supplied.

I chose not to insert the bolt more than a few threads, as I wanted to be able to position the front section, making it easier for me to join it to the rear portion.

The rear cooler already had a protective sleeve installed and easily slid in above the rear stabilizer section of the frame. After both halves were connected, I tightened the bolt securing the front section to the frame. I then double checked clearances and tightened the two halves together.

I installed the other hose to the remaining section of the adapter making sure the chrome end was facing towards the cooler. I paid particular attention to how it slipped through the front frame section. When the hose was routed correctly, I joined the two sections of the adapter together paying attention that the O-rings were in place and the correct length bolts were inserted (there are two lengths). I tightened securely in an X pattern.

I installed the chrome end of the short hose to the chrome fitting on the cooler. I tightened all fittings securely and installed the new oil filter after first applying a few drops of oil to the seal to ease tightening.

I added a half-quart of Spectro 20-50 and started the engine. As the engine was warming up, I checked for oil leaks and was pleased to find that there were none.

I took the my '09 dresser for a short ride and when I returned, re-check the oil and topped it off. After sitting overnight, there were still no leaks.

To find out more about the OIL BUD contact Buds Biker Parts, 3302 Airport Road, Helena Montana 59601 Phone is 406-457-2458 or check out their website at www.budsbikerparts.com.
–ROGUE