


Dining Room Rigid?
By Bandit |
Editors Note: The following was sent in via e-mail by Bikernet reader Mike Hahn. We’d liketo share his story with you. We particularly appreciate the fact that Mike cooked thisbeast up in his dining room…. The only question we have is, which wine is bestserved with a rigid?
Dear Bandit,
Thanks for the quick response to my e-mail. Here is my story: I havedreamt of building my own bike for about eight years. Every time I went to build it,I was discouraged by the amount of money I needed. I did, however, end up buyingand rebuilding a 1978 FXE about five years ago and rebuilt that to how I wanted.
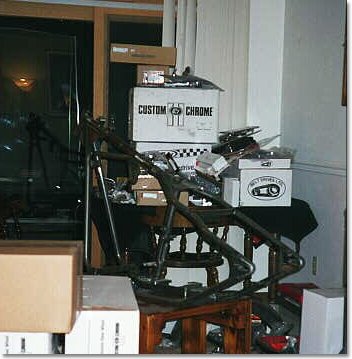
I ordered the kit on Dec. 1 and received it on Jan. 15. The engine was on back order when I ordered the kit (which they didn’t tell me until they got the certified check). I had a party when it arrived and went to work.
It mocked up pretty well, except the rear fender support sucked. I made my own.
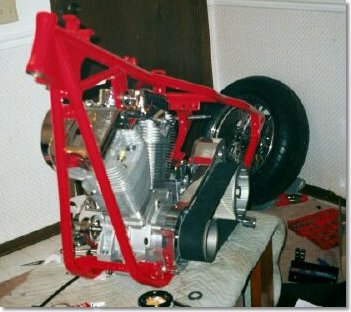
I had the frame powdercoated, which took about a week, had the tanks lined professionally (too much time in the past wasted on cleaning out filters and petcocks with that creme shit), and had a buddy paint it good and cheap.
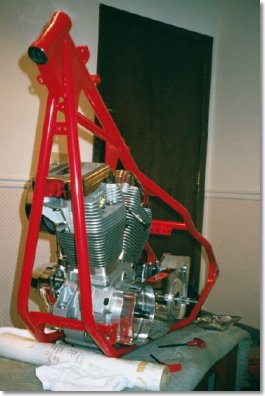
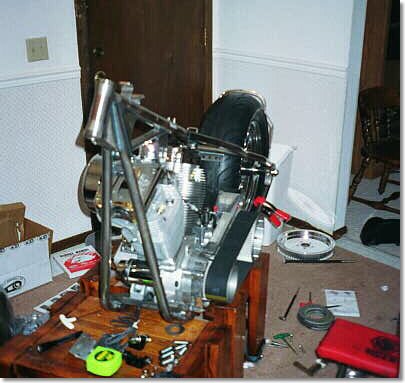
I started the final assembly about the second week of February. I worked three jobs all winter to help pay for this shit and found time to finish it in about six weeks.

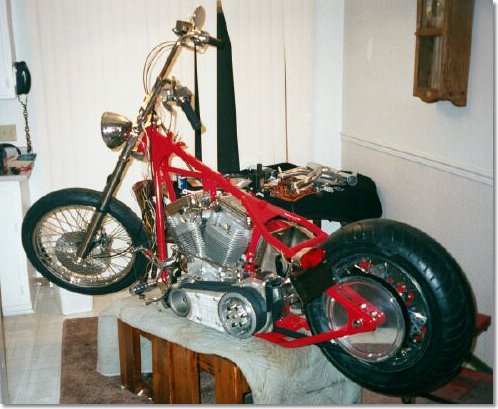
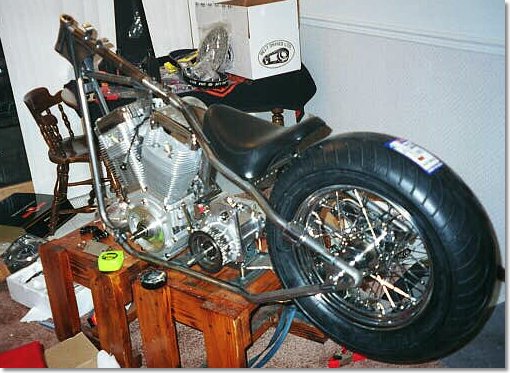
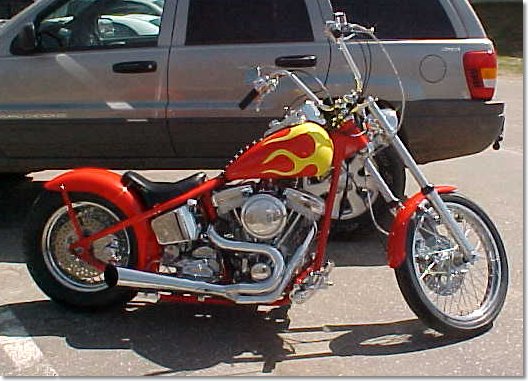
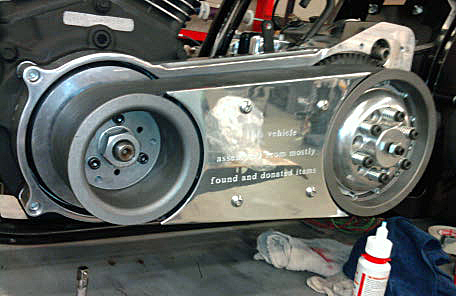
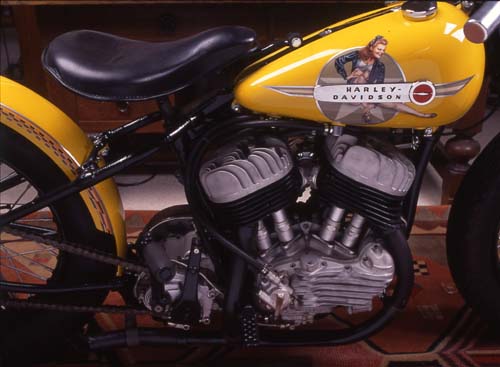
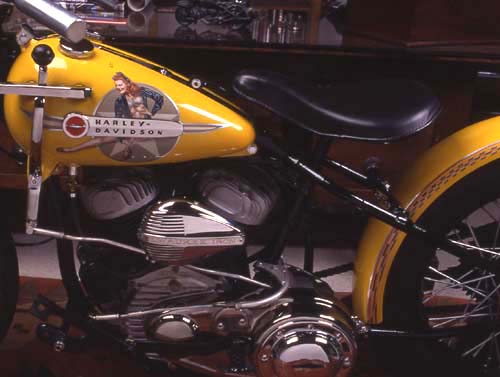
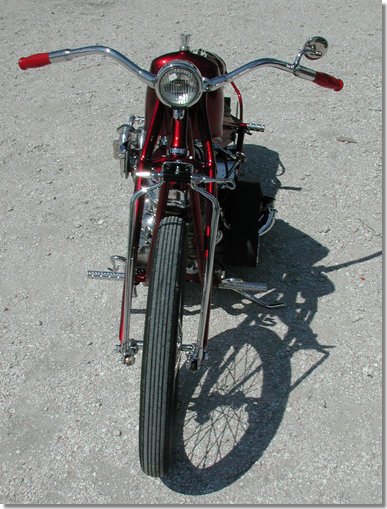
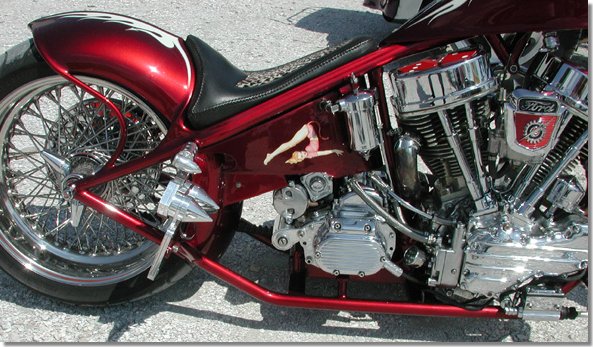
1. The rear fender support sucks. 2. The handlebars suck (no knurling, good size bump, they slip). 3. It’s a very, very, very nice kit for the price. It comes with a West Coast Choppers fender, Accell charging system, Crane ignition, Lepera seat, BDL belt primary, 100-inch engine with a 6-speed transmission and a nice BIG back tire. 4. There were a lot of cheap import miscellaneous items such as nuts and bolts. 5. It rides good and the rear tire absorbs the road better than I had hoped. 6. I’m very happy with the overall quality. The most important parts were of high quality. It just seemed like some of the things could be better.
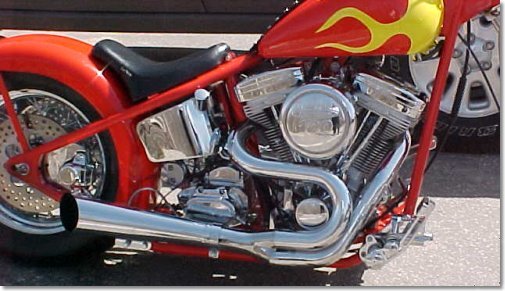
I did change the forward controls to Jay Brake, and installed a Hookerexhaust system. Getting the inspection for a title around here can sometimes be a pain in the ass, but I was in and out in under 20 minutes. I’veattached pictures and will send more on request. Every good day we’ve hadso far this spring I’ve ridden instead of stopping to take pictures. But I will take more soon.
Thanks for your time,
Mike Hahn
Rosemount, Minn.
Birth of an Evilution
By Bandit |

I’ve often heard, and truly believe, that building your own motorcycle from the ground up is a “biker’s rite of passage.” I haven’t been able to pin down the origin of the statement or if it has a notable person attached to it, but they couldn’t be more right.

This Evilution was born of a combination of desire, passion, survival, friendship, skill and a dab of raw human kindness. I’ve loved motorcycles from the minute my uncle Willie took me on his Ultra through the streets of Spanish Harlem. I graduated high school at 17 and joined the Marine Corps never having had the chance to learn to ride. After moving to Florida at 21 years of age, it finally happened. I bought a Kawasaki Vulcan 800 with help from my best friend. It started a fire that burns brightly to this day.

After several unfortunate mistakes and poor decisions, I ended up living on the couch of a friend and making money hustling and bartending. It’s from that couch that I realized I was obsessively watching reality TV shows about building motorcycles. Finally sick of the life I was leading I told myself, “These guys aren’t that much smarter than I am, I can do that.” I was in for quite the surprise.

I started my research and found two schools a few hours away. One included 8-hour days, out in 6 months. The other offered 4-hour days, and completion in a year and a half. I’m the instant gratification type and called the shorter of the two. In 2004 that school faced an enrollment so heavy that I was placed on a year and a half waiting list. The other wasn’t much faster. I asked the enrollment clerk what class gave the student’s the most difficulty. She said the welding portion frustrates a lot of students. If I had to wait a year and a half to start my new life I was going to lose motivation, so I decided to learn everything I could about welding.

I immediately enrolled in the full time welding course at Palm Beach Community College. My class only had seven students. That made the individual attention very easy for my extremely talented but quirky instructor. Over the next year-and-a-half I was certified in several processes including stick welding, MIG, TIG, Flux Core, plasma cutting and oxyacetylene welding, cutting and brazing. I figured this would make my success at tech school a breeze. Wrong again.
I’ll never forget the morning I left for Daytona. I was living with a co-worker in Deerfield Beach, Florida. My mother came down to see me off with $300 dollars and a bit of bad news. My father who had recently lost his job was being evicted from his home in Tampa. My mom sent him $50 for gas and instructions to meet me in Daytona. I had nowhere to live up there, no job, about $500 total and now had to figure out how my father and I were going to survive. Oh yeah, and class started at 7a.m.

The Marine in me came out and said, “Everything’s against you, find a way, we’re not losing.” I packed my 1998 Mustang with everything I owned. Being a transient bartender/hustler doesn’t usually leave much to pack. Heading up I-95 the plan included finding dad, feeding us, crashing one night in the cheapest hotel I could find, and living out of our cars until we got back on our feet.

Life apparently contained an alternate plan. I pulled off of the highway onto International Speedway Drive in Daytona Beach and stopped at the Hooters (enjoy the view, especially if life’s about to get rough). I called Dad and he was about 20 minutes out. We met in the parking lot and held each other for a moment. I think we both realized that things looked damn bleak. As we chewed on wings and drank draft beer, I filled him in on my plan. I had the restaurant’s phone book and a pen to make notes, in the margins of the hotel pages. As I’m rapidly discovering that we’re in deep shit, my phone goes off. It was a dear friend “Taxi Mike.” He gave me a phone number and name.

“Call him and he’s going to give you directions to his house, he said you can crash there,” Mike said. “He’s a friend I met in Costa Rica and I told him you’re family.”
“But I have my dad now too,” I responded.
“Just call him, his whole family is really cool.”
That next phone call changed my life forever.

I paused for a second not believing that there might actually be an out for us. I called the number and was pleasantly answered by a warm southern accent. “Well we’re about 20 minutes south of you in New Smyrna, jot these directions down and I’ll see you when you get here.”

I did and hung up with a 1000-yard stare I couldn’t shake. My dad was floored but relieved for the moment. He followed me south and we arrived at “The Compound.” I’d learn later that it was their nickname for the property. As we pulled up the father, who closely resembled a warm Kris Kristofferson met me in the dirt driveway.

I received a firm handshake and a friendly introduction to the whole family, close to a dozen on the property. They led dad and I to a room that had originally been setup for a massage room. One of the daughters graduated as a masseuse and used it as a treatment room. They had two military cots with dry towels, blankets, and pillows on them. It was a small extension of the house but had air conditioning and a separate entrance. Dad and I both had eyes welling up with gratitude and disbelief. This family took us in, sight unseen, complete strangers, on the word of a friend 400 miles away. What does any of this have to do with The Evilution?
It has EVERYTHING to do with it.

I was going to tech school while looking for a welding job and Dad was looking for anything to earn money daily. The father and oldest son had just acquired an assembled from parts, 1990 Fat Boy. The paint job looked like it was a huge calico cow. My favorite part was the two June bugs, mid coitus doggy style, very discretely painted on the bottom right rear fender.

I found out later the builder’s intent was for it to look like a horse. Nice effort bro, but no one, even one, saw that. The H-D on the tank shoulders were supposed to be the branding marks, but also got swallowed by the rest of the paint. They were having occasional issues with it, so I’d ride it to school and use it as a classroom-learning tool. Fixing it up for free was the least I could do to repay my enormous debt of gratitude.

I found a job welding full time and I got Dad a job at my school since they were looking for a maintenance man. It only took a few months before we were finally stable enough to move out. I will never forget or be able to repay that overwhelming act of kindness.

I graduated in January of 2006 and was promptly hired at a south Florida dealership. I quickly found my home for the next few years. At that time, people were buying toys like the world was ending tomorrow, insert foreboding irony here. I was making decent money and the dealership got me approved for my first Harley, a used gloss black 2003 Night Train. I rode that thing constantly, my car only started once a week to pick up my young daughter from school.

March 12th 2007 at around 10:30 p.m. A white Ford Explorer hit me. I woke up eight weeks later in ICU. There’s much more to that part of the story but this is more about the bike than my injury details. The important lesson is that I didn’t know if I would ride again. From my wheelchair, I would entertain myself by reading, watching TV and staying on Bikernet. I read every article, including the archives, when I came upon Jared Peterson’s “Enlightenment.” That article to this day brings very powerful emotions back instantly.
I was reading about someone who had been badly injured and survived to ride again. I started to cry at the keyboard as the details and emotions he was recalled mimicked exactly what was tearing me apart inside. I wrote to thank Bandit and Jared then, and I thank them every chance I get now. I couldn’t have found the strength to heft my injured leg over a Nightster a few months later, with my cane and colostomy bag still attached, just to ride around the parking lot, had it not been for this website and that specific article.
After recovering and going back to work, I eventually reached the position of Service Manager. From out of nowhere I got a phone call from the family in New Smyrna that saved my father and me almost five years prior.
“Hey Joel, Dad stopped riding because mama would rather play tennis, and he didn’t like riding without her.” The son quit riding because of a messy divorce and he got full custody of the young ones, so he’s not taking any more risk. He didn’t want to lose custody if he got hurt. “We can’t get what were asking for this bike and if we’re going to give it away, we figured it should go to you. You’d appreciate it the most and ride it.”
I sent the work truck to pick it up the next day. The cow was coming to daddy. It arrived in good running condition, but looked rough. Since I had last seen it they had painted over the calico with straight vivid black and installed a silver painted 80 inch remanufactured Evolution engine, the original was black and chrome. It only had 1000 miles on the re-man.
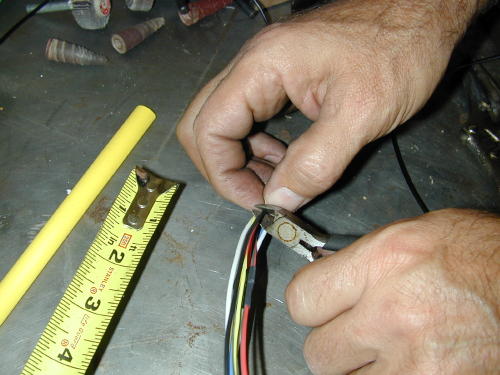
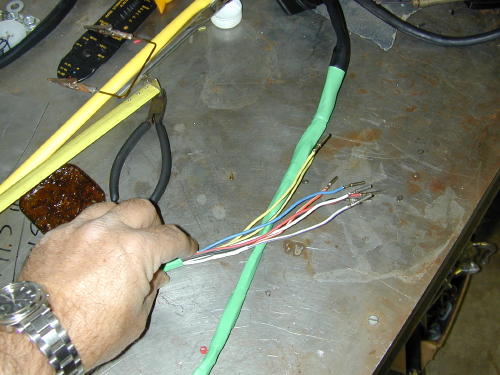
I took it for a spin around the block and right away felt familiar but unsafe. I pushed down on the handlebars; the front end bottomed out, and stayed there. It was an aftermarket front end I didn’t recognize, or wanted to use for that matter. I looked at what was being used as a wiring harness and while simple, also looked like an eventual fire hazard. If I was going to repair and upgrade these systems, I decided right there this was going to be my chance to build something I’d wanted since those days on the couch.
Everything from the handlebars and front end to the antiquated primary, transmission, and wiring were going to face a budget makeover. Budget because while I was employed and making decent money I had my bills, my child support and just life in general tying up funds. So off to the junkyard and my friend’s garages I traveled. What a treasure chest of random mismatched parts from the entire time and model history of Harley-Davidson. First, the rolling chassis needed to be found. My friend and co-worker had a bare ’99 and earlier pro-street Softail frame, a 180 purple swing arm and a pitted chrome low profile oil bag.

My boss was just as giving and enthusiastic about the project. He was a participant in the 2010 Hoka Hey Motorcycle Challenge. He had a spare set of wheels and tires for his 2010 Road King ready for a NASCAR style tire change sitting in his office. He said if I could make them fit in a Softail swing arm I could have them. As nice as the 28 spoke late model Harley wheels looked, I was going to find a way to make them fit.
Once the mismatched donations began to arrive, I started cleaning parts and making preliminary mockups. I began to see immediately that there was going to be a lot of “out of the box” engineering modifications needed to make these mixed year, mixed model parts come together smoothly.
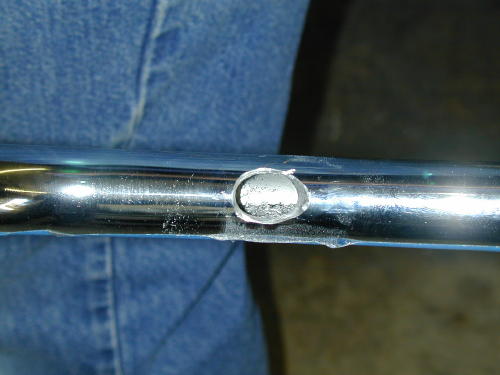
The fuel tanks were transplanted from the donor bike, but neither they nor the oil tank would line up with the pre drilled mounts on the frame. Of course not! We solved those issues later. I was fortunate. We scraped together parts from my favorite three H-D model lines. The front end and wheels came from a Road King, the frame from a lowered Softail Night Train with forward controls stance, and the Fat Bob handlebars and hand control setup.
Our first problem was the front end. Using the 2010 touring wheels required me use a set of take off, late model touring lowers. I used the stock upper touring fork leg and installed it in a stock Softail triple tree. Everything was fitting smoothly until I installed the dual disc Brembo calipers. When everything was tightened down the wheel was binding almost to the point of seizing. Further inspection revealed that the Softail triple trees were just a hair narrower that the touring ones. I sent the legs out to mill .030” out of the inside of each lower leg. Upon reassembly the calipers centered perfectly. Hurdle one down with enough in store to fill the Smithsonian…twice.

I figured with the front end set up just about licked the back would just fall into place as long as the wheel fit in the swing arm, big rookie assumption. I didn’t take spacing, driveline alignment and rear caliper, rotor, and pulley spacing into account, as I’d soon get a big lesson.

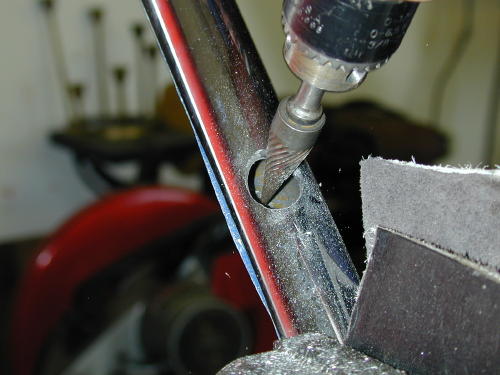
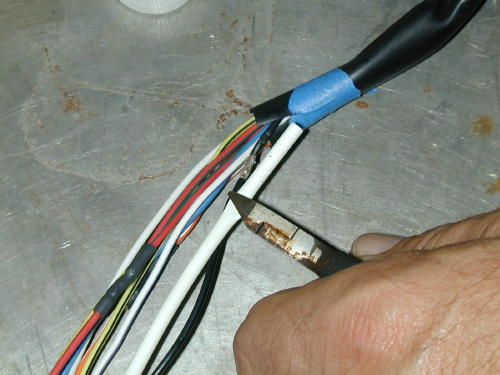
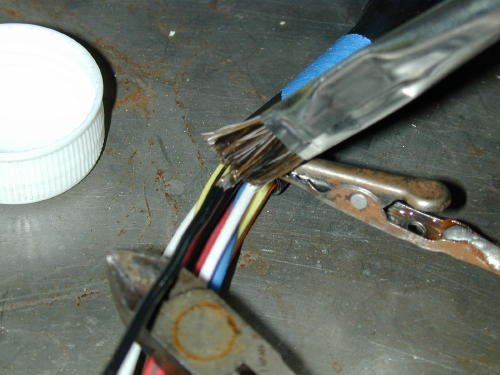
This became my biggest challenge of the entire build. See, what looks like plenty of room to fit a 180-rear wheel and tire package, isn’t. It is, when you have the option to run a chain, and sprocket or some low profile, hot rod brake caliper and rotor setup, but we didn’t have those options. I had to run those wheels because first, it’s what I had, and second, I had already invested in modifying the front end to take the damn things. The late model rear wheel consists of three very specific components, each with very specific widths. They cannot be intermixed with other wheel components without over-the-top type modifications.

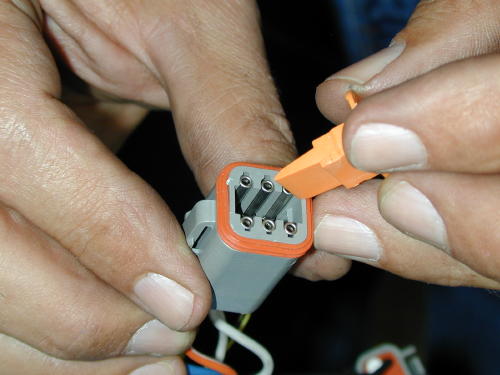
Here you see the rear wheel, the rubber isolator, and the inside of the pulley. My understanding of it is that Harley-Davidson engineered this final drive system to absorb some of the rotational force, sound and vibration caused by the compensators used in the later model bigger displacement drivelines. I’m sure there’s much more to it than that, but I’ll let one of you write to us to complete the technical explanation of how it works. I started to mock it up with a Softail axle and right away noticed that the axle wasn’t the right diameter for the bearings used in the wheel. Not a problem on the front because we used touring lower legs. The swing arm came from a ’99 and earlier Softail using the smaller diameter axle.
![]()
The axle needed to be addressed right away. I thought I could just change the wheel bearings to the ¾-inch diameter with the touring outside diameter, but I found out that the dimensions of the Harley touring bearings were of a very specific and proprietary configuration. No industrial application called for these dimensions outside of Harley OEM applications. So long story short, the bearings didn’t exist. What to do? Make it work.
Looked simple, almost innocent I thought. There are custom machined bushings that take up the difference from the axle to the bearing inner race.
Now I can fit through the natural swing arm openings and take up the slack in the wheel bearing inner races. Now we have that covered. Next, up, caliper and driveline alignment.
Once the wheel axle and bearing were now properly secured, we had to work on spinning and stopping. I had Brembos up front but I had room for NOTHING in the rear.
We cut it down to ¼-inch with a slightly oversized steel insert to absorb any stress to the base aluminum once properly torque down. We also had to open the clearance of the mount that attached to that swing arm tab. We were very limited in our spacing and had to be perfect in order to get our driveline alignment correct and safe.
After cutting the caliper down and making custom wheel spacers, we installed it and got to relive a previous fear. We raised the rear end up and tried to spin the rear wheel without the belt to check for free movement. The wheel refused to budge. I was nervous to say the least. Come to find out the late model touring wheel’s rear Brembo rotor is actually a tad larger in diameter than its predecessors, so it was hanging itself up on the inside of the older caliper. I was lucky in that Harley kept the same mounting points on the wheel, so all I had to do is run the earlier rotor on the later wheel. Some of you may have already noticed the rotor change in the mock up pics.
We had to use a late model Softail drive belt because it was the only one that would fit the narrow touring pulley width and still have the right length and strength.
Now that the front and rear wheels were installed spaced and free spinning, we could get to the rest. I needed a primary driveline. Hmmm where to find one?

So we commenced to gutting, pillaging and raping the poor donor bike for desperately needed items. The engine, transmission, and primary had to get dressed up before we could use them. Just so you know, I love Evolution engines, but I hate silver painted Evos. That was our starting point.

They can be as reliable as they come, if built correctly and properly maintained. I wanted more power than the stock configuration provides, while still using mostly Harley OEM performance offerings. My boss, Bill Sidman, and my very performance driven co-worker, Gabe Farfsing, suggested an entry level, reliable package that consisted of the SE64 cam, 1340 Pro performance Evo heads with matching high compression pistons. Once the cylinders were bored 10 over, it was a simple plug and play package. I didn’t need to peel my eyelids back, but I definitely wanted to, at least, get out of the way, in a hurry, if needed.

I tore the engine apart and began the performance upgrades and cosmetic reconditioning. We started by letting David Davis hit the bottom cases with one of his masterful textured black paint jobs.
David’s attention to detail and unwavering dedication to a quality finished product shows in everything he touches. My lessons continued with another Harley-Davidson mechanic’s inevitable fate, the Evolution base gasket.

I know many of you old timers will laugh at me because I am a rookie, and I haven’t built a thousand of these. Removing this gasket without using a power tool, for fear of making the surface uneven, is a serious endurance trial. I’m sure many of you could do it faster, but I had 2.5 hours per cylinder into properly clean them. Then we lap the base before reinstallation.

Once assembly was started, I pulled the timing cover and got another surprise.
Points can be reliable when used properly, but I wanted something a bit more modern. I decided a Crane Fireball would do just the trick. So once assembled, we ended up with this beautiful power plant.

Remember how I said the oil and fuel tanks wouldn’t line up with the pre drilled holes? Here’s how we decided to “make it work.”
This custom machined adapter moved the pre-drilled holes to where the oil tank mounts actually sat naturally.
Jimmy from Allied Machine in Oakland Park, Florida was singularly responsible for engineering and designing every machined part on this project. Another debt I’ll be forever grateful for and paying back for a long time going forward. This was his way to fix a tank that doesn’t want to line up.
The tank bolted on perfectly. I have to thank Dave and Mike at Hardcore Custom Coatings for an amazing interpretation of my idea for this paint and making it “Soulless Black.”
I’ve always been a huge fan of drag bars and forward controls, even though I’m only 5’9” and stumpy. I wanted to get that look while keeping the feel comfortable for me to ride….ALOT. These were ready for the over haul.

I had a 2009 Fat Bob after I wrecked on the Night Train, I fell in love with the Fat Bob pullback drag bars. When I installed them, the heights of the risers were too tall for the flat, low-slung look I was shooting for. Once over 3 inches were cut off, they were PERFECT.
I opted for Joker Machine’s hand controls and spacers because they gave me a super clean and adjustable set of hand controls.

I decided to use a takeoff Dakota Digital American Ironhorse speedometer cluster mounted to the headlamp nacelle. It looked clean while keeping the dash smooth. But now I needed a smooth dash. I looked everywhere for blank metal dashes and found not a single decent one. So, I went to see the Wiseleys at Custom Bikes of Fort Lauderdale for some help. Jack looked at what I had and knew just what to do.

A great customer of mine, when I worked at a Pompano dealership, was a machinist by trade and saw the 2006 Mustang GT I had built. He said it looked like the new Knight Rider or something out of a Transformers movie.
He machined a Deception logo out of scrap aluminum and gave it to me as a gift to mount on the grill. I couldn’t do it without damaging the billet grill, so it ultimately ended up in Jack’s hands at Custom Bikes for this dash.

They did a perfect job of channeling the spirit of that gift, while building a BADASS dash. It looked even better on black with fairing weather stripping installed.

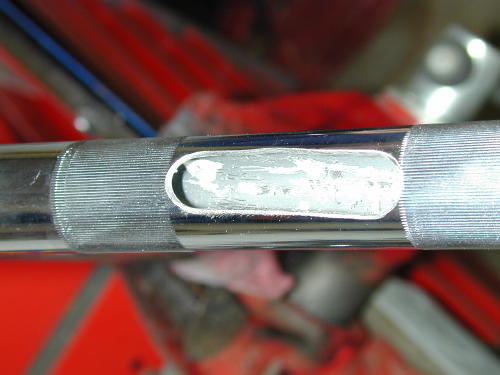
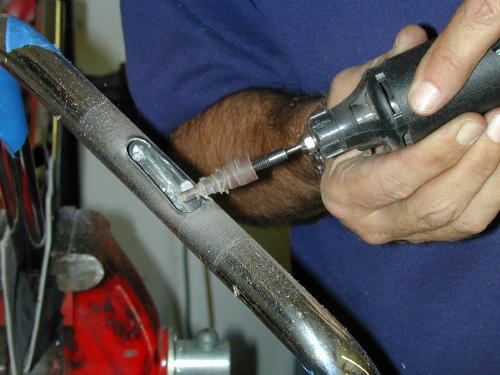
I wanted to run as much stock sized Harley-Davidson parts as possible. That mantra became an issue. The rear fender was donated from a friend who changed the stock fender from his 2009 Cross Bones to a color matched Fat Boy fender. I was ready to install it when I realized that the rear fender struts were too narrow AND their OEM mounting holes didn’t line up once again with the pre drilled frame mounts. Jimmy to the rescue again. I can conceive these items, but it takes a special artist with metal and machines to bring them to life.
Those adapters allowed us to run the stock sized, late model, rear Softail fender. That, in turn, allowed me the option to use Harley-Davidson OEM detachable hardware for accessories, wiring harnesses and accessory LED rear tail lamp.
I have no pictures of the transmission because it was a 4-speed off of the donor that a friend said he could make it work in my application. He not only made it work, but machined it to accept a late model; twin cam 5- speed gear set with a splined shaft AND modified the starter mount to take a late model, high output touring starter.

Even better, the low profile oil tank allowed for a starter install and/or replacement only lowering the exhaust, pulling the open belt primary jackshaft cover, removing the jackshaft and two starter bolts. That’s a TON easier than removing the traditional stock Softail starter by opening the primary AND removing the oil tank and lines OR having to pull the rear wheel. So now, on to the primary drive set-up.

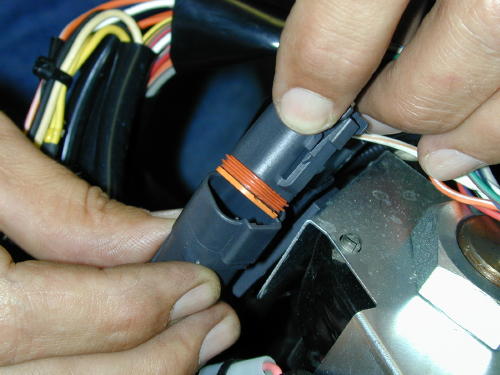
As fate would have it, at that time, my company still worked on police motorcycles. A Broward County Sheriff was building a motorcycle for his wife and bought her a BDL 3-inch open belt drive. Then he started getting a bit worried that she’d get herself caught in it. He asked if anyone would be willing to trade a closed primary, even exchange, for the new unopened belt drive. Um, yes please!
That move played hard on me, only because I’d never installed one before. Once the engine was secured and the transmission and trans plate were in place putting the inner primary plate on was a snap.

Thank god for Bandit and Bikernet (listen folks, I’m not kissing ass, they really answered my e-mails and pointed me in a direction that saved me a lot of headaches on this build). I searched for a BDL Primary install and read the tech article on Bikernet. If not I would have never thought to try this.
That article and the BDL Youtube videos helped me get this on a lot easier. But I still wanted this to be a direct reflection of me. I decided the belt guard would be one of those places.
I prepped the mounting studs.
I installed it and then asked Vasile Ciuperger to help with my custom engraving.

Then we installed it.Vasile also custom engraved the left side hand control spacer to look like a wedding band. JFFJ= Joel’s forever, forever Joel’s. For my first ever build, I can only hope so.

Now just the finishing pieces. James himself, from James Dean Custom Seats, came out to fit a saddle for her.
Awesome! He even figured I might want to bring a lady friend.

Between all of what was already needed, and what was added last minute like–The custom textured skirt that matches the front end-To the horn cover-and the black LED headlamp-

I can’t thank everyone involved enough. I can only hope to never disappoint any of you and ride this thing forever. Because this is a true Custom Vehicle Operation.

To every person whose life has touched mine, and in turn allowed me to touch another, I thank you all. I needed each and every one of you to build this, and I’m eternally grateful to you all daily.

BIKERNET EXTREME EVILUTION TECH CHART
Owner: Joel Mercado
Bike Name: Evilution
City/State: Fort Lauderdale, FL
Builders: Joel Mercado, Graham Weaver, Oscar Acosta, Shane Nardi, Steven Sabo, David Davis
E-mail: joel_mercado_76@Yahoo.com
Fabrication: Same as Builders
Manufacturing:
Welding: Allied Machine
Machining: Allied Machine

Engine
Year: 1990
Make: Harley-Davidson
Model: Was a Fat Boy now a Pro Street
Displacement: 80 cu in
Builder or Rebuilder: Joel Mercado, Graham Weaver, Shane Nardi
Cases: H-D
Case finish: Textured Black
Barrels: Stock H-D
Bore: +.10
Pistons: Screaming Eagle Pro High Compression Forged 1340
Barrel finish: Textured Black with highlighted fins
Lower end: Stock H-D
Stroke: Stock H-D
Rods: Stock H-D
Heads: Screaming Eagle Pro Evolution 1340
Head finish: Textured Black with highlighted fins
Valves and springs: Screaming Eagle
Pushrods: Screaming Eagle adjustable
Cams: Screaming Eagle SE-57
Lifters: Screaming Eagle
Carburetion: S&S Shorty E
Air cleaner: K&N
Exhaust: Vance and Hines Black Big Radius
Mufflers: Vance and Hines
Transmission
Year: 1990
Make: H-D
Gear configuration: Machined to fit TwinCam 5 speed gear
Final drive: 2008 Touring Cush Drive
Primary: BDL 3 inch open
Clutch: BDL
Frame
Year: 2003
Builder: Daytec
Style or Model: Gen2
Stretch:
Rake: 35 degree
Modifications:

Front End
Make: H-D
Model: 2008 Softail Triple Tree with 2008 Touring Legs
Year: 2008
Length: Stock Touring
Mods: Lower Legs Machined .0030 to center the Touring Brembo Calipers

Sheet metal
Tanks: Stock 1990 Softail Split Bob
Fenders: Front is a 2008 Police Road King
Rear is a 2009 Cross Bones
Oil tank: Low Profile for easy starter R&R
Other: Custom Dash by Custom Bikes of Fort Lauderdale

Paint
Sheet metal: Custom Coatings
Molding: Custom Coatings
Base coat:
Graphics: Custom Coatings
Type: PPG
Frame: Innovative Powdercoat
Graphics or art: Custom Coatings

Wheels
Front
Make: Stock H-D 2009 Touring
Size: 18
Brake calipers: H-D Brembo
Brake rotor(s): H-D Brembo
Tire: Dunlop
Rear
Make: Stock H-D 2009 Touring
Size: 16
Brake calipers: Modified 2006 Stock H-D Softail Rear
Brake rotor: 2006 H-D Softail Rear
Pulley: 2009 Touring Cush Drive Pulley
Tire: Dunlop 180

Controls
Foot controls: Found
Finish: Chrome
Master cylinder: Unknown
Brake lines: Front H-D Rear Custom Cut
Handlebar controls: Joker Machine
Finish: Satin Black
Clutch Cable: H-D Diamond Black
Brake Lines
Shifting: Foot
Kickstand: Modified Stock H-D

Electrical
Ignition: Crane
Ignition switch: Pollack Marine
Coils: Dyna
Regulator: Unknown
Charging: Stock H-D
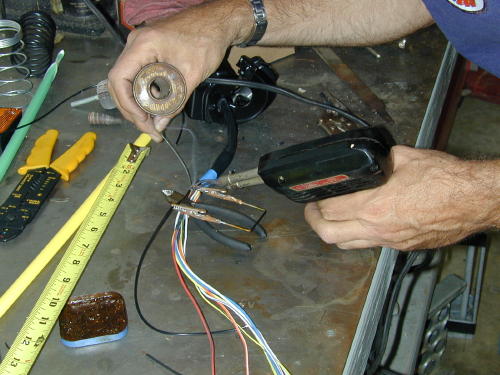
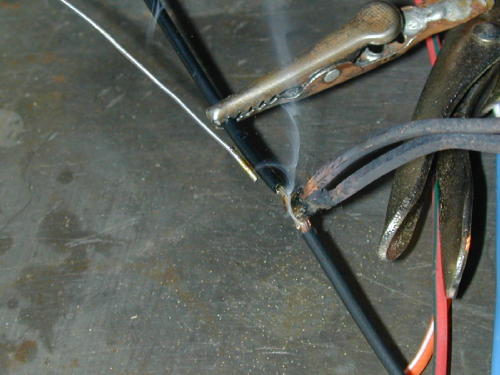
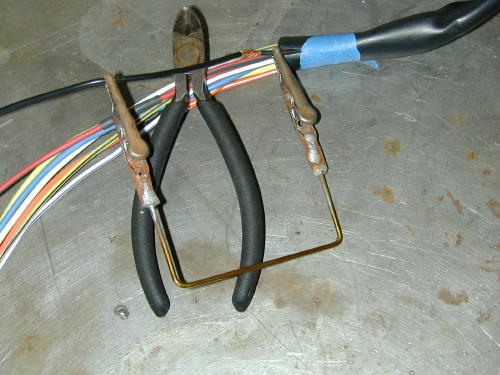
Wiring: Custom harness by Graham Weaver
Harness: See Above
Headlight: H-D LED
Taillight: H-D LED
Accessory lights:
Electrical accessories:
Switches: Pingel
Battery: H-D

What’s Left
Seat: James Dean
Mirror(s): H-D tribal
Gas caps: Drag Specialties
Handlebars: Stock H-D Fat Bob bars with modified risers
Grips: Performance Machine
Pegs: Drag Specialties
Oil filter: H-D
Oil cooler: none
Oil lines: Black Rubber Hose
Fuel filter: Pingel In Line
Fuel Lines: Black Rubber Hose
Throttle cables: H-D Diamond Black
Fasteners: Mostly H-D Chromed
Specialty items: Custom machined rear fender strut adapters, fuel tank mounting adapter, rear master cylinder mount, Ignition switch and coil mount, risers, horn mount, lower fork legs and rear brake caliper.
Detailing by FJ’s Auto and Marine Salon www.fjsautoandmarinesalon.com

Comments:
Detailing Supplies provided by Jeff Telliard of Cycle Ice
Custom Engraving by Vasile Ciuperger

Credits:
Designed and assembled by Joel Mercado with a ton of help from Graham Weaver, Oscar Acosta, Shane Nardi, Steven Sabo, David Davis, Wayne Nitche, Stacey Beasley, Tim Lawler, Joey Simon and Sean Jones.
Special thanks to Chuck Montague for all of the help with my parts needs.
Extra special thanks to Bill Sidman for giving me the chance to build this and to Jeff Cheek and Shelly Rossmeyer-Pepe for allowing me to work in the field I’m so passionate about.
Road King 12/20/02
By Bandit |

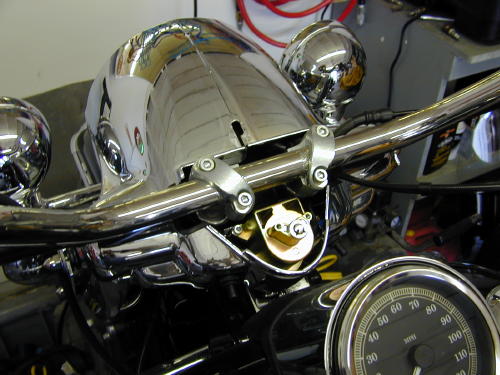
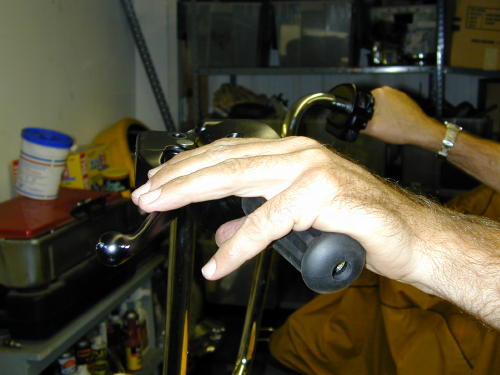
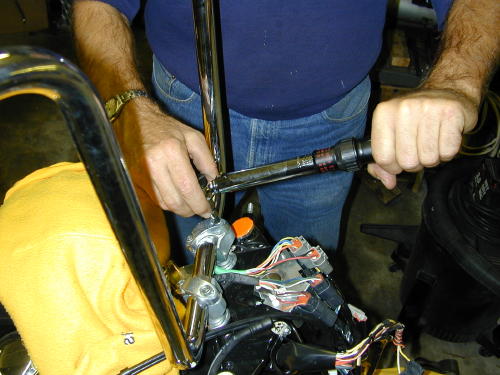
There’s an unwritten rule in the Code OfChrome that says, if you slip a set of highbarson any motorcycle you save it from mediocrity.There’s more, an evil punishment for this oftenillegal gesture towards the rebellious arts. Assoon as the unsuspecting rider throws his legover the saddle and reaches for the tall grips,his sideburns expand down the sides of hisface and a goatee springs forth from his chin.The cuffs of his t-shirt roll, and he begins tosmoke a pack a day. An treacherous grinspreads across his smoke tainted teeth, as ifa deadly rash, and before the week is out he’sleft his lovely religious wife and ravagedseveral other women. Hearts lie broken in histire-burned path. It’s an ugly sight. So what didwe do to the King next–Highbars to the stars.
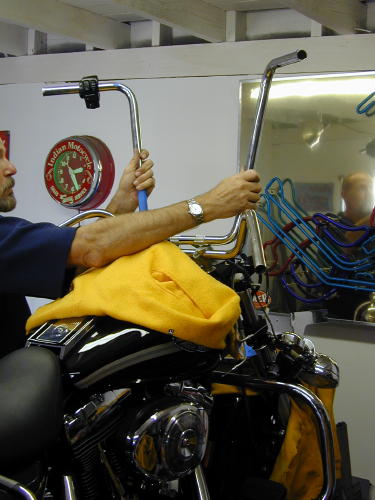
As soon as a date was set for theArizona Run I called Frank Kaisler, “We’ve gottwo weeks. Let’s install the highbars.”
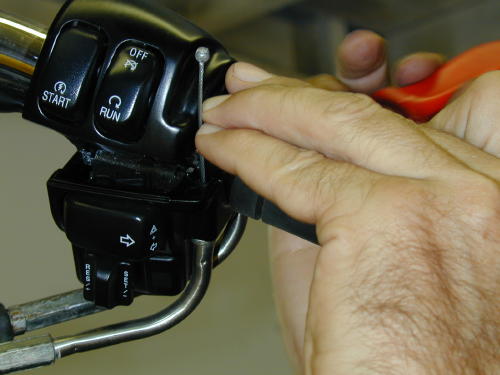
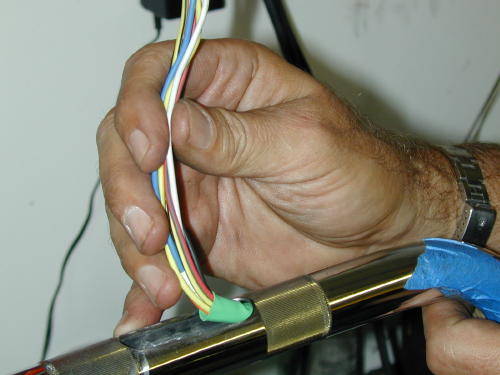
“You’re nuts,” Franks said, “but we allknew that. Let’s do it. Make sure you have aroll of thin 60/40 solder, soldering paste and awide variety of long shrink tubing from 1/8 to1/2 inch. Oh, and you can get a head start bydrilling holes in the bars for the wiring and aslot at the bottom for the wires to exit. Startsmall and work up to and beyond 1/2-inchholes.
With multiple drill sizes and burr bits Iformed over 1/2-inch holes after holding thebars up to the bike and trying to estimate theposition of the grips. This is critical. I unboltedthe grips and measured the distance in fromthe end of the bars where the wires would runand noted the position of the wiring.
This was nervous work since it was notprecise. Even the slot at the bottom of thebars almost 2 inches long and 5/8-inch widehad to be carefully positioned not to put unduestress on the wires.
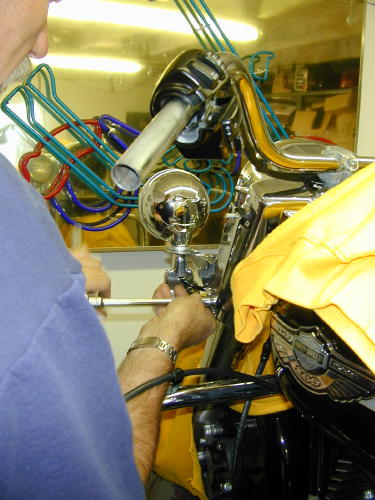
I took the riser housing off so I could seehow the wire looms and cables ran. WhenFrank arrived he brought along a sack full oftools that included emery bits and a dremeltool to smooth out the sharp edges particularlyon the inside.
We quickly rounded out the edges of theholes so as not to cut the wiring. Frank usedhis trick of shoving a tissue paper in each holeto test for sharp edges or burrs. If it snaggedthe least amount we continued theedge-softening procedure. He also kicked meduring the process and reminded me todisconnect the battery.
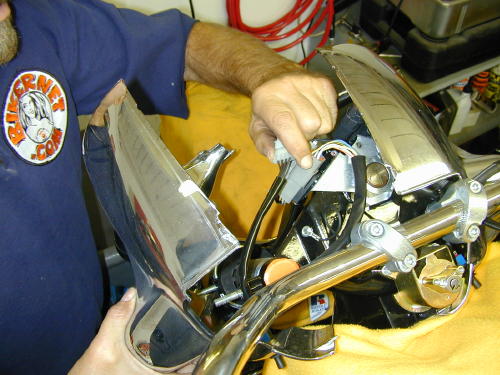
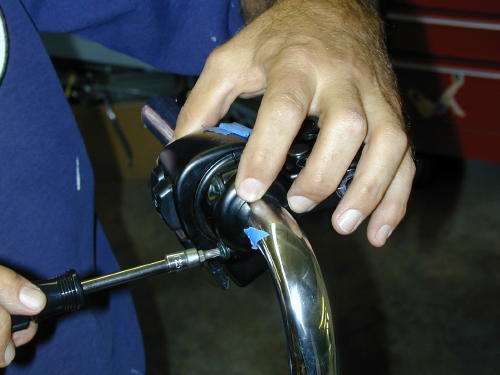
Next we had to carefully strip theheadlighthousing and handlebars. To remove the riserhousing there are two screws adjacent to theignition switch (pop off the guide ring aroundthe ignition switch with a screwdriver), but thatdoesn’t do the entirejob. The headlight ring must be removed.Take the sheetmetal screw out of the bottomof the ring and then lift out and up. Thering is held by a notch at the top andsupported by a spring that will snap loose.When it pops free there are eight small blackscrews holding the headlight assembly inplace (the other silver screws are there toadjust the lens–don’t mess with them). Afterthey were removed theassembly came out easily but needed to beunplugged from the wire connection at therear.

The wiring seems daunting, but it’s notbad and very organized.
The last small bolt holding the risercover inplace goes in this hole under the nacelle strip.The strip hooks into the slot above it.
Then you need to reach up under thecowling and feel along the bottom for the verysmall nut that holds the bezel strip in place.Once the strip is removed, the riser cover canbe removed.
Here’s the cover removed. A lot of workto reach the handlebar clamps.
The two 5/16 dome nuts holding eachside of the bezel also hold the runners for thewindshield and the passing light bar, whichwe removed along with the front crash bar–Living dangerously.
Then the passing and turn signal light barwas removed for ever more, and the bezelremoved with the 5/16-inch dome nuts oneither side of the front end (make sure youkeep all the fasteners together including thewindshield runners). Set the chromed bezelaside somewhere out of harms way. That’s abig chunk of visible chrome.
This photo reveals a handlebar clampbeing removed. It’s bullshit. We didn’t removethe handlebars until much later.
If you have a pal in the garage drinkingbeer and watching, get him to take shots ofthis process. If you must wait a week tore-install all this crap you may need areference guide and photos help a feeblememory. Or, of course, come to Bikernet andprint out this tech. Don’t forget to cover the tankand fender with something soft to protect themfrom scratches.
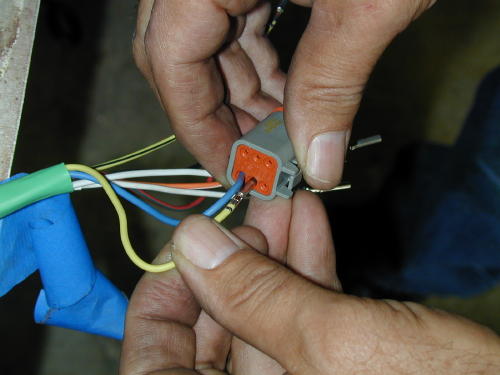
We noted that the electrical plugs on theleftside of the bike were different color from theright. We also noted their location and thedistance from the bars were measured beforeunplugging each connection to the handlebarswitches.
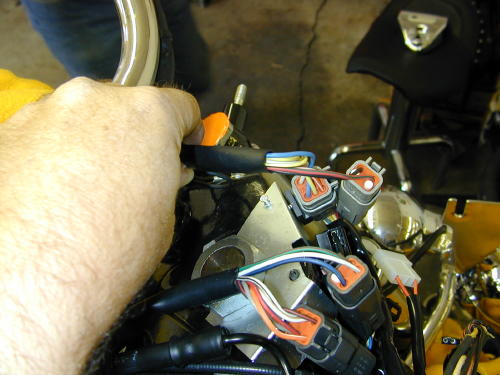
Don’t remove any wires before youdraw the diagram below. This cap performs acouple of functions. It seals the plug andinternally is pinches each wire lug in place.Once it’s removed a small screwdrive will pulleach catch away from each individual wire lugso it can be removed easily.
Check your diagram twice, no threetimes, before removing any wires.
We also noted the position of the throttlecables before removing the bars. Then thegrips were removed and switch housingsloosened so we could begin on the left side ofthe bars.
We handled the left wiring extensionfirst. This shot is of the right side and doesn’tshow a helluva lot, but it’s important. Toremove the throttle cable housings from thethrottle body it takes four miniature hands andtwo dinky screwdrivers to pinch the spring ringthat holds the cable in place. Be patient.
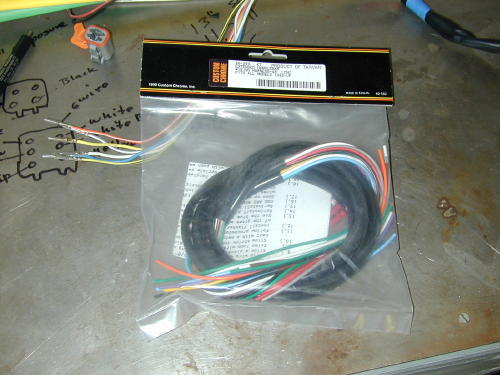
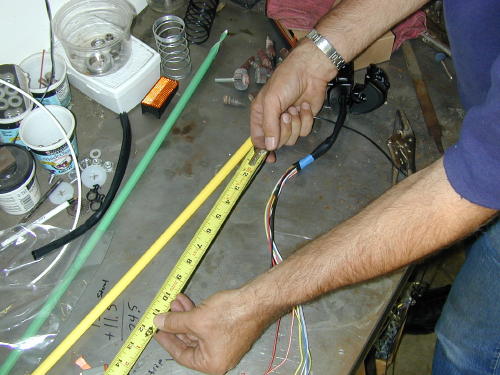
We measured the length of the wiresfromthe switches to the plugs, then compared thatmeasurement to the new highbars anddetermined that we needed to extend thewiring 13 inches to insure the proper length.Add an inch just for safe keeping. This aspectwas measured carefully several times.

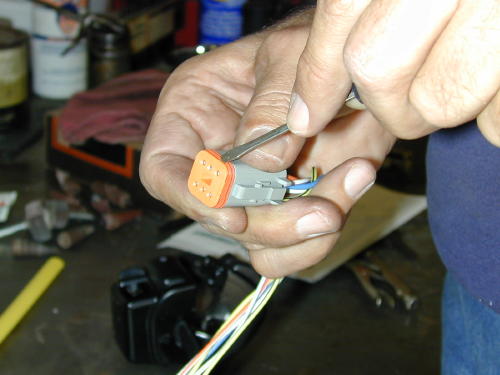
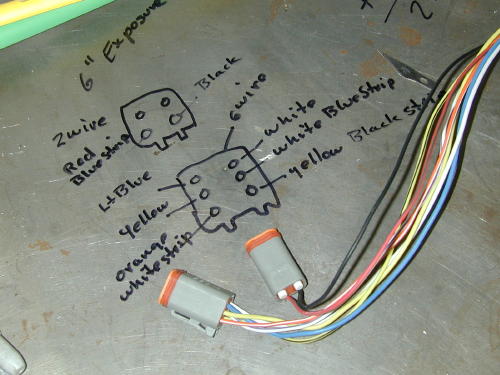
Then the left switch loom was attackedfirst by drawing the back of the plug on thestainless bench top with a felt pen. We notedeach color coded wire and position beforeremoving the wires from the plugs. Do it fromthe back so you’re in the same position whenyou reinstall the wires.
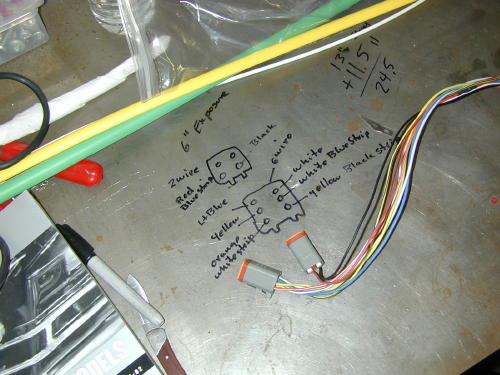
Sure, here’s another shot of a diagram,but it’s damn critical to insure the wiring iscorrect, so pay attention. Note, that we madeindications on the drawing to indicate the topfrom the bottom of the plug.
We added sections of 13-inch wirestaggered in the center of the loom so as notto stack junctions, and so we maintained theoriginal color coding. Each junction wascarefully striped 1/4-inch, soldered and sealedwith shrink wrap.
One shot we missed depicted thewires staggered. That’s also crucial so youdon’t have junctions bunched together.
Note the handy wire connection holdingtool that Frank had made while working alonein his garage for ten years. Trying to hold theconnection together, while holding the solderand the gun is nearly impossible.
The Frank Kaisler, patent pending, wirejunction tool. Send $99.99 to P.O. Box 666,Hollywood, Calif. Send only rolls ofquarters.
He spoke to an engineer at one point whodidn’t cotton to twisting wires. He suggestedthat the wires be carefully mated straight onand soldered. The “Puerto Rican shrink wrap”as Frank refered to my colorful array of shrinktubing, was cut so that it would seal 3/8s of aninch on either side of the connection. Mostchunks of 1/8-inch diameter shrink wrap werea pinch over an inch long.
We also washed each connection withalcohol to remove the flux, which could harmthe wires or insulation, then with wet and drysandpaper, brushed any sharp edges thatmight cut through the shrink wrap.
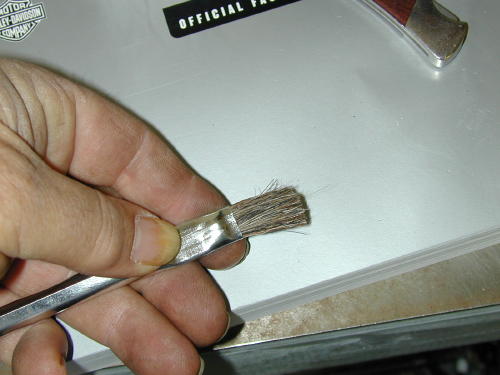
We cleaned the connections usingalcohol with this brush trimmed in half tomake the bristles stronger.
After each wire was carefully soldered andprepped we covered it with shrink wrap, thenusing Frank’s handy tool we heated the areaand moved onto the next stage.
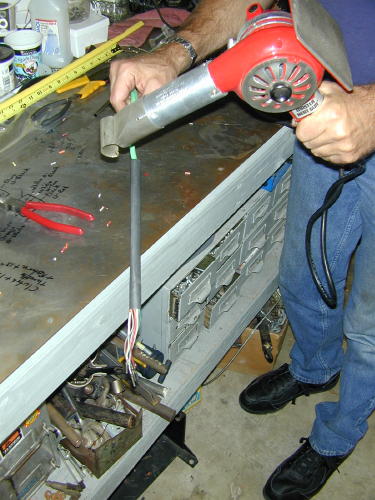
Then the looms were carefully coveredwithadditional 1/2-inch shrink wrap. Finally thebars were carefully blown out with the aircompressor and wiped clean before thelooms were fed into the grip ends of the bars(first we wrapped the pin connections withpainter’s masking tape and created a guidingpoint).
I used a painters masking tape to wrapthe connections and form a guiding point. Ididn’t want to use a tape that would requireawkward or violent stripping to remove it(which could damage the wiring).
Feeding the wiring into the bars fromthe grip end.
Once carefully pulled through the bars andthe switch housings positioned, we beganthe process of installing the connector pins.
Gently pulling the wires from thebottom of the bars.
After making sure the wires are exactlyin the right position we snugged down the torxscrews, but not permanently.
While refering to the diagram on thebench we carefully replaced the wires in thebottom of each plug.
Note the wedged caps that force eachwire clip into a locked position.
This depicts the same procedure fromthe other side of the bars. What a great shot,huh?
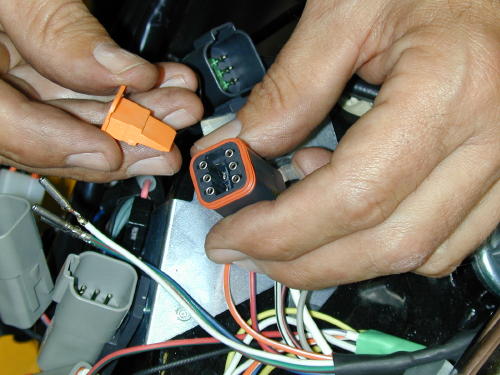
Only then could we snap the plug backinto place on the bike. Of course the plugcolors matched.
This was a nervous time. We hadextended 8 and 9 wires respectively (on eachside of the bars), carefully worked themthrough the bars and guided them out thebottom. As we replaced the plugs the sweatbeaded on my brow. Had I correctly solderedeach wire? Was each wire replaced in theplugs properly? Did I call a wire white withgray stripe, when it was actually white withblue stripe? It had taken almost four hours tocomplete the operation on the left side of thebars.
We put the levers in place just to checkthe position and see if we didn’t blow it. It wascool.
After a needed lunch break we tackledthe right side of the bars with the sameprocedure. Now with the wiring installed in thebars they were returned to the motorcycle. Iswung my leg over the 100th anniversaryCobra-styled seat and perched my ass down.Frank turned the ignition switch on, “try it out,”he said.
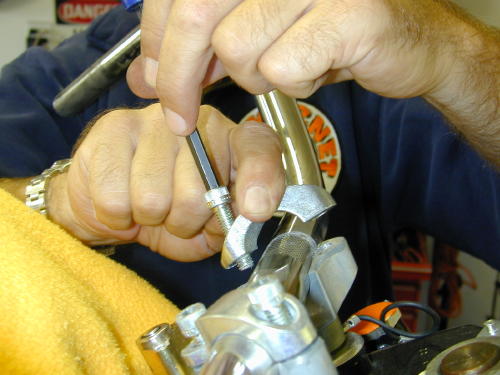
Torquing the bars down to 15 footpounds. Torque the front Allens down first,then the rear according to Pablo.
Continued On Page2
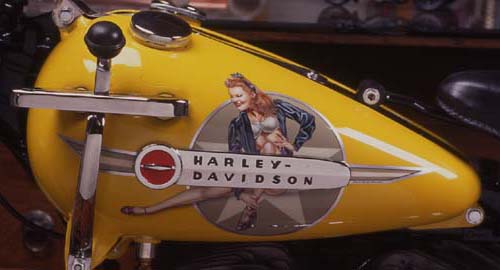
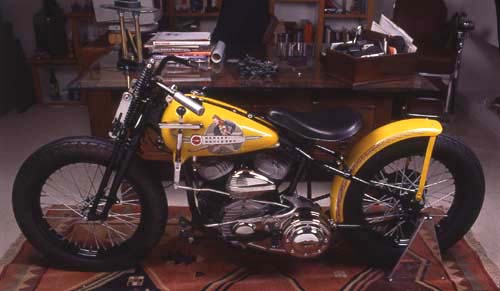
1939 WLDR BY MILWAUKEE IRON
By Bandit |


This bike represents one of the many reasons I love motorcycles. Scooters have stood beside me through jobs, five marriages and various relationships that thankfully didn’t result in more weddings. There comes tough-as-broken-spokes-times during relationship hell that a man needs all his faculties and all the positive influences the biker world can afford him. This scooter carried me through one of those eras.
I fell in love, head over heals, for a women with loose hinges, mental instability and great tits. I was lost in a black hole of infatuation with an evil being. My draw was stronger than heroin to an addict. I fought it night and day, usually unsuccessfully. I worked as hard as my fleeting concentration would allow. I hit the gym harder and tried to focus on other women including my lovely ex who I abandoned. I failed miserably.
In the center of this fiery hell a call came from Randy Simpson of Milwaukee Iron. “I have just the thing you need,” Randy told me, “but you have to hang on while we restore it.” Those words twisted inside me.
I’m not sure my mind and vocal cords were connected, but in a deeper sense I believed that Randy understood my tsunami pain. His business had grown quickly, and we spoke almost weekly about the industry and his own expanding-enterprise woes. During a rough winter the snow piled so high on his building that the roof collapsed. Talk about a single motion that can knock an man’s lifestyle to its knees.
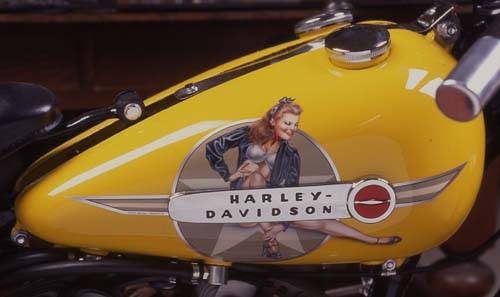
Randy recognized the wavering tone of my distant voice from Lynchburg, Virginia to Los Angeles and understood a deeper motorcycle related need. He purchased this running flat track racer complete in ’83 from Rick Allen and Ed Rich from Asheboro, North Carolina. It lacked only basic fasteners and the original clutch pack. Weekly Randy reported on restoration progress and the sheet metal paint scheme which was sent to Dawn Holmes in Prescott, Arizona. At that point I planned to escaped the inner city and hide in a small condo on the edge of town.
Each time the phone rang Randy’s hopeful tone momentarily released me from a lover’s doldrums. I sensed that he was taking a mental dip-stick to my heart in addition to accounting for the bike. I perceived in my mind that I would overcome this affliction. I knew that I was not alone, that men and women all over the globe were facing heartbreaks. Weekly, in the news, the terror of relationships-gone-wrong splashed across headlines. Recently a man attempted to kill all four of his kids to express his rage over a woman. I prayed I wouldn’t stoop to anything foolish or destructive. I told my brothers, fleeing from terrible break-ups, that there’s another woman with the touch, beauty and heart to erase your pain. During the onslaught of emotional terror, it’s hard to imagine.
During a weekly check-up, Randy explained that most reconstructions, especially race bikes, begin with frame straightening. Milwaukee Iron houses a rare, original, precise chassis table for just such chores. After stripping the bike, frame truing came first. Milwaukee Iron trues and modifies frames constantly
I couldn’t concentrate on the technical aspects of the renovation. A brother recently stared at me across a table and pointed out examples of men, in the industry, who destroyed their businesses and lives through break-ups. The community property law can cut a company so fast it never recovers. Even more importantly, it often slits a man’s ambitious drive like a 16-penny nail through a tire at 100 mph. When deflated some guys can’t reach the can of Fix-O-Flat. Life is wild.
One week while Randy was taking my temperature he told me that Rick and Ed developed a Harley Museum in Asheboro called American Classic with 36 notable Harley-Davidsons and assorted memorabilia. He actually told me the address at 1170 US Highway 64 West, but I lost it (I had to call information). The number is (336) 629-9564.
When that ’39 WLDR was delivered I was moving into my stucco cave on the outskirts of society. I lived upstairs and a neighborhood kid and I struggled to haul that little 45 cubic inch flat track racer to the top of the stairs. I surrounded myself with motorcycle art, memorabilia and that ’39 WLDR. I looked at it from day to day and told myself that this classic would feel no pain even if my heart was crumbling. The quality of the Dawn Holmes intricate paint scheme wouldn’t change. The frame wouldn’t rust but remain strong and resilient, always a solid quality example of motorcycling history.
That motorcycle is still with me, remaining an inspiration, still looking as good as the day she rolled off the truck. It’s a constant reminder that as human beings we can bust up our own lives, partnerships, and relationships. We destroy or build, it’s our choice. Randy proved to me that while I was fumbling inside, he was creating new products, rebuilding his shop and had the time to restore this classic on the side, in 120 hours. He reminded me of the essence of friendship and the quality of accomplishment.
Remember brothers and sisters, when life is bleakest, there are the fine lines of a custom or antique motorcycle to releash and the open road recalling pure freedom. At our grease-stained fingertips is the constant opportunity to attain distinction and the hardened steel drive to reach the next brilliant achievement.
Dust your down-trodden-self off and hit the road. Thanks Randy.
–Bandit
Larry’s Yella Asshammer
By Bandit |


My third cup of Saturday mornin’ coffee had yet to eat its waythrough my stomach lining when I rolled out in search of Larry Beintker andhis notorious Evo chopper. I’d seen this incredible scoot at the FresnoAutorama, but didn’t get to talk with Larry about the beast. Now was mychance to see it off the rotating platform, and away from the garish neonlights, and to find out a bit about what makes it tick.

First, I learned a bit about Larry from a mutual friend; Bobby Z.,of Final Finishes metal polishing. Seems that Larry’s been buildin’beautiful scooters for years but managed to stay outa the spotlight, unlikesome of his ol’ drinkin’ buddies like Arlen Ness. Larry has some storiesabout the wild times of the ‘sixties and ‘seventies, when he, Arlen, and afew others were buildin’ those radical block-long choppers, an’ partyin’like there was no tomorrow. That’s fodder for another wild tale. Right now,let’s take a look at this yella man-eater!

When I got to Larry’s shop, he’d already rolled the scooter out, andwiped it down. We decided on a place for some pictures, and it was time tomove out. He thumbed the starter button, and when that monster lit, it madethe hair on my ass stand straight up like a bristle- brush! Damn! What abeautiful soundin’ sumbitch! You could feel the horsepower rumble up throughyour feet when he twisted the wick. My ol’ amigo “High Speed” Howard Lacydid the final tuning and setup, and believe me, he’s the best in thebusiness! Hell, his lawn mower runs in the low 9s!

While it warmed up, I looked it over like Bill Clinton interviewin’a new intern.Larry had already told me that he was responsible for the wild paint, withits narrow scallops, and bright accents. It began dark at the bottom of theC.M.C. frame, and faded as it moved up, for a shadow effect that playstricks on your eyes. The slippery lines of the fuel tank, made byIndependent, out of Vegas, make the graphics look like they may slide rightoff at any second. I think it’s only the eye-poppin’ stripes laid on by Dale”Sogy” Oftedal that keep ’em in place.

The wide rear fender is a Jesse James product, and it blends into the flow of thescoot without any supports to get in the way. It’s a real elegant way tokeep mud offa your T-shirt.
The 88 inch Evo engine has S&S cases, and Screamin’ Eagle heads, ported andmassaged by Leo at Direct Parts in Vegas. The trick heads breathe throughCustom Chrome shorty straights for an eardrum shatterin’ bark.An S&S “shorty” feeds the thirsty mill, and the horses are transferred by a3″ Primo open belt primary to a Rev Tech 5 speed tranny.The wheels are from Custom Chrome, and the tires from Avon, although therear looks like it could’ve come off a 747.
Watchin’ this man-eater rippin’ down the street, it occurred to me that whenyou’ve got the kind of “giddy-up” this thing has, you damn sure need a lotta”whoa” too, so the stoppin’ power is handled by Performance Machinecalipers, master cylinders, and rotors.
The classy front end is made by Sullivan, and the clean lines will have yatakin’ a second look, and maybe a third. This thing’s first class eye-candyfrom end to end!

Joker Machine made the forward controls, and they’re damn near too pretty toput yer nasty ol’ feet on, but Larry built this scoot to ride, and ride hedoes! Of course, the polishin’ of all those glistenin’ parts was handled byfriend, and fellow biker Bobby Z, of Final Finishes. Who else?Speakin’ of ridin’, that’s where comfort comes in. Larry hand made the seatto fit the lines of the bike as well as his ass, and the upholstery choreswere handled by none other than Leon Hatcher. There’s enough paddin’ to takethe sting outa this high-torque asshammer, but not enough to make ya forgetwhat kinda machine you’re ridin. And after all, this ain’t no F’in RoadKing, it’s a hot-rod for the serious adrenaline junky only!
By the way, if this scoot really talks to ya, Larry says it’s for sale. Hisnext project is already under way, and there’s no time like the present tostart on the future. If you’re seriously interested, drop Bandit a line, andhe’ll give ya my e-mail address, but first, I’ll answer a couple ofquestions I know you’ll have.

1: YES, IT GOES FAST!
2: NO, YA CAN’T RIDE IT TILL YA BUY IT.
3: NO, HE WON’T TAKE YOUR SPORTY IN TRADE.
4: YES, WOMEN WILL EVEN LOVE YOU IF YOU’RE RIDIN’ IT.
So take a few minutes, look over the pictures, think about what it’d be likeridin around on this beauty, then sneak the ol’ lady’s weddin’ ring down tothe pawn shop, an’ go for it!

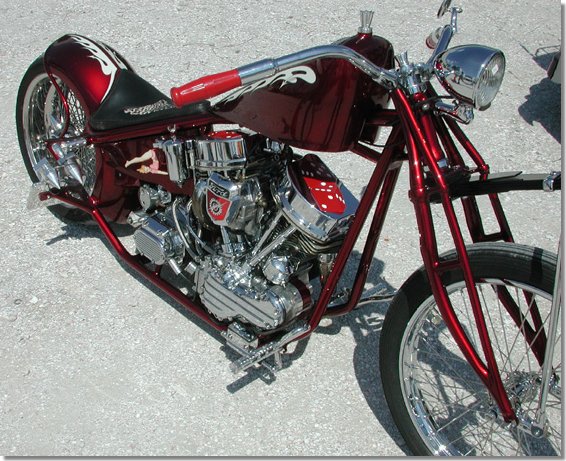
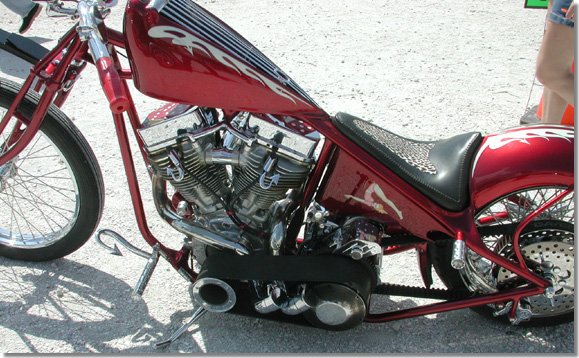
Billy Lane’s Fat Ford Chop
By Bandit |

The concept for this bike developed as I went along. The bikewas the one I had originally planned to do for Bikernet.
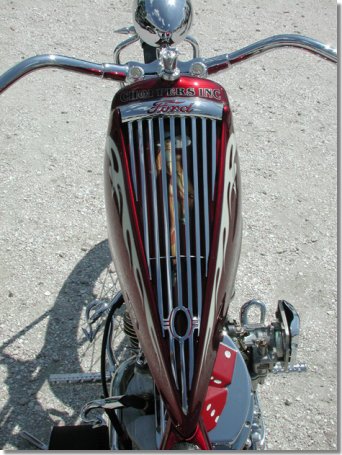
I mentioned to Bandit over a year ago that I wanted to do a frame with norear axle adjustment. That was a challenge, probably the most difficult thingI’ve done. My intentions at that time were to use a Wide Glide and Evo. Ibought the Indian Springer at a Daytona swap meet, and that changed the wholelook of the bike considerably. The grill turned up on the side of theroad in Kingman, Ariz., on Route 66 of all places, during the Laughlin Run 2000. It was badly damaged around the edges with pieces missing, so I trimmed itdown and noticed that it closely resembled my stretched Sportster gas tank shape. The old styling kind of took hold at that point, and I followed it throughthe rest of the bike.
Dice Overhead
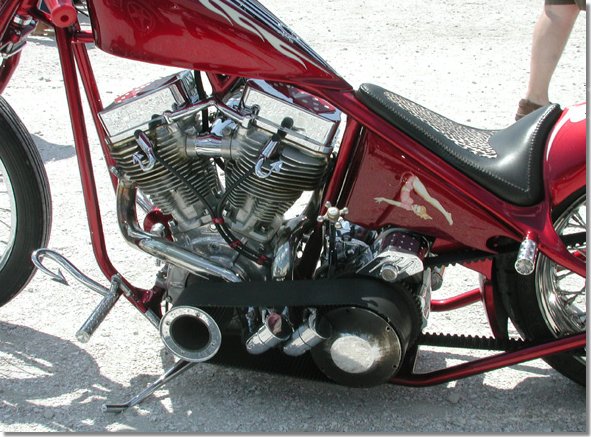
Deviltail Plug Caps and Pipes Through the Primary
Beauty Behind Bars
I built it largely at night and on the weekends lastsummer just prior to Sturgis. I was very busy and stressed, so that bikewas my relaxation. I drank a lot of beer and whiskey, and the ideas keptcoming. I can’t even explain the pipes. The foot controls are neat. Ilike clean, and I didn’t want to use typical controls, so I just started inwith the devil tails. I made a sissybar like that for a guy in the past,and thought they’d make great pedals. The bike was supposed to have a Knuckleengine, but I didn’t have time to rebuild it. I had the running Panengine, so it was the choice by default.
Wicked Footclutch
Leafspringer
Driveside Brake
Billy Lane’s Fat Ford Chop (Continued)
By Bandit |

I have had an overwhelming response to this bike everywhere I take it.It will be in Mike Lichter’s Journey Museum during Sturgis.I want to ride it out there this time completed (last year it was in flat black primer),but that’s not going to happen.
Rolling Dice
Footpeg Turnsignals
Devil Doll, Turned All Upsidedown
Everything I build is a sounding board for ideas for new products andstyles. This bike was no exception. Business has been incredible, and thatPan is part of the reason. If nothing else, it makes people ask who we are andwhat else we are doing. I’m trying to control growth right now, which isdifficult. Jesse talked about that in his Discovery Channel show. It’seasy for things to get out of control. The goal is to do well enoughfinancially through the parts that we make and sell so that we can controlthe number of bikes we build and keep each one unique andinnovative — something you see very little of, considering how saturated thisindustry has become.

-Billy