
Fork Tube Dimensions
By Bandit |
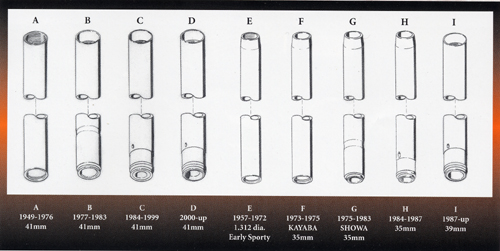
Readers often ask about fork tube specifications. There are somany we’ve been in search of standard information to help buildersunderstand what the hell they’re working with. This information camefrom Rick Whitehead of Custom Cycle Engineering. As you will seebelow, they make and chrome any size you need.
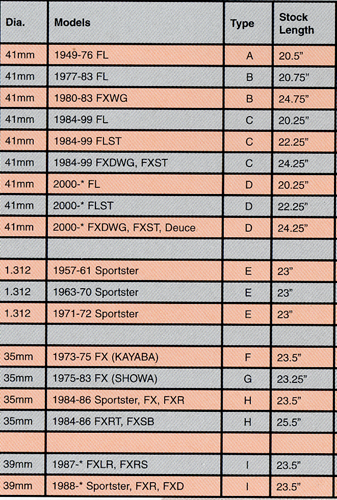
“For over 30 years we have manufactured extension fork tubes. Westart with DOM 1026 steel tubing thatis ordered specially from a tubing mill,” Rick explained. “Then wecenterless grind the outside diameter to OEM specifications andmachine the rest of the tube to exact ID specs. We buff the materialto a mirror finish and chrome plate the final product to a showchrome finish. This is a product that we are very familiar with, pluswe cover every Harley-Davidson fork tube model all the way back to 1949.” CCE maintains alarge inventory and offer sizes from 4 inches understock FL to 20 inches over stock FL.
“When ordering please specifymodel and year,” Rick pointed out. Hope this helps when trying tofigure out how long the tubes need to be, for your next project.
–Bandit
Back to the Garage…
Handlebars–A Pain In The Ass
By Bandit |

|
Yeah, right, there once was a time when changing handlebars meant taking off the throttle, the grip on the left side, and one mirror, replacing the bars and bolting the other shit back on. Ah, but that was 5,000 years ago. Now replacing a set of bars is worse than replacing a piston in the snow with a pair of pliers.
So we went to a man who builds limited edition, very specialized handlebars. Initially, I suspected that he knew little about anything, yet something about drinking Jack without training wheels, neat, or straight up, told me he knew whiskey and women.
Ah, but before we launch into the technical jargon, these bars have risers. Billet cut out of ASTM-A36 steel, they weigh in at 10.5 pounds and the tubing aspect of the bars is made from .083 wall material, which is thicker than factory bars. Chris claims it’s the strongest bar on the market, and if you get up close to these slotted puppies, you’ll agree. The centers are knurled, and the handles angled at 20 degrees for comfort. Then the bastards are Tig welded by a certified welder. Three models are currently being made: the Hillbar for extended frames, or stock bikes with short riders. Four slots adorn the rails with a built-in 10-inch stretch. The Outlaw- bar has three windows in the uprights with a 7-inch pullback for more aggressive riders, and The Chopper Bar with the 10-inch rise, is built to be stood up like apehangers instead of pulled back like the other two models. Mr. Hill specifically built these puppies 31 inches wide because most apartment doors are not wider than 32 inches. Makes it easy to pull your putt into the girlfriend’s condo or motel room.
First, and foremost take the fuckin’ leads off the battery. It can be startling and harmful to create a short in the middle of this process. For Softails, remove the tanks to retrieve the multi-pin receptacle, disconnect and remove the individual pins from the connector, but note the placement. Remove your electrical controls and switches with Allen or Torxs wrenches. Undo the factory clips and remove the wires from the bars. Remove the loom from the wiring harness carefully with a sharp knife or razor blade. Now, measure the wiring. This length varies on some models, for instance: Dyna wide glides have 10-inch factory apes so that wiring harness is longer than most. To put this aspect of the bike together properly, buy a wiring extension kit from Custom Chrome. Chris recommends soldering the wire and not using crimp lugs. I was in agreement with his thinking also, however a new twist has emerged. I spoke to Giggie from Compu-Fire recently about wiring and he prefers the lugs as long as you use a special crimper that does the job right. He explained that when soldering, the molten metal flows under the insulation and makes the wire rigid. With constant vibration the wire can break.
This is very important. There’s nothing like installing a new goodie, only to have it harm an old one. You’re getting close now. So pre-adjust the bars and install the controls. Make sure nothing binds, the cables are long enough, and check the switches again for proper operations, no shorts. Shrink wrap the wire exiting the center tube on the handlebar for a clean look and protection against abrasion. Make sure you sit on the bike and determine the best position for the bars and all the controls before you put the wrenches to her. Now replace the wire plates on the bars and tighten ’em down with blue Loctite (photo 5).
 Put the gas tank on permanently, hook up the battery, and go for a ride. Wait, wait, I forgot the cables. Obviously, if you’ve change the position of the bars the cables may need to be replaced. Check it out, before you make that turn and the engine revs! Ultimately Mr. Hill plans to build several variations of the Hillbars to include two to five slots and perhaps a 16-inch ape-like arrangement, if he gets enough complaints, I mean requests. If you have any doubts about this operation, get a trained professional to do it for you. Believe me, handlebars with all the fuckin’ wires, cables, hoses, switches and such are as complicated to install as a piston in the snow with just a pair of pliers—oops—I said that already. Now, I gotta go. If I’m ever to have a chance to go out with lovely Lexi, I’ve got to take a shower at least once this week. ‘Course, if Bandit finds out, he’ll cut my pay to make it tougher on me. I’ll find a way. —Wrench |


Back to theGarage….
Little John’s Desk
By Bandit |
|
 I don’t know what gets into that bastard, Bandit, he’s got way too much going on. The one thing about working with him is that we can say anything we want, like the time Zebra blew a hole in the headquarters because he was pissed about something. We let this jerk know what’s on our minds. So when he started another motorcycle desk, I got in his face, just like I do whenever he starts anything. When Jon Buttera of Lil’ John’s Customs saw Bandit’s desk and wanted one, the big bastard said, “No problem, I’ll make ya one.” Sure, it’s not like running out and building a new bike, but it still is a helluva lot of work. So I got right into his face, but it didn’t do much good. Fortunately for the crew around here, NuttBoy had the time and a pickup to pitch in, so they went to work. The first aspect of building one of these puppies is finding the parts, and Bandit is known for collecting junk. There’s one firm rule for these projects: There shouldn’t be any working parts on these puppies. I ride Bandit like a mad dog on this code. It must be built from junk, or forget it. We’ve got staff members who need bikes. We’ve got crew whose bikes are broken. I can’t allow anyone to put a proper working component on a desk. Got that? Besides, if I let the rule slip, Bandit will start taking parts off bikes behind the bar. Years ago when Bandit built his first desk, he asked long- time friend Ron Paughco for frames and front ends that could not be sold to the public. Ron went into the basement of his Carson City manufacturing shop and found two such animals. That was the beginning. Then Bandit contacted engine builders and dug around in his garage for shit that would never run again. It’s actually not hard to do, and soon he had enough components to begin the process. With the frame and front end assembled, NuttBoy and Bandit strapped it to their lift and stood back. The front end didn’t reach the ground so NuttBoy went to work cutting and brazing bits of tubing to form a stand under the front end. In order to make such a stand work, the frame must be pulled tight to the lift, and it’s not a bad idea to make sure that it’s level. You need to put bearing cups in the neck, old bearings if you have them. If not, wrap the stem with strips of beer cans until it’s tight. In this case, Bandit got the shell of a blown-up engine from Marty Ruthman of High Tech Custom Cycles. The head gasket had blown and the rider didn’t stop to check it out so the stream of leaking fire had shot a hole from the headbolt stud hole through a couple of fins on the rear cylinder. Bandit and NuttBoy bolted the engine together with heads, barrels, a JIMS cone cover and lifter stools. They found a couple of defective Custom Cycle Engineering finned rocker box covers from the late ’80s and bolted them directly to the heads without the use of the bottom or center rings. I thought they’d lost their minds and started to scream and throw shit at them. Bandit ignored me and mumbled something to NuttBoy about no valves, no need for the bottom two rings or the lifter axles. Now if you look close you’ll see that it looks as though the engine was channeled. That lame bastard pulled the valves and springs out of the heads and discovered that the top rocker box cover would fit down against the head, which accomplished a couple things. One, the frame was built for a Pan or Shovel, so now the Evo had no problem fitting. It gave the engine a tight, squat look, although some Mickey Mousing went along with the fastening of the finned cap and realigning the holes. I took another pull on my flask, sat back down on my milk crate and shook my head in disbelief.

|
On to Part 1, Page 2….
| |
Little John’s Desk (Continued)
By Bandit |
|
 The transmission looked brand new, but was a Rev Tech reject. Bandit made the tranny plate out of flat stock and put the tranny in place. NuttBoy’s curiosity got the best of him and he asked, “Where the fuck will you put your feet?” “Hold on,” Bandit said. He took the tranny case and the left engine case next door to James Famighetti for a plasma cutting job to open up the back of each case. I shook my head again and complained about the structural integrity of the engine, but Bandit ignored me and muttered to NuttBoy, “This will allow John a place to kick back or stash spots behind the scenes.” For years Bandit kept a .38 stuck in the back of his transmission. NuttBoy got crazy once the engine and trans were in place. Painter Phil wandered into the garage and started talking about sheet metal, wheels and other strange shit. Phil even suggested a smoke machine attached to the exhaust system. They started digging through parts boxes and bins looking for weird old carbs and jockey shift levers. I jumped into their mugs if they reached for a box stuffed with good parts. I forced them to use a smashed Bendix carb, but they went to a lot of work shaving, stripping and polishing it. “Damnit Renegade,” Bandit snapped, “It’s just a desk. We can cut busted wheels in half, make 2-foot-long intake manifolds our exhaust pipes, or put purple running lights on it if we want, now back off. It’ll never run.” They stripped the frame of unnecessary brackets, even eliminating the top motor mount. Oil pump holes and top motormount bracket holes in the engine were filled. Bandit took a 5-ball, drilled and tapped it and made a jockey shift knob, then welded an arm to the ratchet top. Bandit called his connection in the JIMS machine warehouse and asked for another lifter stool and a set of pushrod covers. The stuff arrived chromed. Although deadlines loomed all around the staff, the two bastards from the harbor kept working in the Bikernet garage. Since the finishing touch for this puppy is a 3/8-inch thick piece of glass the shape of a surfboard with a hole in it for the springer and handlebars to protrude through, there must be supports. Just behind the neck, NuttBoy cut a chunk of bar stock 1/4-inch thick and about 2 feet long. At its widest point, the glass is 36 inches wide. The t-bar was checked for level then two supports of 3/8-inch round stock ran to the down tubes for support. At the rear, the pipes hold the glass and that entailed a trip to Samson’s Exhaust in Anaheim.
 |
On to Part 1, Page 3….
Back to Part 1, Page 1….
| |
Little John’s Desk (Continued 2)
By Bandit |
|
 Kenny opened the door to his warehouse, pointed to a dented and rusting bin and said, “Go for it.” NuttBoy climbed in the back looking for the proper bends. This bin was the size of a full length truck container and two-thirds full of scrap 1-3/4 inch pipe material, yet there wasn’t a 90 degree bend in the mix. With the nineties pulled from another bin and a selection of header pipes, they brought enough scrap back to the garage to build several systems. Bandit went to work cutting and welding chunks of pipe together, then brackets to the frame to support each piece. A level was used several times to make sure the system matched the t-bar and the glass would be level. Bandit considered another aspect of this high-profile pile of junk while fabricating the components to support the glass. He called John, “How tall is your current desk?” “Twenty-eight inches, why?” “Never mind,” Bandit responded abruptly. “Bring mo’ money.” He hung up. Bandit has noticed in the fourth version desk that the neck area of the desk is very close to 30 inches off the carpet. Most desks are between 28 and 31 inches. This was his chance to adjust the height. These two nut cases have no business building a desk. Bikernet is not a fuckin’ furniture company. I got fed up and wandered to the bar up the street while they hauled the cases, heads, tranny case, frame and springer stand to the sandblaster for a fine blast. Then it was off to the powdercoater for a durable dark metallic silver finish. The pipes, carb and brackets were hauled off to Chris Hill at Chrome Services, and the barrels were taken to Joe Stubblefield to have five fins shaved off the base and the barrels polished. With some new fasteners a week later, NuttBoy and Bandit were back in the garage immersed in final assembly. Oh yeah, they also ordered the glass. It pisses me off, but it will probably be sharp when they’re finished. –Renegade
|
On to Part 2, Page 1….
Back to Part 1, Page 2….
| |
The Finished Desk
By Bandit |
|
 I almost quit over this one. Bikernet was in the middle of year-end taxes and financials. We were about to launch the Cantina. Nyla was shooting photographs of the new line of Dragonfly shirts with near-naked women and the Digital Gangster was working his fingers to nubs trying to get everything launched. Where was the big guy? Out in the garage grinding on the frame for John Buttera’s desk. He brazed, welded and fucked with the parts so much that he ran out of oxygen and acetylene, and since his tanks were stolen, no one in town would fill them. He had to pay the local muffler shop to complete the final brazing.
 Professor NuttBoy and Bandit ate up a couple of days just grinding and rubbing their shitty welds with wet and dry sandpaper. Their notion was to powdercoat the frame, engine and tranny cases for a durable finish, then chrome the rest. First, all the parts were taken to a sand blaster, then directly to the powdercoater for a charcoal silver finish. Of course Bandit had to drop off the parts then vacillate about the color. He took Sin Wu across town for her opinion, then Layla, then some girl he picked up on a street corner. Finally reaching a consensus, they made a decision on the gloss silver. Then the chrome was delivered to a Corvette behind a diner at midnight and that sparked another major problem–getting it back. With the chrome and powdercoat finally in hand and the glass people screaming at us to get the glass out of their warehouse, Bandit picked up the final fasteners from California H-D and the local hardware store and began assembly. With the business faltering and the IRS calling, we couldn’t get the big bastard on the phone. He had kidnapped the professor and his new truck for glass duty. The crew at the glass company was astounded as Bandit and NuttBoy tossed the delicate, 3/8-inch thick, surfboard-shaped chunk of glass in the bed of the truck and peeled out of their lumpy driveway. They weren’t surprised when Bandit called the next day about the broken glass. It split near the hole and the sun’s heat caused the fissure to creep to the edge of the glass. That was a cool $350 out the window. Bandit ordered another sheet and the photo shoot was canceled.
|
On to Part 2, Page 2….
Back to Part 1, Page 3….
| |
The Finished Desk (Continued)
By Bandit |
|
 Bandit and NuttBoy made a container for the glass with the bottom of an old H-D shipping crate, a couple uprights, tie-down eyes and some old carpet. This time it would be moved properly in an upright position. So Bikernet came virtually to a standstill while Bandit and NuttBoy finished little John’s desk. Can we get back to work now? Nope. NuttBoy dug out a mammoth Headwinds billet headlight shell and pointed out that they had forgotten about support for the glass in the frontend. NuttBoy made the headlight bracket and Bandit arc-welded it. They tightened it up but felt that it would pivot too easily, so another hole was carefully drilled in the back of the bucket to create more tension to the top of the nacelle. With a screw in place, the load could be adjusted to support the glass. The project was complete. John’s son, Chris, came and the crew loaded the finished desk.
 Damn, we were finally out of the woods. We mustered the crew to fist fight these bastards back to their keyboards when the phone rang. Seems there will be two art exhibits in Rapid City during the Black Hills Rally this year. One is called MotoArt and submissions are being sought from far and wide. In addition, Mike Lichter is having an exhibit with motorcycles from some of the top names in the industry, and they saw it in their hearts to invite Bandit to enter one of his motorcycle desks. Goddamnit, we just about had him back at his own Panhead desk, and now this… What the fuck? –Renegade
|
Back to Part 2, Page 1….
| |
Digital’s Rigid
By Bandit |
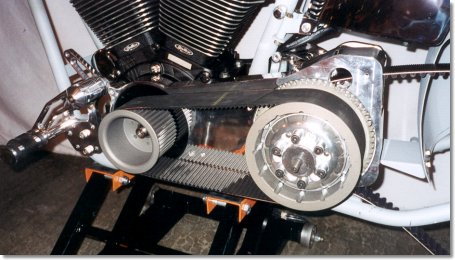
 Welcome to the inside of the Bikernet Northwest Garage. This is where the next project begins. The goal – To complete one bad ass, mail haulin, knuckle draggin’, speed bump scrapin’, rip the skin off your face, back breakin’ rigid scoot. This bike is going to be ALL about mailorder. Since many of you don’t have shops in your area that are versed in how to build a custom scoot, we thought you might like to know how we did one without the help of a local professional shop. Buying parts is easy. Painting, powder coating, and certain sheet metal fabrication and modification however, can pose particular problems when you, the builder, do not have the ability paint or weld. Watch over the next couple of months while we put this beauty together (without the help of a local shop) and tackle some of the hurdles of a ground up – mail order custom. The following is a glimpse of some of the stuff we have so far. It should be noted that the most important piece of equipment here IS the cooler pictured in the first photo (above). You gotta have beer to properly build and test a rigid…..
 This is the single piece Softail tank with welded shrouds on the front and in the seat pocket. This particular tank is available from Custom Chrome. Since this is going on a custom frame with a 2″ backbone stretch, we made some minor mods that required some welding and finishing. More on that later.
 The Baker Six Transmission. This is the Softail version. These amazing pieces of engineering come with full width Andrews Gears. They’re tough. Damned tough. One of these took Zebra from Florida to Sturgis at a non-stop 110 MPH last year.
|

The above photo details the back end of the Atlas Precision ‘Roadrunner’ frame. Attached is a 9″ wide stubby fender, also supplied by Atlas. Both the fender and the frame are designed to handle 200 mm meat. We’ll be using a 180 for the project.
Since wide tire aftermarket frames require special fenders, you have to be careful to select the proper width fender and fender struts because stock fenders don’t often fit, even if you run a stock tire.
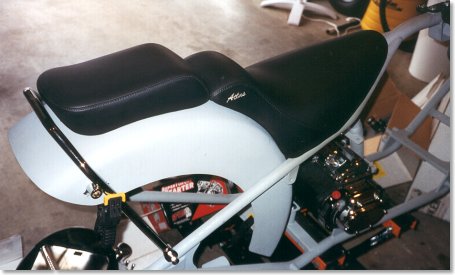
The Atlas Seat pictured above is by Danny Gray, built specially for Atlas to fit their frames. It’s pretty bare bones, but fits the ‘Roadrunner’ like a glove. This seat also came with an optional pillon pad. I got it so the wife could tag along. I have a feeling, it’ll get used only once. A note about the seat maker. Danny uses all European leather to make his seats. He does this for a good reason. Since European cattle ranchers don’t use barbed wire, the cattle don’t get any scars. This means, you get a seat without any irregularities in the leather.

See the open BDL drive in the box? Stop drooling – it’s mine! We’ll be putting one together in detail for you.
In addition, we’ve got a LOT of Joker components for the project including the hand controls, wheels, pulley’s brake rotors, etc. We’ll detail ALL of the goodies when we pull them outta the box and mount them to the bike.
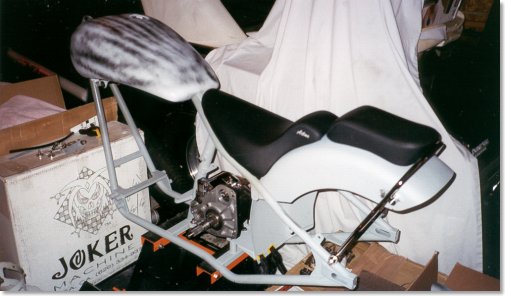
Stay tuned boys and girls. When Oz gets me the engine, we’ll really start to rock and roll!
We’ve collected a number of parts for the rigid over the last few months – but one key item was missing. That’s the engine. When it came time to decide on a power plant for the project, there were a couple of factors that warrented consideration. The first is of course, cold hard cash. None of us have a lot. Any way you cut it, an engine is not cheap. The second factor, of course, is engine performance. Nobody wants to make this kind of investment, no matter what the price, only to find out it the motor is a dog or doesn’t hold it’s own when the throttle is cracked. (When buying mail order, performance is particularly tough to judge because you never get to test the engine before you buy.) The third factor is overall quality. If you shell out a few grand for a motor – you don’t want to have to do it again in 3 years. You want it to last, and you don’t want it to be plagued with problems. Having a bike that spends more time in the shop then it does on the road just plain sucks.
As the number of V-Twin manufacturers increases to meet current demands, the competition to provide a high quality, big torque V-Twin that can withstand time and abuse for a reasonable price has also increased. The clear winner in this competition is you, the consumer.
For those of us who need to maximize our dollar spent, we need to really understand our requirements. What’s the average biker want? A motor that’s usable for the street. If you want a Nitro-Burning tire shredder, get ready to spend some serious cash. But if you basically want a hot street motor, and live on a budget, you should to look at a couple of factors. These are performance, reliability, total long term cost of ownership,and the reputation of the engine manufacturer.
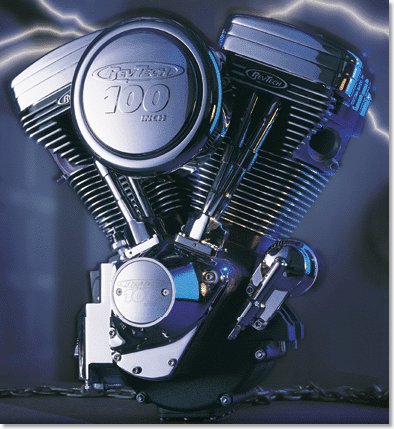
For this project, a Revtech 100 CI Evo-Style motor was procured. The guys at Custom Chrome cut us a deal on it to fit our budget. Let’s have a look at some of the features that convinced me that the RevTech 100 was my best choice.
First off, the Engineering and Manufacturing team at RevTech have spent thousands of hours researching, designing, building, and testing their engine design. When you buy one of these motors, you’re not just buying an engine, you’re buying 20 years of experience and expertise from one of the largest, most respected aftermarket american v-twin companies in the business. The company’s reputation was an important in choosing to buy one of these motors because I’ve never so much as thrown a leg over a bike built with one of these engines.
Second – The spec sheet. Have a look at all the features this engine has.
Basic FeaturesALL Chrome Covers are included. No need to add your own. Price this out when you’re building your next project. You’ll see the advantage of buying these as a package. Comes with a Mikuni Carburator, Revtec Air Cleaner, Thunderheart Ignition Pickup AND Thunderheart Electronic Ingnition Module. Keep this in mind when buying a motor. The Module, Ignition System, and Carb/Aircleaner setup when purchased separately are worth at LEAST $600 retail if you have to add them separately. There’s a trick feature here too – the ignition module is actually mounted right on the pickup – so mounting an external box is NOT required. Available in 88 or 100 CI displacements, in Raw, Black Powdercoat, or Show Polished finishes on the cylinders, heads, and case.
Case356-T6 Aluminum Case with added material in key areas for increased strength. What does this mean? Lower case flex. Why is that good? Longer bearing and shaft life. If things stay aligned, they wear less. It also means, this motor can take some punishment and that your lower end is likely to fail in an extreme condition than your average run of the mill case. Removeable Lower Sump Plate. – This is VERY cool. It allows you to keep tabs on your motor over time by being able to inspect the lower end WITHOUT having to rip the whole motor apart. You don’t get this with just any case. Pressed and Bolted Crank Pin and Pinion Bushing Carriers. The carrier on the left is pressed in like stock. The one on the right is pressed and bolted against a machined surface for superior alignment across the case. This translates into better alignment of the bearings, lower friction, and less bearing and shaft wear.
HeadsNo head gaskets! O-Rings are used for LEAK PROOF SEALS. This is an extremely important feature for retaining compression and performance over time. Wider than stock spaced head bolts for superior strength. D-shaped ports for high flow characteristics. If your motor ain’t flowin’, it ain’t goin’.
CylindersSteel cyliner liners are perma-locked into the outer aluminum casting for the ULTIMATE in durabilty. Larger Cooling Fin Area that Stock Evo Motors for lower engine temperatures. Lower engine temperatures means your oil retains it’s integrity longer and provides better engine protection to reduce wear. Cast Pistons in the 88″ motor, Forged Pistons in the 100″ CI Motor. This is something you may want to consider if you have a personal preference.
FlywheelsThe halves are one piece forged and then post machined from 4340 Steel. What’s that mean? They’re seriously strong and accurately manufactured. Oil Pump
The latest in oil pump technology. NEVER underestimate the importance of delivering good lubraction to your motor. In an air cooled motor, oil is also the lifeline to cooling. Warranty
2 Year – 20,000 Mile warranty. Just make sure you fill out the card when it comes. Shipping
Bagged and shipped in a custom built wooden crate..
Third factor – Total price – about $5600, retail. We did some internet shopping and found that you can knock about $600-$700 off if you look around a little.
We also priced comparable Black Powder Coated 100 CI motors from S&S $6300 Retail + which still require an ignition module to run (about a $200-$350 investment). If you want a TP Engineering motor, add another $500-$600 to those prices. Don’t get me wrong. S&S and TP make damned good engines, but you’ll pay for them. If you want a great motor that’s convenient to install, and has the added benefit of a carb pre-installed and dialed in with a pre-existing ignition module, and you’re on a budget to boot, you may want to have a hard look at the Revtech motor.
We’ll have some details about mounting it into the frame as the project progresses.
OK, I know….. It’s a shitty photo. Sorry folks. The good news is, it’s promted me to go out and buy a new camera – so keep an eye out for some high quality photography in the next installment.
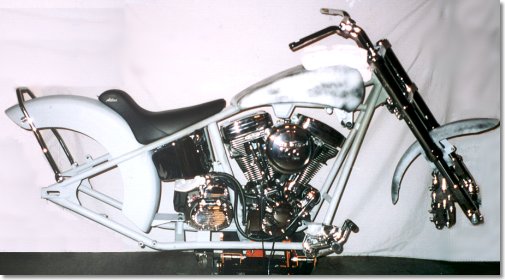
So here it is. Actually, as I write this, the project is a little further than the photo would indicate, but the time it takes me to get film developed has me at a disadvantage (Did I mention that camera will be a digital one?) Whatever the case, at this point, it’s almost completely mocked up.
We do have one good photo to show you however (and no, I didn’t take it.) It’s a photo of the front end. I feel it’s one of the centerpieces of the bike. It’s a GCB 54 mm inverted system. It’s massive. They aren’t the most inexpensive forks on the market, but a set of forks this wide will give you the most stable ride you’ve had. Not to mention, they look killer.
This set came from Chrome Specialties. The chrome leg version retails for about $3000, but if you shop around the web, you can sometimes find someone with an online shop who will sell them to you for 10-15% less.
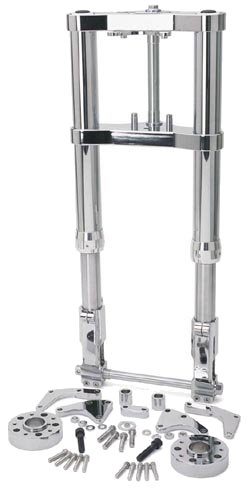
These setups come in either a wide or mid-glide style fork, in either satin or chrome. They are stock FL length (30″) which when matched with the rigid frame and 40° rake, provides for a nice level stance on the frame.
A couple of things I’ve learned along the way during the mockup.
1.) If you’re building a bike with rake over stock – get prepared to make use of internal fork stops. I’ve got somthing kinda jimmy-rigged for the mock up, but will be putting some in soon.
2.) If you’re making use of a belt drive, be sure you’ve got a tool to remove the race from the main shaft. Jim’s makes one. If you go look in their section, you’ll see a “How To” on using one. I ended up waiting for some period to time to get mine in the mail.
3.) If you think you can use the spacers and the bearings only to determine where your front wheel should be placed on the axel – think again. I was able to do this on my last bike, but not on this one. I found that the races in the hub were not quite where I thought they should be. They were off about 1/4″ the left as received from the manufacturer when looking at the bike from the front. Since I had a local shop already check the end play on the bearing races, and pack the hubs, I had to make up the difference with spacers….. Which meant I had to order some….. Which meant I had to wait another week for parts. Patients is a virtue when building a mail order custom.
4.) Paint. I’ve changed my mind on paint. I’d planned originally to paint the bike orange and put some racing stripes down the middle. Here’s the problem. I’ll be sending my paint out via UPS to have a friend paint it who lives in California. So, without the chassis, how do you line up the stripes along the length of the bike? The answer is, you don’t. So much for that idea. Instead, here’s a pencil sketch of the artwork that will be adorning the tanks. Jon Towle is working on the final product, and I’m going to see if I can’t sweet talk Crazy Horse into making it a reality in enamel.

Uncle Big Bad – By Jon Towle
When Jon get’s the artwork done and colored, we’ll have a look to see what color will be best behind it, then it’s time to send the sheetmetal out for paint.

Although you haven’t seen it in a fully assembled state, the rigid has actually been mocked up to completion. However, anyone who’s built their own sled knows that an assembled bike without paint and powder just isn’t quite the same as the finished product. Although a primered mock-up will show you the lines and shape of a bike, the machine doesn’t truly come to life until it’s been dawned with color. For that reason, we saved a lot of the assembly detail for you until the paint and powder was complete.
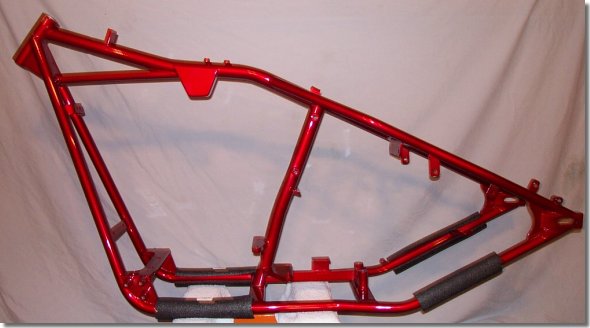
The mocked-up rigid was torn down to the frame, which was sent out for powder coat. It came in only a few days ago and blew my socks off. Although the photos shown here make it look screaming red, it’s actually a deep sunset orange.
The powder coat was done by Hytek Finishes in Kent, Washington. Hytek was the ONLY house I could find in the area that had worked with anything other than a flat powder. This one is a candy orange, color matched to a House of Kolor Kandy paint I’d selected as the base coat for the sheet metal.
Candy paints are valued mostly for their depth. They are made of a base metallic coat covered by a transparent paint. House of Kolor offers a color book for about $42 that you can order from their Web site. Many custom painters around the country use and are familiar with these paints, so they make for a good standard to work with. Candy colors will vary slightly based on the thickness of the transparent color that is used to coat the base.
Candy powder is a little different. The base principle is the same, but you are limited on thickness that can be sprayed because the metal has to be charged to get powder to stick. If the base coat is too thick, you will lose the charge and be unable to get the top coat to stick. Whenever you pick a powder house to do your candy color, make sure they’ve used such paints before because they are tricky to use. This one had a couple of thin spots underneath because the powder coater didn’t want to lay it on too thick. Fortunately, the areas are under the bike that nobody will ever see.
The way I had this matched was to send the House of Kolor sample to Hytek Finishes. They sent the sample to their ‘Prismatic Powder’ supplier, who custom mixed the powder for the job. Not many places do this, so you may have to do some searching. The results are well worth the effort.
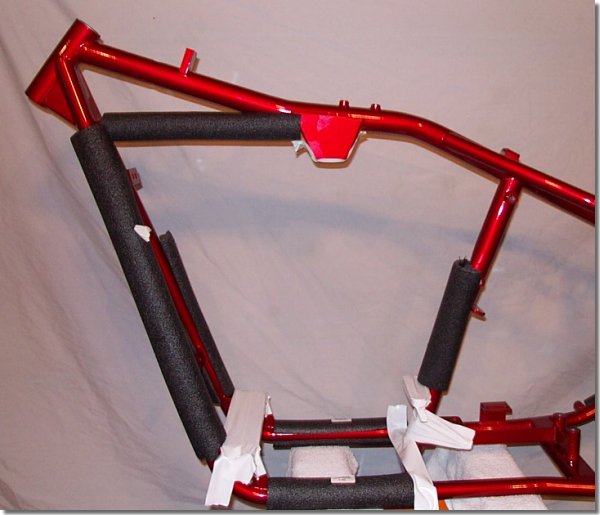
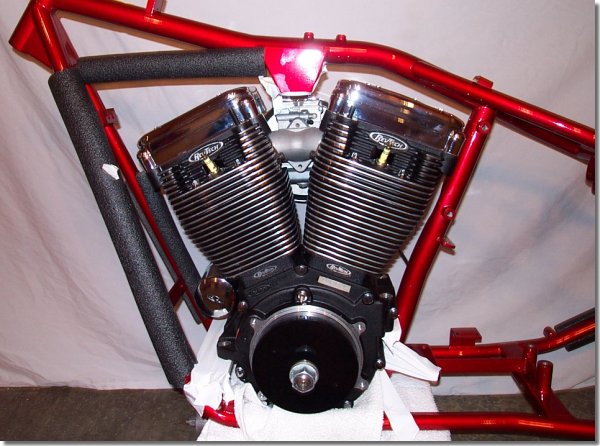
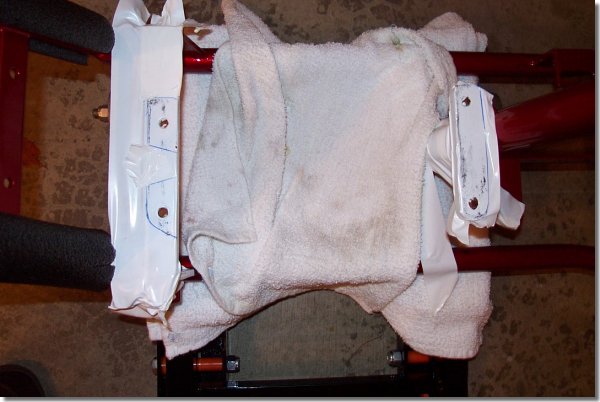
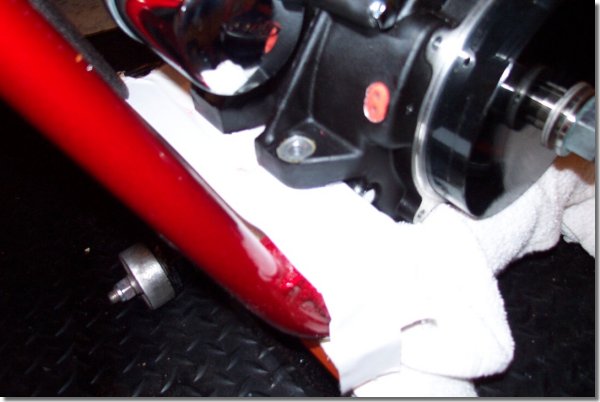
With the frame back in the garage, it was time to get started. The first order of business was to get the power train in place. I started by prepping the area where the engine would sit in the frame. To do this, one must take the time to pad the area so as not to scrape the shit out of the newly finished frame. I used a combination of plastic tape, pipe insulators, towels and bubble wrap to do this.
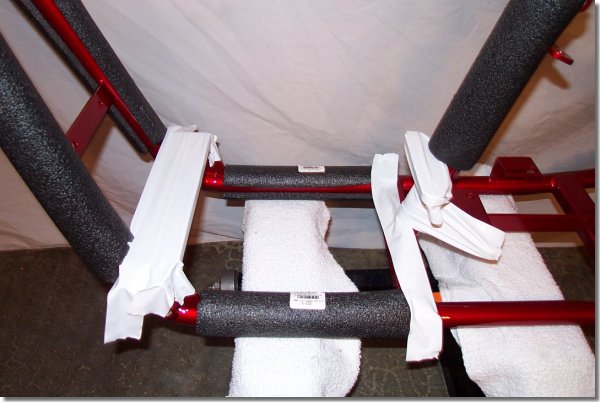
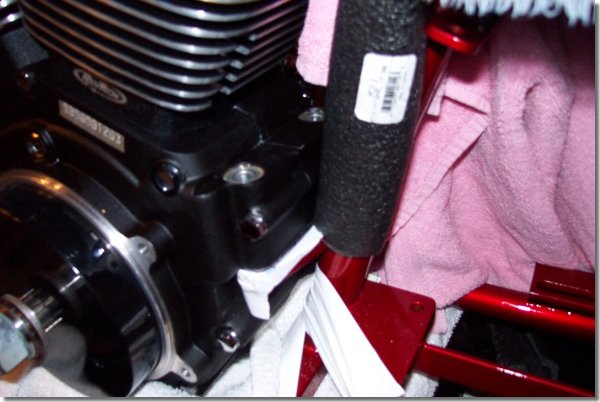
It was then time to put the Revtech engine in place. Caution and ease are the keys to success here. One thing to note: If you build a ride of your own and are using the type of stand I do, which sits under the frame, make sure the rails are around where the bottom of the engine will sit to ensure the motor will fall into place and not sit ON the rails.
Using a pen, the front and rear engine mounts were traced. The engine was removed and what is left is what you see in the next photo.
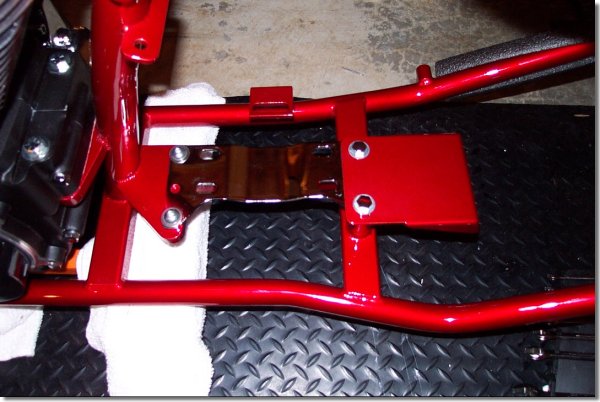
Using a razor blade, I removed the tape from the areas where I planned to mount the engine and prepared to strip the powder coat. The powder must be stripped from the mounting area because the power train must make electrical ground contact to the frame for the ignition, starter and speedo sensor on the transmission.
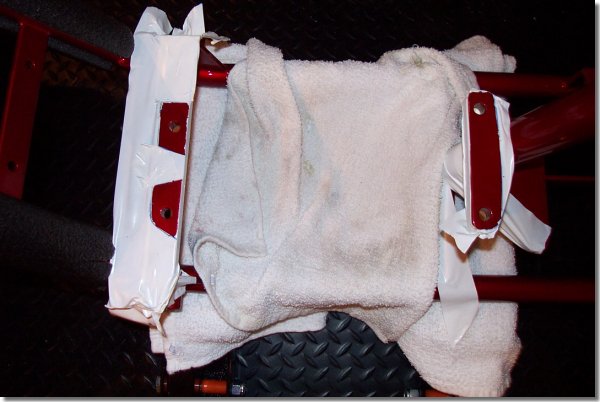
Once the tape was removed, a small Dremel tool was used to strip the area down to the bare metal.
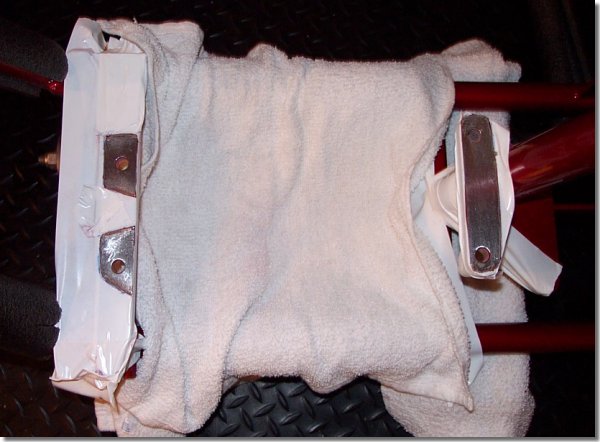
The area was cleaned and the engine was placed back in the frame over the bare metal spots.
Then it was on to the area where the transmission was to be placed.
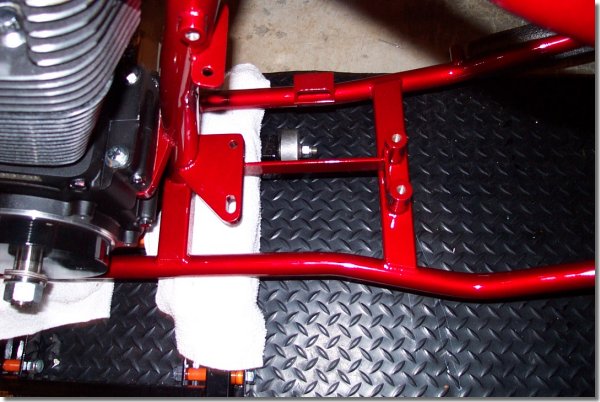
The transmission plate from Custom Chrome and the rear fender mounts were put into place and bolted down.
The transmission was then put in place but not bolted down.
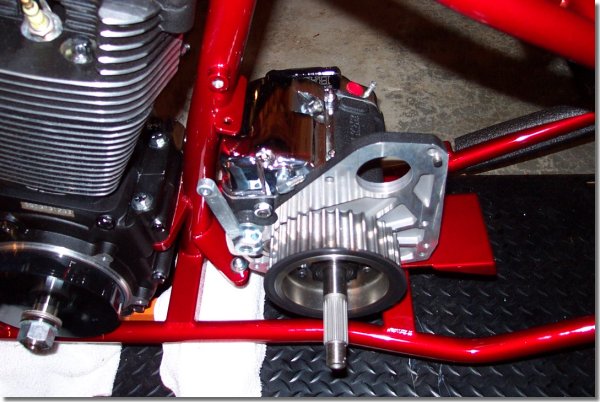
You’ll notice at this point that the secondary pulley is already on the transmission’s output shaft and the shifter lever is in place. Note: You want the shift lever to be straight up and down when bolted in place. The one in the photo required some adjusting to make this correct.

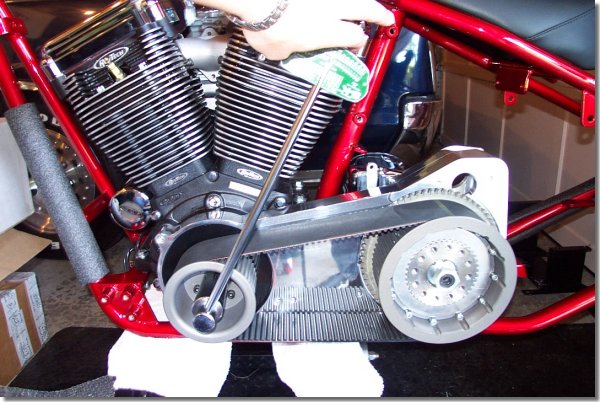
This project uses a BDL open drive system to drive the tranny, so the motor plate was put into place and bolted down while the engine bolts and transmission bolts were still loose. Make sure to use Loctite 242 and to torque the bolts to spec per the instruction sheet provided with the BDL system.
Something to note: This plate comes with its own bearing for the main shaft on the transmission, so the color had to be previously removed from the transmission. A tool from JIMS USA is available for this and can be found here in their section on Bikernet.

The offset needs to be pinned into the front pulley as shown below.

Both pulleys had to be slid onto the engine and transmission shaft simultaneously.
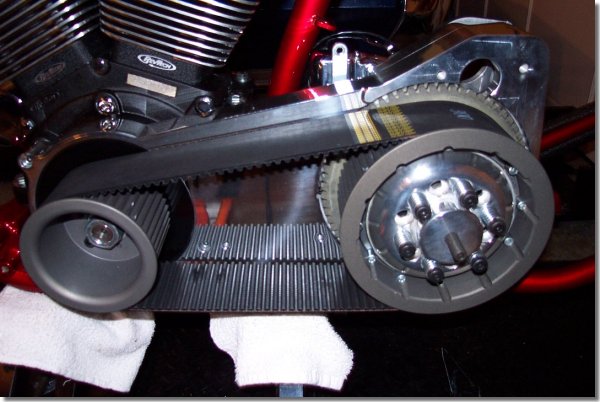
The spring plate on the clutch had to be removed to allow for bolting the rear pulley to the shaft. This was done by removing the six spring/bolt assemblies and the plate.
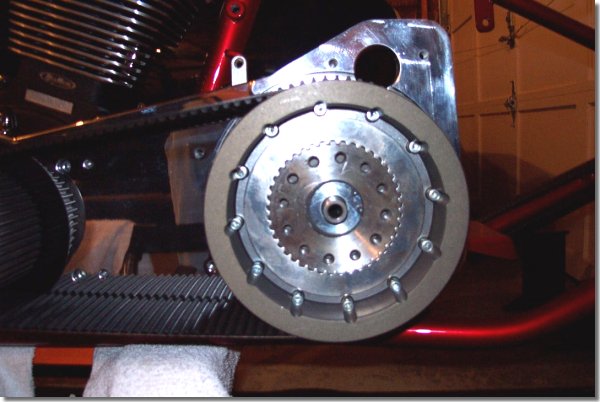
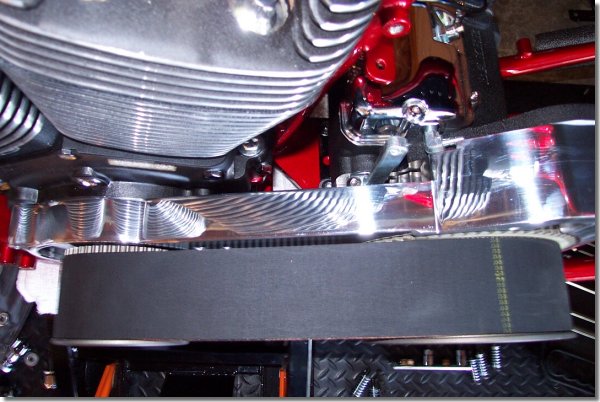
The bolt was torqued down to spec, along with the front pulley. I was then ready to turn the motor to make sure the belt tracked properly. To torque these down, an air compressor and an impact wrench was required. I would never have been able to torque against the motor or transmission using a regular torque wrench unless I had jammed the pulleys.
Using a large torque wrench, I turned the motor forward a few times to make sure the belt could make three revolutions and still track to the center of the two pulleys. If you use one of these set ups, it should track as assembled, but if it doesn’t, check the spacing on your front pulley. If you still have problems, you can call BDL and they will walk you through how to shim things up on your frame.
| |
Digital’s Rigid 2001 Part 1 (Continued)
By Bandit |
|
The above photo details the back end of the Atlas Precision ‘Roadrunner’ frame. Attached is a 9″ wide stubby fender, also supplied by Atlas. Both the fender and the frame are designed to handle 200 mm meat. We’ll be using a 180 for the project. Since wide tire aftermarket frames require special fenders, you have to be careful to select the proper width fender and fender struts because stock fenders don’t often fit, even if you run a stock tire. The Atlas Seat pictured above is by Danny Gray, built specially for Atlas to fit their frames. It’s pretty bare bones, but fits the ‘Roadrunner’ like a glove. This seat also came with an optional pillon pad. I got it so the wife could tag along. I have a feeling, it’ll get used only once. A note about the seat maker. Danny uses all European leather to make his seats. He does this for a good reason. Since European cattle ranchers don’t use barbed wire, the cattle don’t get any scars. This means, you get a seat without any irregularities in the leather.
See the open BDL drive in the box? Stop drooling – it’s mine! We’ll be putting one together in detail for you. In addition, we’ve got a LOT of Joker components for the project including the hand controls, wheels, pulley’s brake rotors, etc. We’ll detail ALL of the goodies when we pull them outta the box and mount them to the bike.
Stay tuned boys and girls. When Oz gets me the engine, we’ll really start to rock and roll!
|
Back to Page 1 of Part 1….
On to Part 2….
| |
Digital’s Rigid – Part II
By Bandit |
We’ve collected a number of parts for the rigid over the last few months – but one key item was missing. That’sthe engine. When it came time to decide on a power plant for the project, there were a couple of factors thatwarrented consideration. The first is of course, cold hard cash. None of us have a lot. Any way you cut it, anengine is not cheap. The second factor, of course, is engine performance. Nobody wants tomake this kind of investment, no matter what the price, only to find out it the motor is a dog or doesn’thold it’s own when the throttle is cracked. (When buying mail order, performance is particularly tough to judgebecause you never get to test the engine before you buy.) The third factor is overall quality. If you shell out a fewgrand for a motor – you don’t want to have to do it again in 3 years. You want it to last, and youdon’t want it to be plagued with problems. Having a bike that spends more time in the shop then it does on theroad just plain sucks.
As the number of V-Twin manufacturers increases to meet current demands, the competition to provide a high quality,big torque V-Twin that can withstand time and abuse for a reasonable price has also increased. The clearwinner in this competition is you, the consumer.
For those of us who need to maximize our dollar spent, we need to really understand our requirements.What’s the average biker want? A motor that’s usable for the street. If you want a Nitro-Burning tire shredder,get ready to spend some serious cash. But if you basically want a hot street motor, and live on a budget,you should to look at a couple of factors. These are performance, reliability, total long term cost of ownership,and thereputation of the engine manufacturer.
For this project, a Revtech 100 CI Evo-Style motor was procured. The guys at Custom Chrome cut us a deal onit to fit our budget. Let’s have a look at some of the features that convinced me that the RevTech 100 was my best choice.
First off, the Engineering and Manufacturing team at RevTech have spent thousands of hours researching, designing,building, and testing their engine design. When you buy one of these motors, you’re not just buying anengine, you’re buying 20 years of experience and expertise from one of the largest, most respectedaftermarket american v-twin companies in the business. The company’s reputation was an important in choosingto buy one of these motors because I’ve never so much as thrown a leg over a bike built with one of theseengines.
Second – The spec sheet. Have a look at all the features this engine has.
Basic Features
ALL Chrome Covers are included. No need to add your own. Price this out when you’re building your next project.You’ll see the advantage of buying these as a package. Comes with a Mikuni Carburator, Revtec Air Cleaner, Thunderheart Ignition Pickup AND Thunderheart ElectronicIngnition Module. Keep this in mind when buying a motor. The Module, Ignition System, and Carb/Aircleaner setup whenpurchased separately are worth at LEAST $600 retail if you have to add them separately. There’s a trick feature heretoo – the ignition module is actually mounted right on the pickup – so mounting an external box is NOT required. Available in 88 or 100 CI displacements, in Raw, Black Powdercoat, or Show Polished finishes on the cylinders,heads, and case.
Case
356-T6 Aluminum Case with added material in key areas for increased strength. What does this mean?Lower case flex. Why is that good? Longer bearing and shaft life. If things stay aligned, they wear less.It also means, this motor can take some punishment and that your lower end is likely to fail in an extremecondition than your average run of the mill case. Removeable Lower Sump Plate. – This is VERY cool. It allows you to keep tabs on your motor over time by beingable to inspect the lower end WITHOUT having to rip the whole motor apart. You don’t get this with just any case. Pressed and Bolted Crank Pin and Pinion Bushing Carriers. The carrier on the left is pressed in like stock.The one on the right is pressed and bolted against a machined surface for superior alignment across the case. Thistranslates into better alignment of the bearings, lower friction, and less bearing and shaft wear.
Heads
No head gaskets! O-Rings are used for LEAK PROOF SEALS. This is an extremelyimportant feature for retaining compression and performance over time. Wider than stock spaced head bolts for superior strength. D-shaped ports for high flow characteristics. If your motor ain’t flowin’, it ain’t goin’.
Cylinders
Steel cyliner liners are perma-locked into the outer aluminum casting for the ULTIMATE in durabilty. Larger Cooling Fin Area that Stock Evo Motors for lower engine temperatures.Lower engine temperatures means your oil retains it’s integrity longer and providesbetter engine protection to reduce wear. Cast Pistons in the 88″ motor, Forged Pistons in the 100″ CI Motor. This is something you may want to consider ifyou have a personal preference.
Flywheels
The halves are one piece forged and then post machined from 4340 Steel. What’s that mean?They’re seriously strong and accurately manufactured. Oil Pump
The latest in oil pump technology. NEVER underestimate the importance of delivering good lubraction to your motor. Inan air cooled motor, oil is also the lifeline to cooling. Warranty
2 Year – 20,000 Mile warranty. Just make sure you fill out the card when it comes. Shipping
Bagged and shipped in a custom built wooden crate..
Third factor – Total price – about $5600, retail. We did some internet shopping and found that youcan knock about $600-$700 off if you look around a little.
We also priced comparable Black Powder Coated100 CI motors from S&S $6300 Retail + which still require an ignition module to run (about a $200-$350 investment).If you want a TP Engineering motor, add another $500-$600 to those prices. Don’t get me wrong. S&S and TP make damned good engines,but you’ll pay for them. If you want a great motor that’s convenient to install, and has the added benefit of a carbpre-installed and dialed in with a pre-existing ignition module, and you’re on a budget to boot, you may want tohave a hard look at the Revtech motor.
We’ll have some details about mounting it into the frame as the project progresses.
Till next time – Digital
On to Part 3….
Back to Part 1….
Back to the Custom Chrome on Bikernet….