
Sturgis 2000 – Part 4-2
By Bandit |
|
 The Harley shop in Green River didn’t have it, nor did any of the other bike shops in the valley, but there was a shop in Aspen. It wasn’t in the phone book and couldn’t be reached by directory assistance. I called the Harley shop back and was given the number for Aspen Custom Motorcycles. I dialed and there was only an answering machine. Tired and dejected, we rambled back toward town. During one of our last installation attempts, we broke off the stud that held the rear tab in place. Now we needed an auto parts store for a large hose clamp and some rubber insulation to prevent the clamp from tearing through the durable powder coating finish. We pulled up in front of a Napa auto parts store and parked beside a blue and silver pickup with Krylon letters across the back window, “Aspen Custom Motorcycles.” Inside, a thin man with dark hair and youthful features leaned over the counter wearing a black Aspen Custom Motorcycles T-shirt. I introduced myself and he asked us to follow him. Two blocks away, this guy had his shop set up in a single storage unit stall (970) 544-9419. His undercover shop was complete with three stage creme sealer and we bought his only kit, thanked him and hauled ass for the Swank Hotel. In front of our room was an outdoor corridor leading to the bar and outdoor pool. I picked up several towels, borrowed a large bucket and we went to work. The first stage was a mixture of water and a strong detergent that was supposed to soak in the tank for four hours. We didn’t have the time and let it set for an hour. In the meantime, the guys in Randy’s room where having trouble with the plumbing. After I flushed the toxic mixture into a bucket, I poured it down the toilet in Randy’s room. I knew I should have stopped, but I was beyond the point of no return. I returned to the bike for stage two – flushing the tank with a strong solvent. Again the remnants of the explosive liquid were drained into the toilet. Meanwhile, hotel maintenance men and managers descended on Randy’s room, where a couple of riders had set up their joint rolling station. Plungers, tools and snakes were moved from room to room. Four rooms were effected and they were going to have to snake down from the roof. Randy shook his head. “Won’t work,” he said and poured the final stage of thick milky fluid into the tank. This process included sloshing the creamy liquid around the tank for 10 minutes, letting it set for 20, then sloshing again before draining. Randy sloshed and coated the lining of the tank for what seemed to be hours, making sure every crevice received its fair share. By this time evening was upon us. The tank was supposed to dry for 24 hours. I didn’t have time and Randy suggested that we use a hair dryer to speed up the drying process. The instructions specifically warned against the use of hair dryers because the final process was extremely flammable. Randy continued draining the thickening substance back into the bottle it came from, as we pondered the question. At one point, we tried putting the tank in front of the air conditioner to augment the flow, but there had to be a better way. Finally someone hit up the maintenance crew for a shop vac. As the sun sank, we started sucking the fumes from the tank outside our room.
 At one point, two girls showed up, one 22 and the other 27. They wanted to smoke a joint and party some, but the fumes held them at bay. Both were wearing shorts and tank tops and carrying shopping bags. One included a couple pairs of spiked heels that they quickly unwrapped and promised to sport for us. One had on a top buttoned up the front over no bra, and her tits were pressed so hard against the mint green fabric that the heavenly mounds creased the material. When she leaned over to slip on the shoes, we gasped in unison. Whatever it is that makes a woman’s body magic to a man, is a wonderful thing unless abused by either party. If a woman minds that a man gawks at the flesh exposed by too little clothing, she should cover herself. These girls didn’t mind. In fact, they enjoyed it and wanted more. We could have given in to them except we had a mission and a deadline. After the girls asked some probing questions and we didn’t respond appropriately, they rolled themselves a doobie and departed. There was another problem with nubile girls finding their evil ways into our lives. We were staying with 100 of our closest, most gossipy friends in the same goddamn hotel. Speaking of gossip, I hadn’t heard from Zebra for two days. He was supposed to hook up with a pack of riders in Tennessee, and perhaps they roasted him instead of a pig. I didn’t know his whereabouts, but I kept calling his cell phone hoping to hear the number had been permanently disconnected. At 6 a.m. Friday, the phone rang. Larry the mobile mud slide maker was leaving his room to meet me in the parking lot to lend me gas. I was hoping to sleep in, but noooo. I wrestled my ass out of bed and out to the bike with the tank. After setting it on the bike, it was difficult to tell that it had been through hell the previous day. I mounted it, hooked up the lines and went back to bed. I told Larry never to call me at 6 a.m. again and to keep his gas. I wanted to let it air for a couple more hours. At 9 a.m. we put gas in it for the first time from Howard’s truck, just a quart. We loaded up and hit the first station. We were Denver bound. Some of the guys were heading into the pass above, but rumor was that the straight shot was down to Green River, over to the 70 Freeway and into Denver. It was 30 miles out of the way, but we chose the straightest shot. The freeway is only two lanes wide but it meanders along railroad tracks and rivers toward Vail. We stopped for gas in Eagle and were passed by 30 Hamsters blasting onto the freeway. How they beat us I will never know, but I sent my navigator his walking papers the next day. We caught the furry beasts outside Vail. Traffic began to bunch up and we kept riding faster, splitting lanes and running the gauntlet between the very fast cars and extremely slow trucks. Treachery was all around us as we crested a pass and could see the dots of a pack of bikes in the distance. The tank was holding and the bike hadn’t burped, coughed or sputtered. It could handle anything I dished out. I turned the throttle and it responded. About 25 miles outside Denver we blew past the guys in yellow and another couple miles down the road it began to rain, then hail. We ducked off the freeway, pulled on our slickers and found a log cabin watering hole.
 |
Sturgis 2000 – Part 4-3
By Bandit |
|
That last 25 miles were the worst of the trip. It rained off and on as the traffic became thick as mud on your boots. Lane splitting is not allowed and when we attempted to play ignorant travelers, motorists tried to hit us. As the sun broke over the parking lot of cars, the humidity rose with the mercury. Of course we got lost at one point, found the Two-Wheelers shop and ultimately the hotel. There was a major party planned for the 25th anniversary of the shop, but the threat of rain and the 450- mile trip to Sturgis the next morning forced us to take it easy and hit the hay early. We tried a local restaurant for grub, but they still didn’t serve peach pie. The next morning, Myron and I were on the road by 4:30. An odd feeling swept over us as we rode Highway 25 in the dark. In the rolling fields and wide open spaces of Colorado, it was as if we were lodged on the brink of the city. There wasn’t a row of houses or an industrial park once we turned north and it felt good. We rumbled for 90 miles until we arrived at Cheyenne, Wyo., for breakfast. We hit the road for another 75 miles and pulled off in Wheatland where we refueled and had one of Myron’s safety meals and coffee. He works out constantly and feels that his success in the gym is attributable to his intake of protein. He doesn’t eat a lot or poorly, but often and bushels of protein. As we walked out of the restaurant, we were met by Cheryl. Tom’s bike had a broken shift lever and he was working on it. “How the hell did you get here?” Myron asked. “Uh,” Cheryl muttered, not sure what to say. “What time did you leave?” I asked. “6:30,” she said. We looked at each other in dismay. Myron jerked on his gloves. “Let’s ride,” he shouted, “We’re burnin’ daylight.” We spit dust and rocks as we blasted out of the gravel lot and onto the highway. Suddenly he was hell bent for leather. We stopped just for gas in Orin and headed east on 20/18, blasting toward the small town of Lusk, Wyo.
 At the end of town we stopped for another safety meal. We had 130 miles to go to get to Sturgis, but the roads would narrow and we’d have to slow down. Across the street the bikes were lined up in front of the western bar. I liked this town. It’s small but has some action going for it. As we turned toward the door of the Del Rey Cafe, Milo strolled out the door pickin’ his teeth with a tooth pick. “Damn!” Myron said and almost abandoned his safety meal stop. “What the fuck are you doing here?” Milo shrugged, straddled his all-black dresser and took off. The waitress would melt a good man’s bones with her silky, fair complexion, even lighter hair and brilliant blue eyes. My words were stumbling when I asked for peach pie, but I lost all interest when I discovered that she had just run out. “You mean you didn’t save me a slice?” I shouted, throwing my tan gloves on the table. In Newcastle we stopped momentarily for gas, but as we paid our ticket we noticed Hamster Jeff pull into the station. Myron grabbed his gloves and headed for his Dyna. “Fuck the peach pie,” he shouted again, “Let’s ride.” I tried to holler to Jeff as we headed out of the station and hit the highway toward Four Corners. We were in a race now, and although Myron said to most riders as we left them in bars and gas stops, “Keep it under a hundred,” this time it was different. If we had open straight roads ahead, throttles would be pegged to the stops. He couldn’t figure out how these bastards who left the motel two hours after we did were catching up. Hell, we were rumbling along at 85 plus, but we had 14 meals to their one cup of coffee. What the fuck? Now we were in narrow canyons weaving through packs of bikers heading to their homeland. Again the chopper handled the curves as if I were on a rice rocket, dipping and bending with each bank. Each gas stop was spoke to spoke with lines of motorcycles to refuel. Each bar looked like a popular biker hangout from Southern Calif. on a Sunday afternoon.
 They were coming from all directions. The rumor of afternoon thunderstorms had us pushing the envelope. Our bikes were a mess, but they were running and we were ready to hit the home stretch for our abode in the Bad Lands. Finally, in Spearfish Canyon 15 miles from home, we slowed and enjoyed the Jack Pines and the bustling brooks that bordered the winding road. We were home. Home to the biker, the outlaw, the bandit and to every fucking rider in the world who enjoys open roads, beer, broads and peach pie. Now if we could only find the girl, or at least a piece of pie.
 –Bandit PS. Zebra had arrived four hours earlier. We immediately gathered up the boys and found the only bikini bike wash in town. Following is a couple of miscellaneous shots from Sturgis 2000. It was a helluva year.
|
Caribbean Customs Builds Ground-Up
By Bandit |

My dad has a 107 Merch motor and was dying to stuff it into a chopper, so we ordered a West Coast Choppers frame.
As soon as we got it out of the box, my dad didn’t like it; he wanted something with more stretch and rake. It just so happened that I had an H-D Evo motor and tranny at the shop, and I decided to build the chopper for the showroom. Parts were ordered little by little over the next couple months. Andy at Custom Chrome and Elizabeth at Chrome Specialties were great about getting the orders out quickly. If you follow the Bikernet news section, you might have an idea of the whole build. It’s taken 2½ months.

One thing that makes a project easy is knowing beforehand what the bike will (sort of) look like and what components will be used. With that in mind,let’s get to the build.
The salty Caribbean air and chromed aluminum parts don’t gotogether. We had some parts that were new but already showed chipped chrome, including the forward controls, triple trees and grips. They were going to be powder-coated anyway, so it didn’t matter. Besides, it was dead stock that we were moving. I’m not going to mention names but anyone with a keeneye will know the manufacturer.

The first mockup was so-so. The rear fender was back ordered and thefork legs were too long. The plan was a narrow glide front end and 19-inchwheel, to make it look longer. When we received the tank (WCC CFL,which is built and sold by Custom Chrome), it was wider than expected and theskinny front end looked out of place. It was ditched and a wide glidetook its place, as well as a 21 wheel-tire combo.

The rear fender was in, a Two-eight by WCC, made for the frame. Well,the radius of the fender was too much and we could spin the 200-by-18 Avon tyrearound with the fender stuck to it. Some heavy cutting and grinding tookplace in order to free them both. I was expecting a better fit from theWCC fender. With all the “custom” work we did, we ended up with about 8inches less steel.

Spacing the rear wheels and Exile sprocket/brake proved to be ahandful. WCC has a hidden axle that looks very cool, but you have to be pretty accurate to make the right spacers, since the axle will not be able tobring the ends closer for a tighter fit. The Exile sprocket runs prettyclose to the brake bracket so a minimal spacer had to be made. Hours wereburned measuring and re-measuring the fender and bungs position before tackwelding. We guessed that the chain would have clearance problems with thefender and we were right.
Full mockup: The motor and tranny aligned pretty well with a stock H-Dprimary, but were hell to align with a BDL open primary. The motor sat veryfirmly and no shims had to be used, but there was a small gap between theplate and the cases. We left everything loose and forced the plate in. I think the tranny plate is to blame. A front regulator/oil filter plate was canned after grinding a half moon notch to fit into the frame down tubes. That’s when I came up with the idea to hide the regulator on the open belt plate. The filter stayed in factory position.
Here enters the new owner. He saw the Jesse James video (like millions of people on this planet) and went to check out the mocked-up bike. He likedit and a deal was made. Before this, the bike was for the showroom and was being built at our pace. Now a deadline was set and all hell broke loose. By theway, I want to thank my girlfriend, Yoly, for understanding my overnightersand lending a hand.

We worked all night, every day to put this bike together beforeSturgis. When all was welded in place and molded, the frame and rear fender went to the paint booth. The tank had to be worked on, moving the bung to a lower location in order to get more gas. Panic struck when I arrived at the shopand saw the color. Our guys have the good sense to always spray a samplebefore actually doing the parts. I had hoped to have the bike ready for the Jack Daniel’s BBQ. Boy was I cocky.
The new owner pretty much left me alone (which was great), only coming bythe shop to see photos of the bike being put together and asking for some parts that he would like.
The paint was my idea — tangerine with metal flake flames. As luck had it, we found a quart of paint in stock and got the project going once more. What you might see in the latest photos was done in five hours. Fitting all the parts two and three times makes life much simpler. Some stuff was still giving us a hard time, however. Yes, the chain rubs the fender a bit, the primary was still a pain in the ass to align and the spacers are not totally right, but that’s easy stuff.
One thing that’s great is the WCC oil tank, which fitted right in and saved us a lot of welding and measuring time. I expected more from WCC, fitting wise. A fender made for a frame should go “like butta,” as well as other littledetails. On the other hand, it’s a bike that needs “thought” and experienceto put together, which is anti-Bozo builders. In short, it makes you becreative.

By the time you read this, the electrics and front end (I hope!) willbe in place, the front brake and perches from PM are on the way (we know theyfit) and that’s about it. Maybe I’ll have it in time for Sturgis…I have no choice.
A really important part of every build; Nothing can get accomplished byone person. There’s a team of people always helping, even the guy who fetchesthe Cokes is worth his weight in gold. Thanks once more to all of you (inour shop and anyone’s), you know who you are.

Frame – WCC Dragon Choppers For Life rigid
Motor – H-D 80 cubic inch Evo, triple 80, 80 cubes, 80 horse, 80 torque
Tranny – H-D 5-speed
Wheels – CCI chrome, stainless spokes, 21 front, 18 by 5.75 rear
Tires – Avon 21 front; Avon 200-18 rear
Primary/ clutch – BDL open
Rear fender – WCC Two-eight (heavily modified)
Gas Tank – WCC CFL (CCI King Sporty tank)
Paint – Tangerine House of Kolor Kandy, with metalflake flames
Forward controls – Pro One chrome chipped
Triple Trees – Arlen Ness wide glide chrome chipped
Grips – Pro One chrome chipped
Electrical – Caribbean (by Guti the Guru)
Sprocket/ brake – Exile Cycles
Front brake – PM 4 piston
Perches – PM “old style”
Pipes – WCC Hellbent (2 months back order)
Carb – S&S
Ignition/Cam – Caribbean secret
Back to the Garage….
| |
Project “Cheap Chop”
By Bandit |
This is the story of the build-up of my cheap Suzuki GN 400.Before you get all upset that it is a jap bike, let me say one thing.I have a 1974 sportster that I finished up a couple of years ago that I ride regularly, I was looking for something cheap that my wife could ride and I wanted to do another build-up.Harley prices being what they are, it was cost prohibitive to build another American bike without selling the sportster to finance it, so I had to think CHEAP.
Last February I started working part time at a local bike shop just to make some spare change and get discounts on parts.My wife ended up getting a job at the same place, running the office and searching the satellite parts locator system for customers and selling used parts.The shop had a couple of service bays but also housed a good salvage yard, all indoors, mostly jap bikes from the 80’s. I located a small bike one I thought would be easy to modify.

The Stock GN400

The GN400 – As It Arrived From The Bone Yard.
My key goals were to find one with a single tube backbone frame, so gas tank selection would be more universal.I also wanted to keep it small and light.I liked the clean look of the single down tube.I looked at a couple of Honda cb 350’s and a cb 360.But the GN 400 had a cleaner looking engine.

I also found a Yamaha XS 650 (this will be a later project)
I scrounged around for another engine, as the engine on the bike was locked up.The front end was bent , so I scrounged another Suzuki front end.
I made him a deal because I was buying 2 bikes and some sport bike wheels, I came home with.A 1980 Suzuki GN 400, a spare front end ,a spare motor, handle bar controls, another Suzuki wheel, and a 1979 Yamaha XS 650 ,and 2 sport bike wheels for $700.

Now I had never seen this model of bike before so I began to search for information on it.The Horse website was very helpful, I found a manual with the help of Wazoo.Then the first order of business was to get the bike running.I swapped engines and hooked up the ignition part of the wiring harness.Cleaned the carb and the sucker fired off!

Okay, so now I have a running bike, my wife is short, just a hair over five feet tall on a good day, so I knew I either had to lower the bike or lower the seat.So I cut the seat support section out of the frame.
Then I welded in some tubing stock to get an idea of how it would look and the height of the seat.Now, remember the Yamaha xs I got? Well because I was going to cut the back end off the Yamaha anyways,, I robbed the shocks and rear fender.I bent some tubing to fill the seat area, but the seat looked funny sitting there all by itself.I went back to the Yamaha and cut the rear frame loop off.Now I had a loop around the seat, this helped to tie everything together visually and also provide my lateral frame support brace.I also used the Yamaha shocks because they were beefier.
I tack welded the seat area together, eyeballing and cross measuring to keep everything centered and lined up.Once this was completed I turned my attention to the rear fender.As you know most jap bikes have very ugly fenders and are usually plastic under the seat.Again, the Yamaha donates the rear fender, the xs 650 fender was long enough to cover the wheel.I wanted to keep the fender close to the tire, I welded a tab to the front of the fender and bolted it to the swing arm.The tire I used on the rear is an odd size, a 130x80x16, the same tire used on the Buell Blast and a Ninja 250, it is slightly smaller than a standard 130x90x16 again, to keep the seat height low.Next I welded some 3/8 steel rod to the rear of the swingarm and ran it up to the fender for struts, I also welded a thick washer to the end of the strut to mount the fender, and pick up the mounting holes in it.I trimmed a Harley fender to fit the front, this took no time at all.

The gas tank! The tank required the most fabrication of the whole bike.The area between the neck and the seat is about 16 inches, about 2 inches longer than a sportytank. So again I searched the HORSE Swap Meet page for someone who had a small tank for saleor trade. Hackasaw came through for me with what appeared to be a Triumph aftermarket tank ofunknown origin. The tank had a very deep tunnel, I needed one with a shallower tunnel, but thetank fit. So I ground the seam on the tank until I could remove the tunnel section. I raisedthe tank and tack welded the tunnel into the right position and made some tabs and fillerpieces to weld into the tank, A by product of this is that I probably gained a half gallonof capacity. I then took the tank to a friend of mine, Scott Morris, who is a certifiedaircraft welder and TIG welds all day on high zoot aircraft parts. He fixed me up, afterwelding I tested the tank and not a one leak or pinhole! Almost a shame to have to bondo overthe welds.

Most of the other fabrication on the bike was minor, grinding to fit ormaking a small bracket here and there. I did make a set of side covers outof 2024 t3 aluminum to hide the battery and electrical components.So After I was happy with the results I disassembled it and finished it for paint.I used epoxy primer, House Of Kolor base coat, and flakes and Mar-Hyde 3 minuteurethane clear. The whole premise of this build was to give my wife a small easyto handle bike, that looked good and would not break the bank.The whole build up required No special machining or fabrication.

The only parts that were bought new was the tail light and blinkers, chain and paint.All other parts were traded for or were scrounged from a salvage yard.I do need to buy a speedo and a tach, I think I will source these from J.C. Whitney as theyhave them on sale.

The total cost of the bike (with new gauges) is right around $650 !!(Yes! That’s right, WAY under $1000 total!) I think this will give my wife a good reliablefun and unique bike, at a FRACTION of the cost of a new bike.

It just goes to show you thatwith a lot of imagination and a little money, and the help of good friends anybody can bein the wind on a custom bike of their own creation. I hope this may inspire someone elseout there to start a cheap project or to get their loved ones involved with motorcyclesand have fun together.

Keep Choppin’ —Elwood
The Beauty Of Cherry Pickers
By Bandit |

Here is engine swap tip “Old Bob” and I came up with. This is the second time I’ve done this on a Road King wreck that involved a frame change.
I saw something somewhere where the factory was putting a Twin Cam engine in a Road King frame on the assembly line. We got to thinking and said shit let’s try the Cherry Picker we have. We used the Cherry Picker mostly for Buell’s. Frame changes, swingarm recalls, shock recalls, and rear isolator bushing changes. The Cherry Picker gives you alot of control when wrenchin’ on Buells.
We pulled and installed the engine on the Road King and it saved a bunch of time. With the Cherry Picker we are able to pull the engine with the primary housing still bolted up, with belt still attached. All we take off is the swingarm, shock’s, and all the other stuff.
You need three jacks and those old trusty, musty, dusty 4x 6 (2) pieces wood chunks all H-D wrenches keep around for whatever. One jack for the rear of trans/oil tank, one for the rear of the frame @ rear crossmember, one with a small pc. of 2×4 under the crankcase. The two 4×6’s you put under the frame at the front on the ears that mount the forward foot controls. This will give support at all the “ah shit it dropped” point’s and helps big time when sliding that heavy sucker back into the frame.
Using the Cherry Picker you have to roll the engine to the right of the frame while dropping the rear of the trans/engine keeping front up some while slipping it into the frame. It takes 2 to 3 people, lot’s of “hold on’s”, let ‘er down’s, and pick’er up’s. It actually went pretty fast. It’s just a little Rockin’ & Rollin’ that’s all. It’s really just like pullin an engine/trans out of an old truck.
The better way to do this, might be using an electric overhead hoist. Not many shops will be lucky enough to have that. I think if you had the overhead technology you might be able to do this swap with the swingarm still attached!! Just removing the isolator supports from the frame.That’s it. It worked for us.
–Paul
Chica Custom Cycles
By Bandit |
|
 With bike builders seemingly dropping from the trees these days, it gets harder and harder to stand out. Chica of Chica Custom Cycles in Huntington Beach, Calif., doesn’t have that problem. His wide array of unique creations is distinctive enough to get noticed, even among the endless displays at the Indy Dealer Expo and Pomona Easyriders Show, where he took a third place for best of show against other West Coast heavyweights.
 A few years ago, I saw one of his bikes in a magazine and I was blown away. It was a clean, mean scoot that looked like it meant business.
 Chica hails from southern Japan. He started out as a Honda mechanic whose hobby was Harleys. After a few years of turning wrenches for Honda, he started working toward his dream. He and few friends opened up Chica Motorcycle Service. They did mostly service work, not much custom work. But the ideas were brewing and when the opportunity came to move to the States, Chica packed up his wife and kid and moved to Diamond Bar, Calif., where he worked in a friend’s shop. After a year and a half, he decided he could build bikes on his own, bringing his designs to life. It was at that time that Chica met Don Millhouse, who worked for a company that exported aftermarket parts to Japan. Chica built bikes in his garage while Don exported parts from his. They outgrew their garages after six months and opened Chica Custom Cycles in Huntington Beach. That was five years ago.
 Chica’s favorite H-D is the original 1946-47 Knucklehead. But his design ideas are pure late ’60’s-1970s with a surreal twist. Most of the bikes he builds are rigids.
 He also likes the flat track racer look, like his creation for Chrome Specialties’ Trick.
|


| |
Can You Ever Be Too Cool?
By Bandit |

So which is it, John?
Well this month, I’m going out on a limb. I plan to use a littlepersonal common sense and let you know how I feel about oil-coolers.Here’s the official disclaimer: this is my opinion, and not theopinion of Mr. Ball, Sin Wu or anyone else. You are welcome to sharein my ramblings, think I’m a genius, recommend me for a gold star, orfeel free to shower me with praise next time you see me. At the sametime, you are more than welcome to disagree with me, tell all yourfriends what an idiot I am, or scorn me for ever more. Differentopinions make this an amazing country to live in, right or wrong.
Get to the point, John.
During the hot summer months, riders seek to insure that theirbikes don’t overheat. If you own an American bike, and its not aV-Rod, you’ve got an air-cooled motor. Most of our metric bikefriends, and the V-Rod riders, have water-cooled engines. As basicas this sounds, either water and air, or oil and air cools yourbike’s engine. Why? I’ll tell ya. Because you are being propelleddown the road by an internal combustion engine. Combustion (theexplosion) of your fuel (gasoline) moves the pistons in your motor,which generates heat. On top of that, the movement, in closeproximity, of the internal components of your motor (rods, pistons,gears and the like) create friction, which generates additional heat.If you don’t control the heat associated with these mechanicalfunctions, all this metal stuff in your motor will melt together likecandle wax and you’ll end up on the side of the road. Not good.
Yeah, yeah, get to the goddamn point, John.
If you’re reading closely, the common cooling feature found ineither water-cooled or air-cooled engines is AIR. Air is the commondenominator that cools your motor, whether you have just oil runningthrough it, or oil and circulating water (anti-freeze coolant)flowing though pockets inside your crankcase. The ultimate goal isto dissipate the heat generated in your motor into the atmosphere.
Yippee, get to the point, will ya.
If you’ve got a water-cooled engine, you’ll be sporting a radiatorsomewhere on your machine. Normally it’s a rather ugly piece of gearaptly named because it radiates the heat captured in the water that’scirculating through your motor. A typical radiator is composed ofthin circuits of compressed tubing through which the water or”coolant” flows. Air passes by the radiator fins, and the heatenergy is dissipated into the atmosphere, so the coolant can onceagain flow into the motor to cool the hot cylinders. If your vehicleis sitting still and no air is flowing through your radiator, heatwill build up and you’ll overheat your motor. To alleviate thiscondition, vehicle manufacturers place electric fans in front ofradiators to assist the flow of air. Flowing air is the mostimportant component to transfer the heat.
This is all about cooling an American V-Twin, John.
Your American V-Twin is a time-honored, incredibly good-lookingdesign, which incorporates an air-cooled motor. Confused yet? Yes,air does cool your motor, but it’s also the oil in your motor that iscirculating and dissipating the heat being generated. Most V-Twinshave only a 3-quart capacity of oil that circulates in and out of themotor. If you’re a quart low on oil, you’ve reduced your coolingcapacity by about 30%. That’s why it is very important not to runyour bike low on motor-oil–even more so when it’s hot outside. Theoil is also flowing at a relatively low pressure in your motor. Theoil pump, depending on the oil temperature, generates only 5 to 15pounds of oil pressure. If you’re oil is extremely hot, you’ll looseoil pressure and that results in engine damage. Sounds like you needan oil cooler, right? Well, not so fast. I’m still trying to get tomy point here, bear with me.
Oil lubes the engine. It doesn’t cool the engine, John. Ifit did, the oil would be stored in a radiator-type contraption. Whatare you trying to say, John.
Air is the key to cooling your V-Twin. That’s why your motor haslarge fins all around the cylinders, which add more surface area forwind to cool. This additional surface area that you see on yourHarley type motor works just like a radiator on the water-cooledmotor. Air passes over the fins when you’re moving, and that coolsyour engine and it’s components, including the oil circulating fromyour oil tank into your motor. If you’ve got an oil cooler it willadd an additional “radiator” type unit, to your oil circulationsystem, to dissipate the heat stored in the oil.
Yeah? As far as I’m concerned that’s cool.
As much as you’d like to run out and buy an oil-cooler, I’d adviseyou to keep your wallet in your pocket. Now, I’m finally gettingaround to my Covington Code regarding why I think you should skipputting an oil-cooler on your bike (see disclaimer above). An oilcooler only works if you’ve got air blowing through it. When you’removing, an air-cooled V-twin motor cools just fine, because you’vegot air blowing through it. The same principal applies to youraccessory oil-cooler; it needs air to circulate through its radiatorto cool your motor. The problem is that I’ve yet to see an oilcooler designed for a V-Twin that includes an auxiliary fan, like awater-cooled radiator.
Ah, your notion is beginning to slip, John. More fins from acooler add surface area to the cooling process while the bike ismoving. The only reason we have internal combustions engines is to”move”. If you must stop, hopefully the oil and engine has cooledenough to survive the pause.
About the only time your bike is going to overheat is when you’resitting still, low on oil, or you’re pondering another route toavoid the traffic jam you’re stuck in. If you’ve got an oil-cooleron your bike, sitting still with your motor running, you’ll bereducing the oil pressure by forcing the oil through the cooler. Thewhiz-bang oil cooler won’t be cooling your oil because it has no aircirculating through it, so you’re in double “heat” jeopardy. Plusyou’ve added about four more oil hose fitting locations creating moreplaces for oil to leak from your bike. If you’re leaking oil, you’reloosing the cooling property and contents of your oil-bag andreducing the ability of your air-cooled motor to cool properly. Note:Harleys don’t leak; they just mark their spot.
One of the reasons I run coolers is to enhance my motor oilcapacity, goddamnit.
Last but not least, I can hear you “Oil-Cooler Advocates” yellingright now that it’s 120 degrees out here in the desert, and you needall the help you can get. Bah-humbug. Your V-Twin is well designedto run at around 215 degrees of oil temperature. If the ambient airtemperature is 90 or 120, your motor really could care less as longas it has air blowing through it, regardless of the air temperature.I’d rather have more oil pressure lubricating my internal combustionengine to keep me going, than a $150 oil-leaking accessory bolted tomy bike that’s not helping me cool my motor.
Okay John, but what about the Twin Cam engines that run 240degrees plus? I installed a H-D cooler and tested it on the run toBarstow. It generally ran 20-25 degrees cooler. Is that bad? Plus thecooler and lines added to my 4-quart capacity.
In summary, I think the best thing you can do in the DesertSouthwest is change your motor oil often, make sure your oil level istopped off, and avoid traffic jams. I also run 25/60-weight oil inthe summer, vs. the standard 20/50-weight oil normally used in yourlate model bike to add an extra margin of heat protection that thehigher viscosity oil will provide. I say keep your money in yourpocket next time somebody tries to sell you an oil-cooler. Spendyour cash on a date for those hot nights Give her a ride to the showon your bike, have a good time, the air-conditioning in the theateris amazing this time of year. That’s way cool.
Here’s a couple more thoughts to consider. The guys at thefactory told me that H-D oil is rated to 360 degrees. During our testmy brother’s Evo dresser ran an easy 90 degrees less than the TwinCam King. What does that mean? Evos are already cool? I’d rather runa cooler and be safe.
One more thought. Evos run substantially cooler, but withconsiderably less capacity. My Dyna only held about 2.5 quarts. Ifoil volume is a consideration and you’re running 2.5, you could addto that number with a cooler.–Bandit
Keep the rubber side down,
John Covington
www.musclebikes.com

Back to the Surgical Steeds…
HANDMADE LEATHER SEATS
By Bandit |
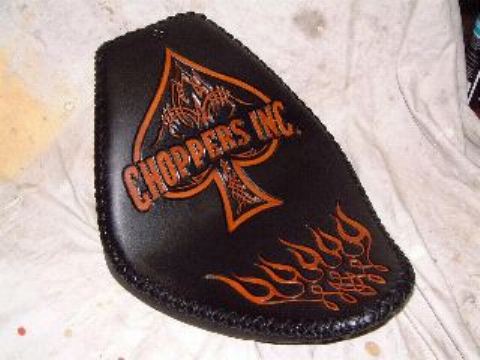
Paul Cox Custom Leather has been creating custom leather seats professionally for over 12 years. His client list includes the likes of Indian Larry’s Gasoline Alley NYC, Billy Lane, Jesse James and Exile Cycles to name but a few. Paul’s handmade work is definitely the finest available anywhere at any price. Each seat is hand made to perfection, and Paul uses only the best materials available.
I had the opportunity to visit with Paul at his Brooklyn, NY shop a while back. Usually, his methods are a well guarded secret, but my being a long time leather worker and die hard rider, I was able to convince Paul to share some of the tricks of the trade with us. Following is the step by step procedure Paul used in the creation of this seat for Choppers Inc. If you feel up to it, try and make your own.
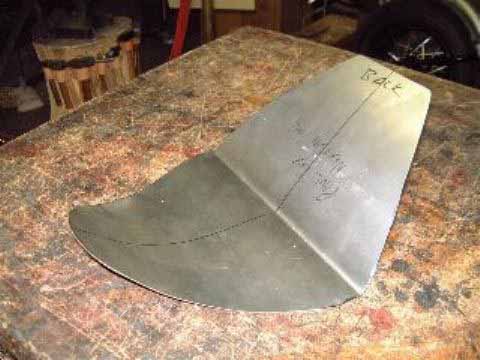
Photo1: The seat pan for the Choppers Inc seat is made from 16 ga. Steel, custom fitted to the frame.
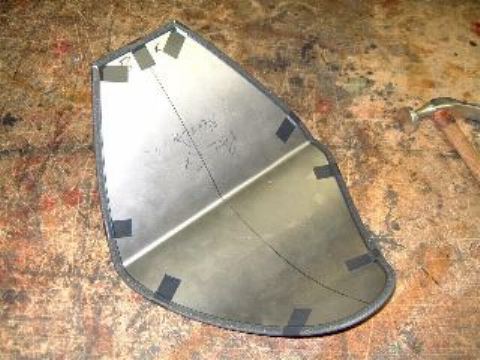
Photo 2: The edge of the seat pan is covered with trimlok auto edging to protect the leather from being cut by the pan.
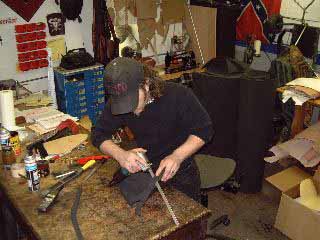
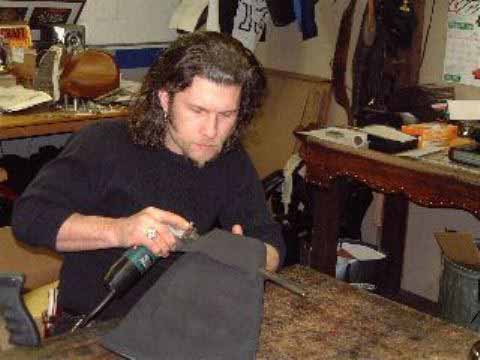
Photo 3&4: Paul uses a hi-density, closed cell water-proof neoprene core for the seat. NOT cheap carpet padding that some other high-end seat manufactures use. He uses spray adhesive to affix the foam to the pan. The foam is rough trimmed to shape here with a Bosch foam cuter, not an electric turkey knife!!
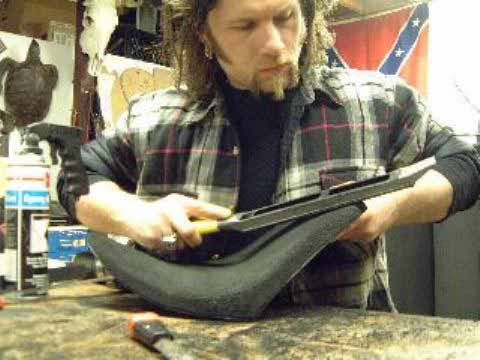
Photo 5: Paul Cox finishes the hand molding of the neoprene with a shaping tool similar to the tool used to shave down sheet rock. You can find a tool like this at your local home center.
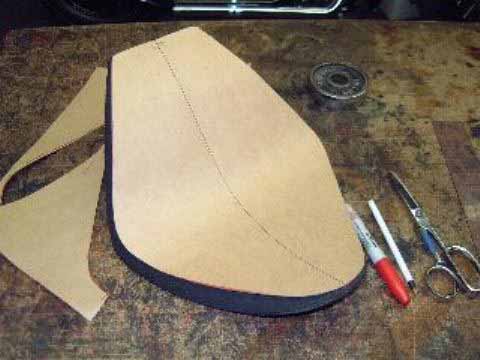
Photo 6: Making the pattern for the leather. Heavy brown paper, folded to find a centerline, is laid over the seat and traced to get the perfect shape for the top of the seat.
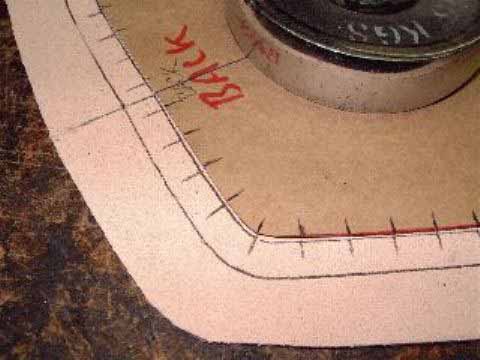
Photo 7: The lacing holes are laid out on the pattern according to the type of stitching required and then transferred to the leather. A word about leather here: If you have a factory seat, you might be surprised to find that it’s not leather at all, but cheap vinyl.
Many makers use it because of it’s low price and its water-proof characteristics and actually because most people don’t know the difference. Paul doesn’t use it….ever.
Leather is the real deal. Why not go for the best? Paul generally uses a vegetable tanned natural tooling leather. Veg tanned hides tool and dye wonderfully. Try a 6-oz weight and if you have to make any tight tucks or bends, you may want to consider a slightly thinner 4-oz for the sides.
Photo 8: Now the fun part begins. You have to decide what you want on the seat.
This is the pattern Paul designed for Billy Lane of Choppers Inc. The pattern is a full sized template.

Photo 9: Casing the leather. Casing is a leatherworker’s term for getting the leather wet enough to accept the tooling, but not so wet that it drips. This is a trial and error procedure for the non-experienced seat maker. Take a scrap of the leather and get it good and wet. Then let it dry out for a few moments and you should be good to go.

Photo 10: Place the pattern on the cased leather and use a stylus or a ball point pen that has run out of ink to transfer the pattern directly onto the damp leather. Be careful that no ink bleeds through the pattern onto the leather.
On to Page 2…
Back to the Garage…
HANDMADE LEATHER SEATS(CONTINUED)
By Bandit |

Photo 11: Remove the pattern and you should see the tracing embossed on the leather seat.

Photo 12: Paul uses a swivel knife to delicately carve the lines into the leather before tooling. This requires a bit of practice. We recommend that you try it out on some scrap leather before diving right into the project.

Photo 13: Paul uses a buffalo hide mallet and a series of leather embossing tools to bring the design to life. Here’s your chance to be creative.

Photo 14: Shows a close up of the delicate design work being brought to life by the hands of a master craftsman.

Photo 15: After the tooling is finished and completely dry, the dying process can begin.
Fine lines are dyed using a brush, broad areas can be dyed with a piece of sheepskin or a cotton rag.

Photo 16: Stitching the gusset sides to the top. After the top of the seat is done, you’ll need to make the sides. To get a good fit, count the holes in the top, paying close attention to the spacing. Lay out a strip for the side leaving at least 2 inches more than necessary for pulling the bends under the seat pan.
A word about lace choices: The best leather lace you can get is made from natural tanned kangaroo hide. You can get away with boot type lacing in a pinch or check out

Photo 17: After the seat cover is tooled, dyed and stitched together it’s ready to be fit to the pan. Paul uses a good spray adhesive to prevent slippage and fits it all together.

Photo 18: Paul pulls the cover firmly over the pan and padding making sure that the leather is not puckered. The leather is riveted to the metal pan and the excess leather is carefully trimmed away.

Photo 19: Heavy felt is glued to the bottom of the steel pan to prevent scratching of the frame upon installation.

Photo 20: Leather dressing is generously applied by hand to protect the seat from weathering.
Photo 21: There you have it–a custom made one of a kind seat. Nothing dresses up your ride better than something sweet to rest your butt on.
You can get in contact with Paul Cox through Gasoline Alley, NYC
151 N 15th Street
Brooklyn, NY 11211
1-718-609-9184
E-Mail: paulcoxleather@aol.com
Back to Page 1…
A BRIEF ON CRAZYHORSE
By Bandit |
| You may have caught much of our event coverage by Crazyhorse, the newest addition to the Bikernet Staff. In addition to all the fast and fantastic coverage she has provided us, she will soon be assisting with the Bike Show.
I recieved the following e-mail from Bandit yesterday with the attached photos. We just wanted to share them with you to show off her talent. If you’d like her to paint your machine, click on the banners for more information
– Digital

 |
On to Page 2….
| |