
Sturgis 2001
By Robin Technologies | | General Posts
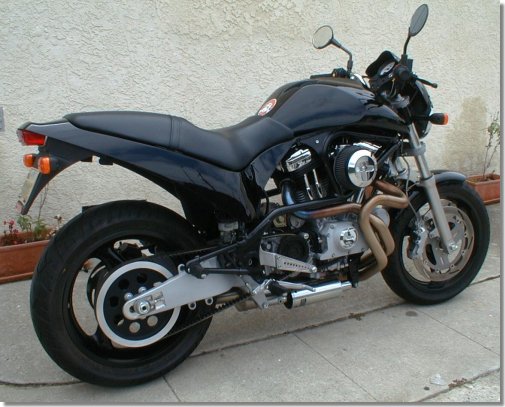
Buells are the Harley-Davidson street fighter. They are inexpensive,sharp-handling machines that give the American rider something toshout about, something to fuck with and something to race.
This bike won’t compete with the 200 mph Japanese sportbikes, but it will handle like one, and brake like one. So we gothold of one and evaluated it for the Sturgis 2001 run. Since I come from a custom bike or chopper background, I wasn’t sure the Cyclone would do the job for me. If you ask a guy who rides a custom bike what style of bike he enjoysand why, the answer might be strange. I want something distinctiveand bad. I want it fast and cool. I need it to handle, but be achopper. Perhaps an oxymoron of conditions, yet there’s a mixture offactors that go into any ride and machine. Last year I rode astretched rigid with a 14-over front end. What a machine. For a rigid,it rode like a dream. For a 14-over front end, it handled well and Ipassed everyone I dared to pass, generally because I had the groundclearance to shove it close to the pavement and the raked tripletrees allowed me to turn the front end where I needed to go.
Each year the trek to the Badlands takes on a differentdemeanor, and this will be no different. After a week, I discovered a serious sense of enjoyment about straddling the M-2 Cyclone. It’s light, fast, a nimble handler that stops on a dime. I needed to learn to ride it like a race bike with my toes on the soft rubber pegs to enhance turning radius and ground clearance. There is also a notion that in the sportbike position, you’re forcing too much weight on your wrists. I discovered quickly that if I put my ass down,the weight on my wrists was not a problem. The force is substantial, however, when braking with a passenger on board. Ultimately, after riding two Buells, I decided that this motorcycle deserved a shot at aSturgis trek. It had class, felt sporty, even nasty, and I could makeit rumble. So I stood back and thought, “Can I make it even cooler?”It didn’t take long to discover that I could strip it down evenfurther than stock. I picked the Cyclone over the model with hard bags because of its bare bones feel. The crew here at Bikernet.com developed a five-pronged approach. One, we wanted toenhance the Harley-Davidson marriage with Buell and downplay thelittle-known name Buell for the time being. We also wanted to enhance the Sportstermotor and bring out the looks of the Harley-Davidson power plant, andchop it in a Buell way without altering the geometry of theframe, the front end length or lowering it, which is a tradition withour custom bikes. There’s more. We wanted the bike to sound more likea Harley and we wanted to enhance the performance without disturbingthe long-range reliability.
Our team included myself, Professor NuttBoy, consulting fromPaul Davis of Charlotte, Gene Tomasen Jr. from the Harley-Davidson fleet center, and a number of Bikernet readers who knew about and were testing Buells. This is the first of several techs on the modifications and the experiences we have with the M-2. We collected and ordered parts, then ran to the fleet center to get thejob done. The initial plan was to unleash the natural performance ofthe bike without breaking down the engine. We started by removing thecarburetor.
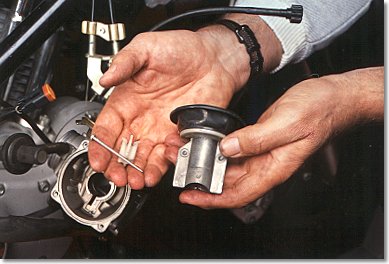
We replaced the needle in the slide with an ’88 Sportsterneedle, and drilled out the carb body above the idle adjustplug.
That allowed us to knock out the plug and back outthe idle adjuster 2.5 turns.
Stock carburetors are adjusted from thefactory to a very lean condition. Usually they are so lean that warmup takes a long time and you get an occasional cough through thecarb.
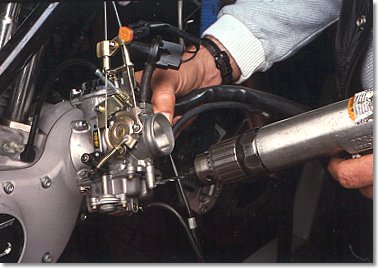
Others have recommended drilling directly through theplug, but Gene warned that if you slip, you will drillinto the adjuster screw and possibly damage it. Gene also recommendedhead work ultimately coupled with a 44 mm CV carb, manifold androller rockers in the future. I had a Screamin’ Eagle air box for a BigTwin, which I modified for the carb with an open K&N filter. We alsodropped the float bowel and replaced the 42 pilot jet with a 48. Becareful not to strip the screws holding the float bowel in place.Treat them with respect or they’ll cause you nightmares.
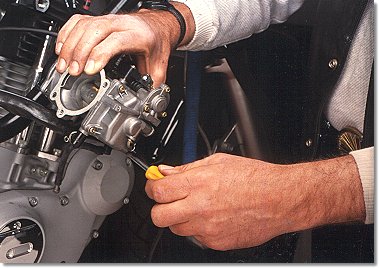
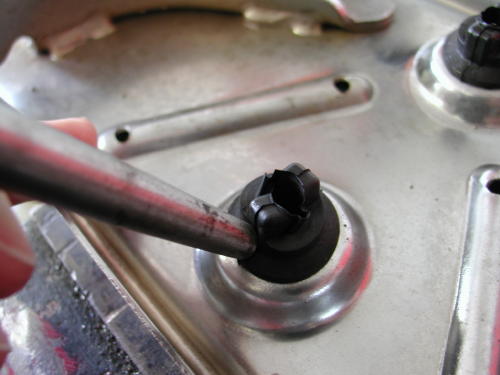
We set the carburetor aside and began to remove the timingcover to replace the cams. It’s important to take a scribe to thetiming plate so that you can duplicate the timing once you havereplaced the cams. Then pull the plate and the rotor cup, which isscrewed into the No. 2 cam. Before you go any further, remove the rockerboxes and the rocker arms to unload the tension on the non-adjustablepushrods. Now you can remove the cam cover, but don’t forget todrain the oil first.
At this point we decided to add a racy feature to theappearance of the bike by shaving the cam cover plate. First removethe oil line. Unplug the timing plate wire, dismantle the connectorand pull it through the plate.
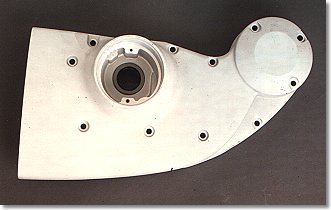
Gene used a Sawzall and a grinder toremove the aluminum underneath the bolt holes.
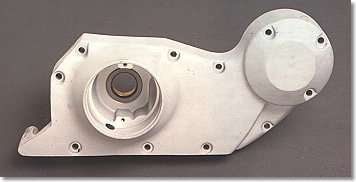
You will note that there is a series of seemingly endless webbing in this area which is for noisereduction.
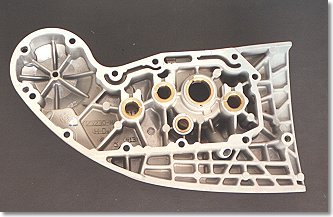
Notice that in the lower left hand corner, there is a dowelpin. Gene chose to leave it in place as a wiring guide and carve thecover around it.
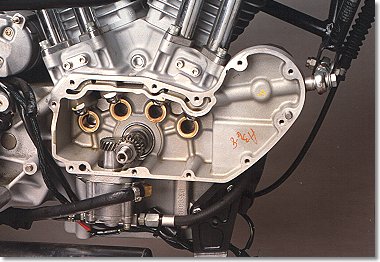
The pushrods are color coded: pink or red forexhaust and brown for intake. The cams are numbered like you readfrom left to right, or back to front, 1 to 4. Make sure you pull theplugs for ease in turning the motor over. Install No. 4 first with redline assembly lube; No. 3 has two index marks. Slip No. 1 in next andNo. 2 last. It has three index marks to line up the cam with the pistonposition and the other cams with an index mark that aligns with aslot on the pinion gear.
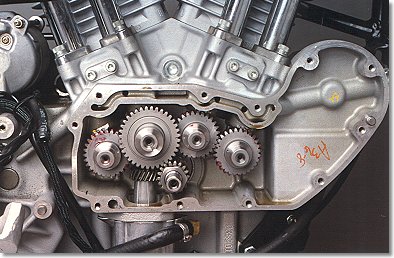
This is where we noticed that the pitch onthe Screamin’ Eagle race cams was different than the new pinionshaft gears. An emergency run to Bartels H-D was in order for partNo. 24055-91, or No. 24061-91. The factory changed to a new pitch in ’99.When replacing the cam cover, keep in mind that there are fourdifferent length Allens holding it in place. Make sure you have theright length in the right hole. The torque setting for the cam coverAllens is 17 foot pounds. After the cover went back on, it was timeto reinstall the rotor cap and the timing plate.

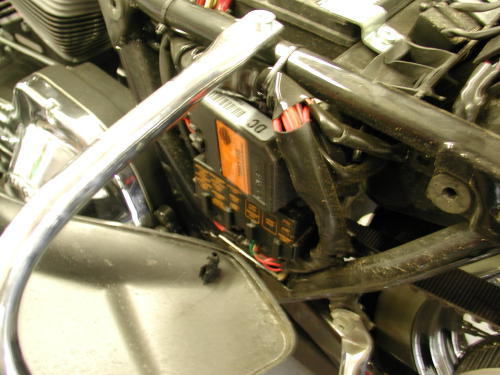
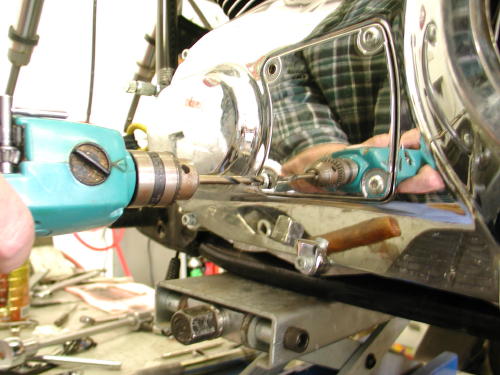
These modifications will help it run better. Buells usually run hot from the factory because of hotter cams and ThunderstromHeads. At this point we re-ran the wiring to the regulator behindthe oil pump for a cleaner appearance. We only had to extend onewire, to the oil pressure switch. Gene Jr. handled it with solder andshrink tubing. Removal of the gastanks is a breeze and access to the heads and top end is easy. But ifyou need to remove the engine, the fact that it is an integral partof the frame and suspension creates unruly problems. The entirechassis must be supported.
At this point we replaced the pushrods from the top of theengine and replaced the stock rockerbox covers with chrome units.Don’t use anything on the self-sealing gaskets except a dab of greasehere and there to hold them in place.
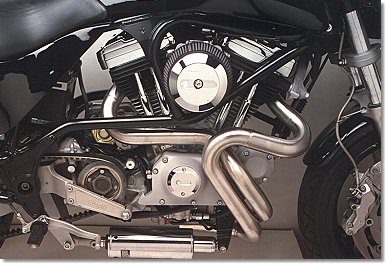
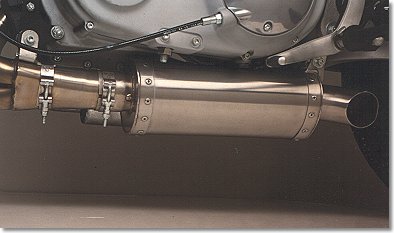
With the engine assembled, we replaced the stock exhaustwith a Buell race header kit and module. While Gene Jr. was out oftown, I spoke to the Buell tech of the demo fleet, Alan Varsi, who hasworked at Bartels Harley-Davidson for more than 11 years. The Buell racemodule retards the timing 5 degrees and eliminates the rev limiter.The stainless steel header is 11 inches longer than stock, which makeseach exhaust runner equal in length. The muffler is an aluminumcanister type that is high flow with low resistance for additionalperformance at the high end.
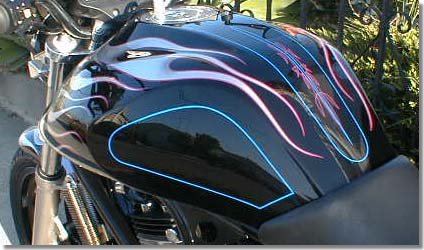
That’s it. Laughlin is right around the corner, along with our firstlong ride on the Harley-Davidson Street Fighter. We’re lookingforward to every desolate mile. We’ll report upon ourreturn. A new paint job is in the wings, along with some cosmetic modsto brighten the look of this bad-ass bike.
Sturgis 2001 Part 2
By Robin Technologies | | General Posts
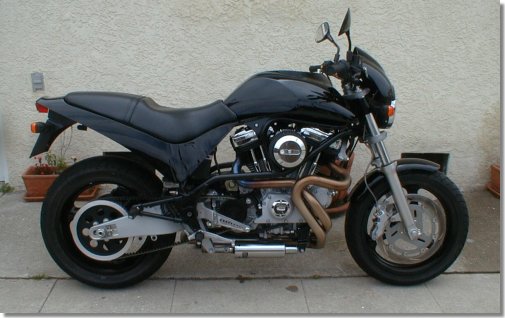
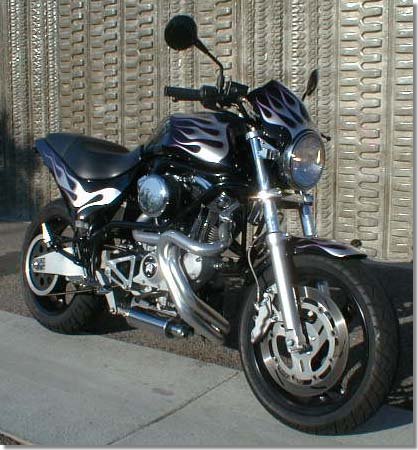
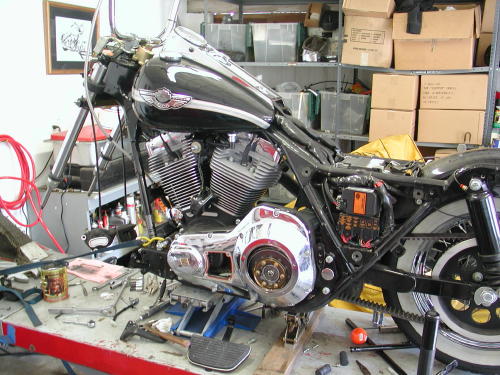
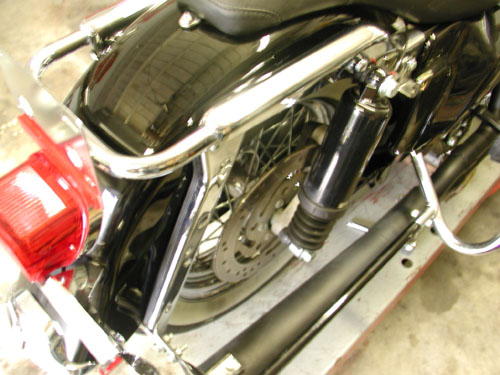
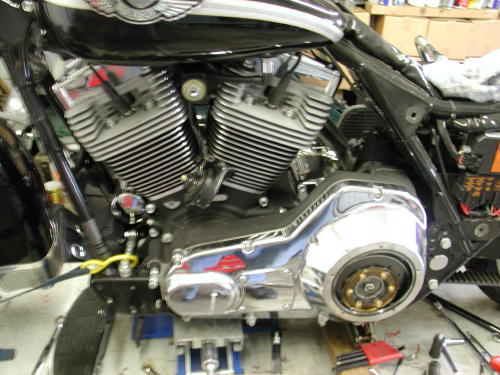
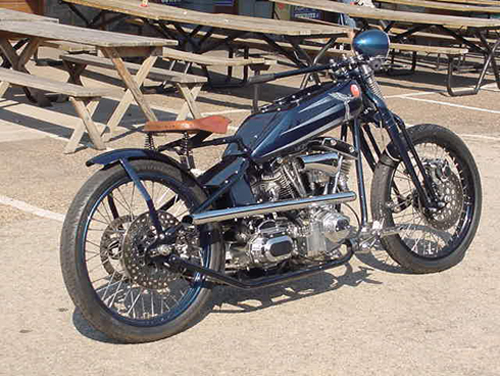
Here’s a couple of shots of the Bikernet Street FightingBuell for Sturgis 2001. This is how it currently stands with ahandfull of minor modifications and a lot of plastic removed. Let meknow what you think.
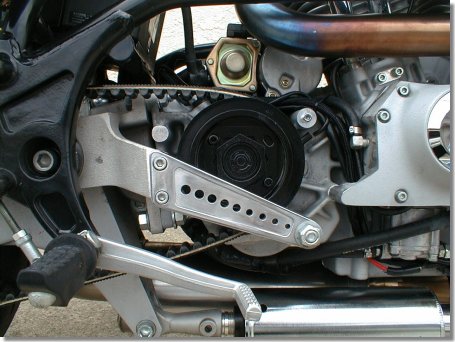
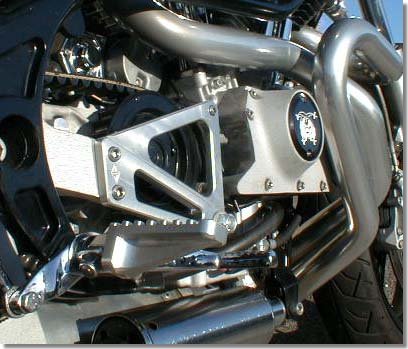
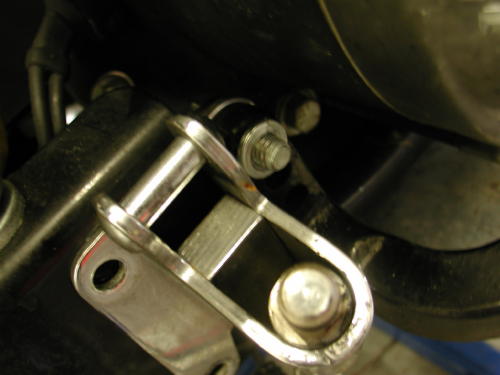
Note the pulley guard. We had the notion to take levers andbraces like this off, lightening-drill polish and replace. Not sureif that’s going to be the bit, now, but this brace was the test. Ithink we’ll powdercoat rather than polish.
Trying to keep polishedaluminum up on a bike that’s well ridden is a pain in the ass. Haveyou seen a polished engine after a ride to Sturgis? We plan to removethe triple trees and swingarm. The tabs for the plastic dust shieldsneed to be removed and then the parts need to be polished to removethe ribs and casting marks before we decide on a finish.
Let us know what you think. I think I should black powercoatthe swingarm and maybe the trees and lower legs. We’re looking for apainter for the sheetmetal, and we’ll be ready to rock.
–Bandit
Sturgis 2001 Buell
By Robin Technologies | | General Posts
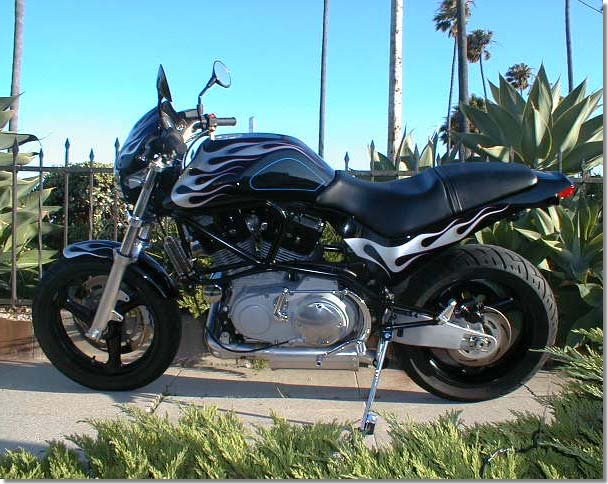
It’s part of our job as moto-journalists to try what’s outthere in the American market and report back. The ultimate test is to take a bike, customize it and ride it to Sturgis. What could give you a truer test of a bike’s ability to look cool and endure a long run? I’ve been fortunate enough to customize and ride everything from nearly bone stock bikes to ground-up customs. Each trip is an adventure. Each run has varying characteristics, and with each journey there’s a new woman, but that’s my problem.
This year we needed to make a choice. I had a Kenny Boyce ProStreet frame that I planned to load a Twin Cam engine into and rideto the Badlands. I also had a 2000 Buell M-2 and I had recentlyinstalled dual Mikuni carb heads on my ’48 Panhead. Since I’m alsoworking on a Pro Street custom for Dr. Ladd Terry, the Bikernetmorale officer, I decided to hold onto my Pro Street project for nextyear. Another doctor, Dr. Hamster, had been working on his 34 VL andwas excited about riding it to Sturgis. We both knew that the antiqueride would be a long shot.
On top of the time/money consideration, I enjoy riding the M-2. It’s the hotrod of Harleys, light, agile, brakes like a madman and hauls ass. The guys at Harley like to refer to Buells as their street fighters. I have to agree. So I decided that I needed to put some miles on it and experience its ability for distance. Like last year when I told folks that I was going to ride a rigid toSturgis, I got the same reaction to the Buell. I rode it toLaughlin with a passenger and soft saddlebags. The bike handled likea dream. At 100 mph, it was more stable than most Big Twins, andacceleration was always at hand. There’s no hesitation from zip to 100 mph, and that’s my riding range.I was advised at one point to put a smaller pulley onthe rear for lower rpms while cruising. Later I found that themodification had its glitches. I found that the bike was glass smoothat 100 and still zippy and that was good enough for me. We began aseries of mild mods with a cam change to the Screamin’ Eagle raceversion and added the stainless race header. My partner to Laughlinhad a blast and was so comfortable she passed on several rest stops.We kept going and ran out of gas in the desert. So you can understandwhy there’s a new woman each year. She’s still out there somewhere.In the final analysis the decision was made to ride the Buellto the Black Hills Rally.
If you’ve read the techs, you know what wedid to this puppy, so I’ll go beyond the build to a few conceptionsabout Buell. First, there is no fairing to speak of, but I actuallyfound the bike extremely comfortable to ride. The little chin fairingkeeps the big blast off your chest and I didn’t need anymore. I mayregret those words as I hit the Colorado monsoons, but so far, sogood. Some guys complained about the sitting position, but I found itcomfortable once I knew how to sit. Like any bike, you need to findthe groove. The brothers talked about leaning on the bars and toomuch weight on the wrists. I found that if I leaned over the bars Iput excessive weight on my grip, but if I sat on my ass, it was nodifferent than other bikes, although under hard braking situationsyou are thrust forward.
Some felt the ride on a Buell would be rough, yet most wereunaware that the bike is basically a rubbermounted Sportster, andincredibly smooth, especially at 80-100 mph.

Others thought I mightlook ridiculous, and I told them I look ridiculous all the timeanyway. What difference would this year make? Others don’t like midcontrols. If you’re not used to them, you may find that you need toadjust, but once you get the hang of them, you’ll find less pressureon your back.
Alright enough perceptions and conceptions, let’s get readyto ride. The Buell has 400 miles on it since we made thecosmetic changes and cured some rocker box leaks.
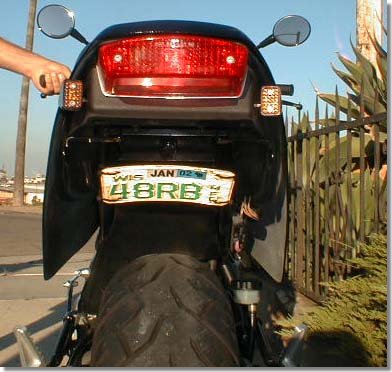
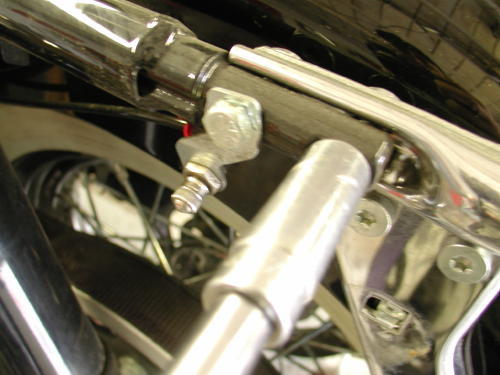
This last week weinstalled Joker Machine billet and anodized turn signals on it and hidthem as much as possible.
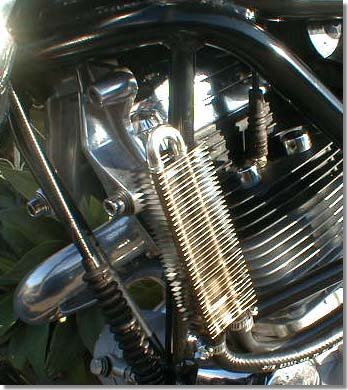
We picked up a small oil cooler from ChromeSpecialties and installed it with longer oil lines at the front ofthe bike. The oil capacity is about 2.5 quarts, which always makes menervous, so we changed oil and plugged in the largest Dyna oil filterwe could find. The filter and cooler combination allowed us to squeakin 3 quarts and take some precarious kinks out of the lines. I alsostopped by Joker Machine and they liked the mods so much they told meto run one of their point covers or die.
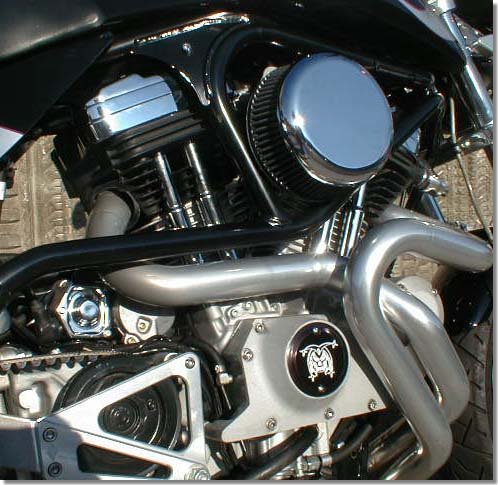
Dewey’s Custom Pegs makes thecleanest air cleaner cover on the market and it fit like a dream.Finally we ordered a chrome hardware kit for the rear pulley. While disassembling the rear wheel, we polished the right wheel spacerand the belt adjuster guides–not bad touches.
So Sturgis 2001 is one week away. If I collect enoughaluminum cans off the beach I’ll have a pile of quarters for spendingmoney. The woman in my life is the best candidate to run Bikernetwhile I’m on the road, and I’m ready.
This is our quest each year,to build a vehicle and make it to the Badlands to talk about it. I’llhave a full report upon my return. Hang on.
BANDIT’S WIRE VISE
By Robin Technologies | | General Posts

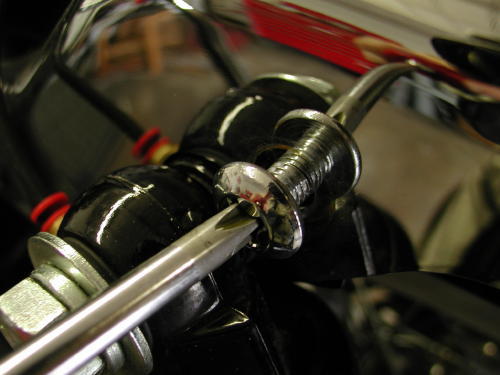
A while back, I spent a week one day in the garageof Bikernet headquarters with Bandit. Bandit was hot to putapehangers on his shiny new Road King Classic.
Once I arrived and cooled down his “high-bar desire”, I suggestedputting all the handlebar switch wires inside the bars where theywould be safe from his undue attentions in the future. After a quickassurance on my part that I wouldn’t feel a thing, he okayed the idea.

With the bars off of the bike and the switch wires laid out on thebench, he started whining about “all those wires”. It was at thistime I whipped out the handy dandy “wire vise” and showed him how touse it (it only took three times) to solder the wire extensions inplace. While Bandit amused himself with this new toy, he asked whereI found it. I explained to him (slowly) that the first time I saw onein use was at the old West Coast Choppers shop in Paramount, CA. Oneof the mechanics “Koon” was using the wire vise on one of the shopbikes, when I asked where he found it he replied, “some old guyshowed me one.” I asked to see it up-close and personal and tracedthe wire vise on the palm of my hand so I could make one once I gothome.

After Bandit was done with his soldering chores on the switchwiring, I retrieved the wire vise from the bench only to be stoppedat the door. The only escape was to promise Bandit a wire vise of hisown. So, the only way to one-up the doorman, was to showeverybody just how easy a wire vise is to make.

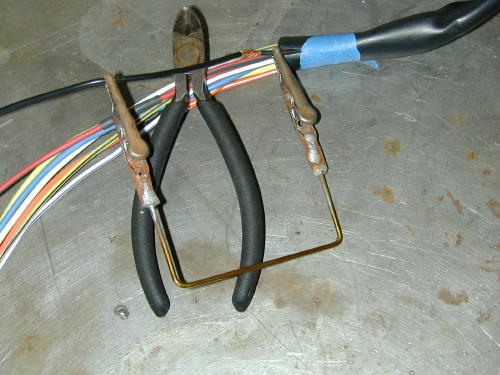
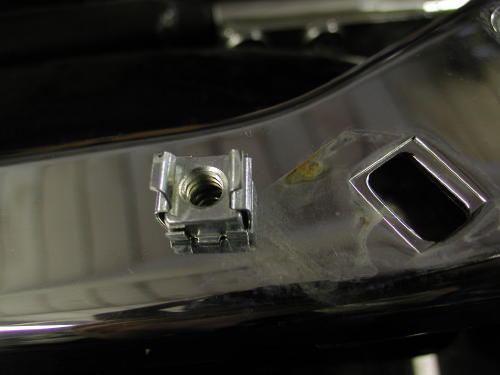
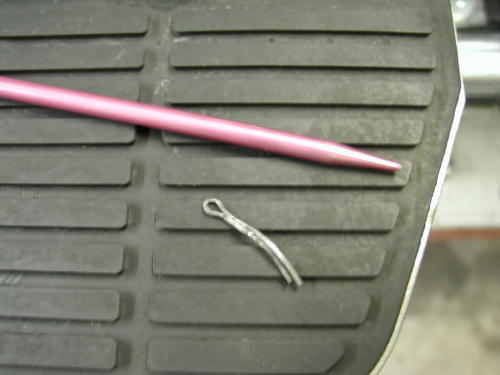
All you need is a short length of wire (a piece of welding rodor even a coat hanger) and a couple of alligator clamps. Here is mywire vise and the components for Bandit’s.

I’ve added a six-inch scale to give you and idea of the overalldimensions. The vise is two and a half inches wide and each arm is aninch and a half long.

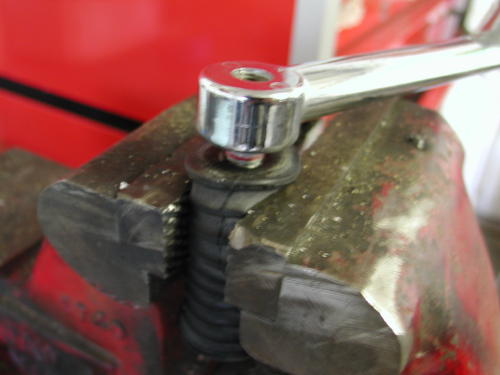
After marking where each bend is, the wire is lightly clampedin the bench vise and bent ninety degrees.

You can see the first arm is bent so it is the correct lengthwhen compared to the original.

Pay attention to the orientation of the first arm when bendingthe second arm, make the second bend so the arms are parallel to eachother.

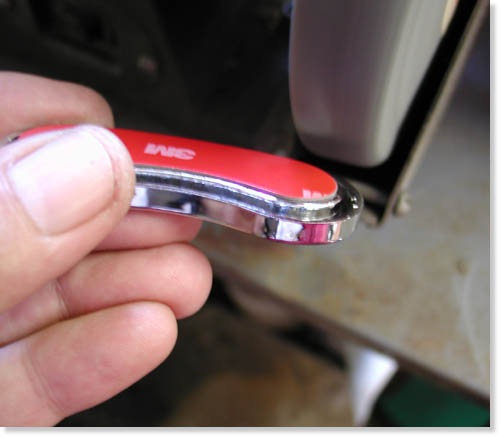
Using the scale to align the ends of the arms, Craftsman sidecutters snip the wire to the correct, equal length.

The wire is bent with the arms parallel and the ends of thearms, where the alligator clips will be soldered, have been cleanedup with Emory paper to insure a solid soldered joint.

Rolled up Emory paper was used to clean the inside of thealligator clip as well.

After the Emory paper treatment each end of the wire and bothalligator clips were cleaned with Super Cleaner from PJ1 to removeany Emory residue.

A good solder joint means using a liberal amount of solderingpaste, here the alligator clip is dipped a few times right into thepaste.

The wire receives the same treatment in the soldering paste.

Now the clips are slipped over the arms of the wire and lightlycrimped in place. The thin wire clamped in the alligator clip jawshelps keep the clips in alignment during the soldering process.

Using a soldering iron held against the alligator clip, feedthe solder into the joint until you see it flow out the other end.Note: it takes a minute or two for the clip and the wire to becomehot enough for the solder to melt and fill the inside of the clip. AnAllen bolt is used to elevate the wire off of the bench top. With theclip sitting on the bench top, it would absorb some of the heat fromthe soldering iron and take longer to solder the joint.

Solder both joints, allow to cool down and your done. Theactual size of the wire vise is unimportant, we found that this sizeworks well in all areas, especially inside the headlight housing ofdressers like the Road King.
I hope this makes Bandit happy for a change. The sonuvabitch wouldhardly let me outta here to go to Daytona. I had to promisethousands of flicks for Bikernet coverages. Hang on for the shots.
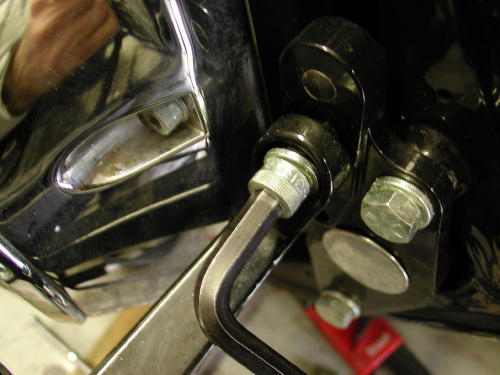
Below is a shot of the Wire Vise in use.
Road King 1/7/04
By Robin Technologies | | General Posts

I had a bad feeling about this mod. First, I don’t like to pack anyone, any time. If you want a ride on my Panhead, carry a hand-towel and a bungie cord. I avoid giving a girl a ride home from the bar, even a babe with gigantic hooters. I would preferred to follow her home. I’m not the kind of rider to take a woman on a long run. I would rather have a variety of women in various towns and cities. Okay, I’m a bastard.
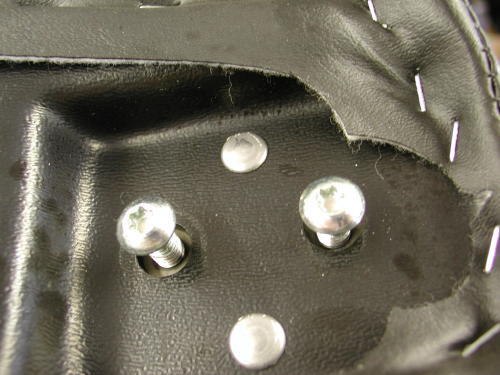
Okay, so the pressure’s on. Sin Wu want’s to ride once in a while, and I want to get laid daily. Gotta give up something. I kept the stock Road King classic seat for additional passenger comfort. It’s covered with dust, in the corner, but that quick change aspect is covered. I ordered the custom billet tab for the rear of the stock seat, and had it powder coated black, so both seats were ride-ready. When you purchase a new saddle, it doesn’t always come with the rear tab. The base is plastic and screwing fasteners in and out will wear out the threads.
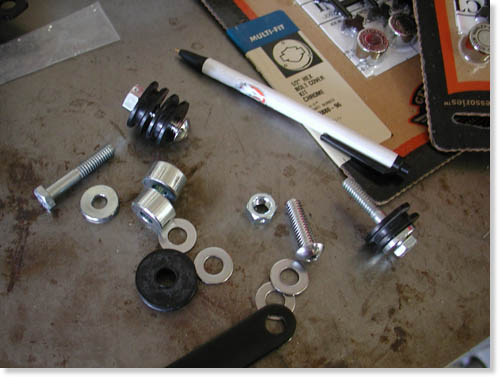
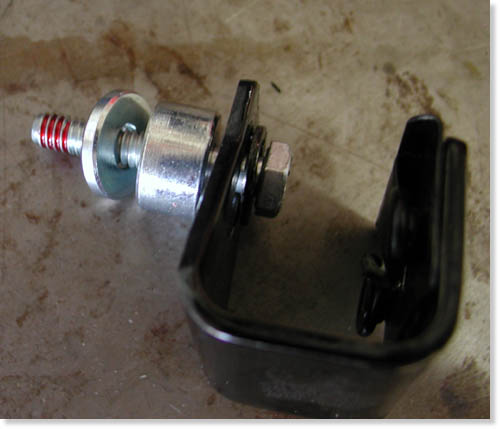
Here’s a handful of the fasteners and bag bracket spacers.
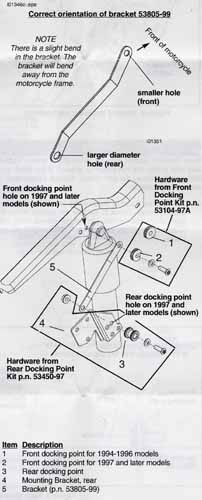
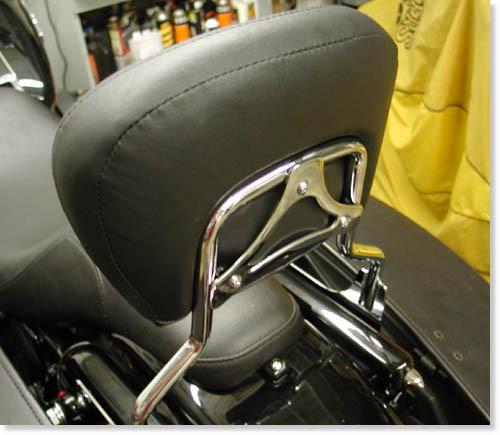
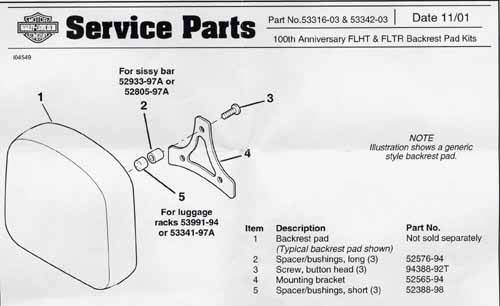
I ordered the front and rear detachable docking hardware kits, but be careful. I leaned toward the new lower backrest/sissybar for styling, which wasn’t in stock, but the pad was. I bought it, then the backrest was back-ordered so we bought the taller sissybar for immediate gratification, but when we got home the pad didn’t fit and we were forced to buy the tall pad. Watch out for this dilemma when ordering. Make sure to check all the installation instructions to make sure you have the correct puzzle pieces. There are several back rest options so watch that aspect when ordering.
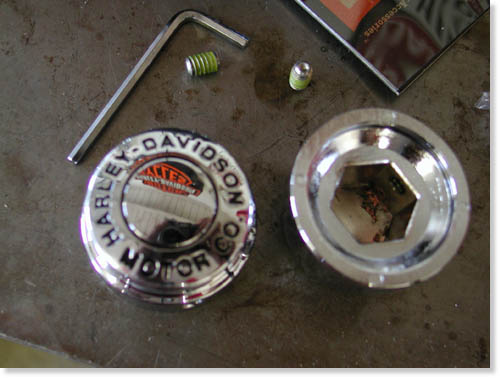
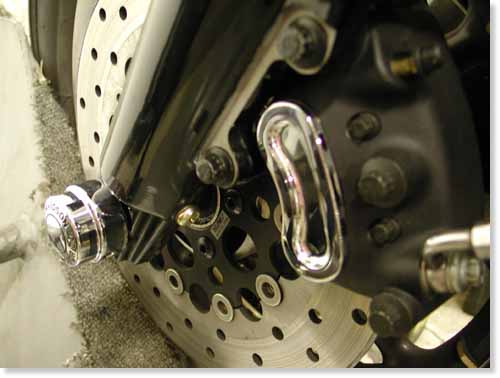
Here’s the massive chromed Classic H-D axle dress hardware.
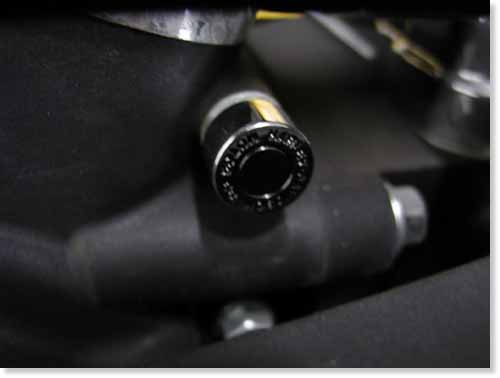
This is simple installation. Slip on the plastic wedge and the cap grips over it. Push them into place–done deal.
We also ordered some classic hex bolt covers and stainless Allen caps to begin an engine detailing process. We purchased chrome caps to detail the front brake calipers and classic chromed front axle covers. We didn’t use the plastic chrome caps ultimately but brush painted the raised edge of the calipers black. I’ll tell you why in a bit.
This was supposed to be one of the easiest mods we undertook, but we learned quickly, that wasn’t the case.
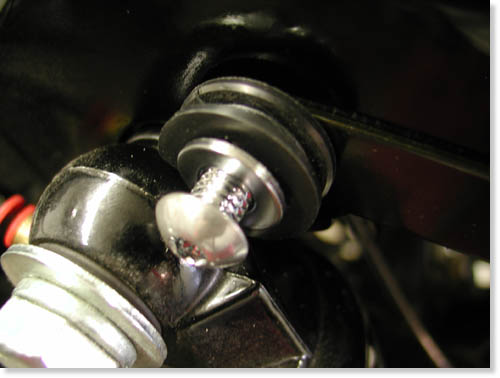
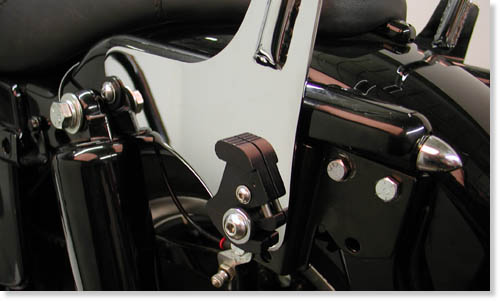
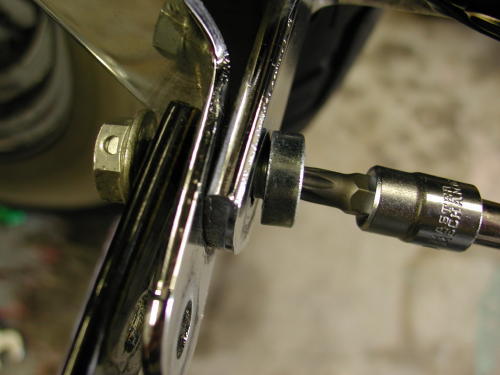
This is the front docking port in place, but not tightened.
When we black powdered a ton of components previously, we assembled the bike securely with Loctite and care. That was our undoing. The Phillips-head beside the shock needed to be replaced with the front docking hardware. Take one bolt out and replace it–no problem, right? The Phillips screws wouldn’t budge and we proceeded to strip the heads. First, I wished I had an impact driver.
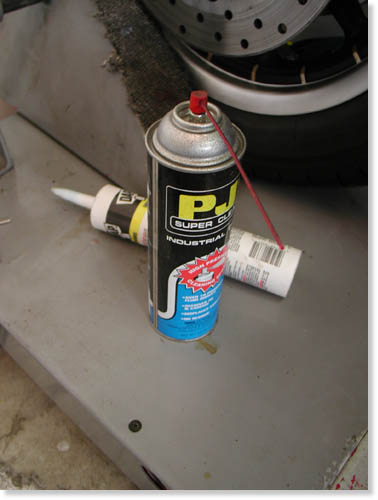
I discovered an aerosol spray by Chemsearch called Yield in the auto parts store that loosens rusted bolts instantly. It worked like a charm, with a little patience the bolts came lose. An American Rider reader complained that this product isn’t available in retail stores. That’s true. My longshoreman connection hooked me up. You may need to find a factory worker or mechanic who has a connection.
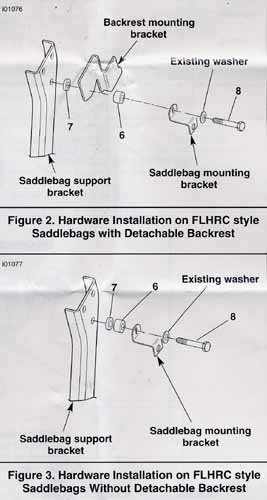
After reading the Low Detachable Backrest kit info that came with the taller kit, the Backrest Docking Hardware kit directions, the Front Docking Point kit instructions and the 100th Anniversary FLHT and FLHR Backrest Pad kit directions, I guzzled my first Corona.
I opened the next Corona. The operation would have been simple if the directions were. I read them over and over. There were too many variations between years and configurations to sort through. The Front Docking port directions confused me with illustrations involving rear bag support spacers designed to bounce out the saddlebags and clear the release button on the backrest.
This was a matter of trial and error.
If you’ve built choppers as long as I have, there’s always a way to make anything work, so ignoring the confusion, we spanked our asses in gear. I ignored the spacers, installed the front docking rubber that was designed specifically for the King with a notch for the shock.
There’s a bracket that runs from the front docking station to the rear, but first the rear docking port bracket needed to be installed. On some models equipped with air shocks the shock filler bracket must be removed. The directions said I didn’t need to remove it on the 2003, bullshit. It was directly in the path of the docking bracket, so off it came.
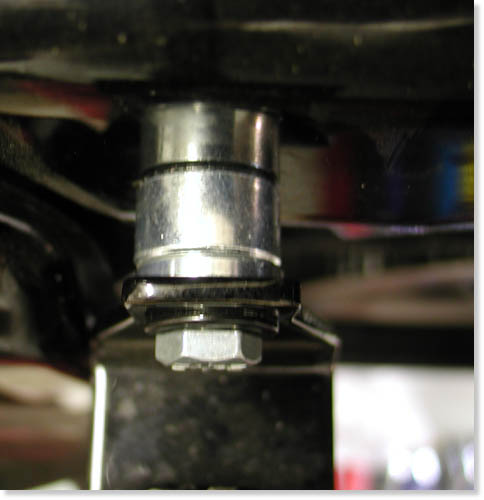
This shot shows the bracket in place, with the shock air port moved. Note the single empty hole in the bottom of the bracket. That’s where the rear bag mount bolts into place. The trick of the night.
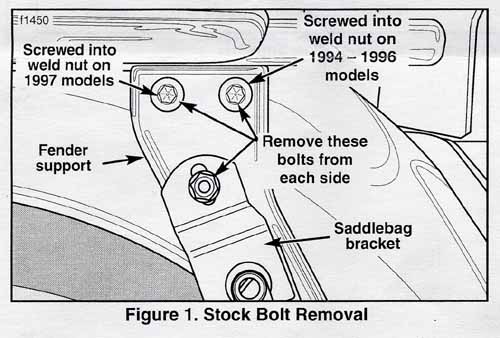
Three lousy bolts had to be removed, the rear bag bracket 1/4-20 fastener and the two 5/16s fender support bolts. First the 1/4-20 spun the thin, tin clamp that holds the nut in place. Then the 5/16, once removed, could hardly be replaced. Nothing aligned properly. My lovely assistant had to squat and lift the tip of the fender, and in one case we were forced to remove the lower bag rail to align the top bolts.
This still doesn’t totally jive. Actually washers had to be fed behind the top Backrest mounting bracket also.
“Can I let go of the fender, now?” Sin Wu asked grunting. The top docking port bolts are packaged in two sizes, 1 inch and 3/4 inch. The directions warn that if the rear inch-bolt comes too close to the fender, replace it with the 3/4. We replaced both and used the 1-inch jobs in the front holes on both sides.
Without the rear fender rack detachable bracket, another option, two washers were thrust under the rear docking port bracket to make up for the thickness of the rack bracket.
Part of the confusion was the numerous detachable elements available for various models. There’s also the two-up detachable rack front docking kit that surfaced from time to time.
That’s all there was to it. We bolted all the elements in place and tested the back rest and bags. Sure enough the King Classic bag lid smacked into the backrest latch when opening. We ultimately spaced the rear back bracket out only about an 1/8 of an inch and we were good to go.
We tried it with the spacers, without, then with smaller spacers that worked perfectly.
Sin fed me chips and salsa and dabbed my sweating forehead with a bandanna, while I slipped the saddlebag bracket, 1/4-20 nut, into place using a long magnet. It worked on the right side. On the left we unbolted the entire fender support, replace the nut, adjusted the thin, tin tabs, and bolted the sucker all back together, only to have the nut fall out again. In this case we squeezed a slim square 1/4-20 nut behind the docking bracket and bolted the back bag bracket on with a spacer. It worked like a charm.
“Can we ride?” Sin cooed. I told her to gear up. We were just about ready to roll.
I used electrical contact cleaner to loosen the tin insignia plate, but discovered that wasn’t the intended plan. Leave it be, goddamnit.
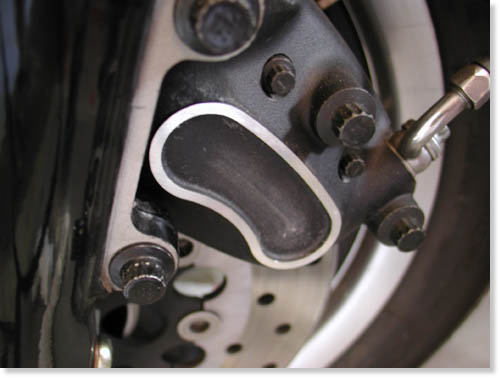
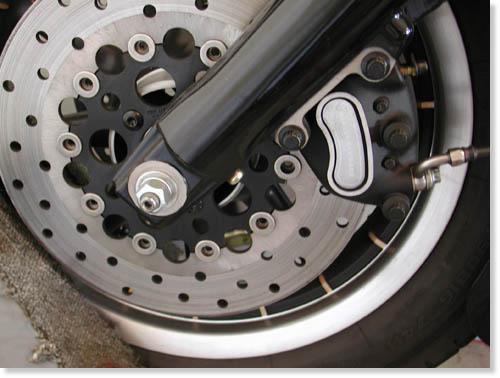
Here’s the totally clean caliper. Big mistake.
I ground the lip unevenly, but it then fit into the recessed slot on the caliper.
After grinding, all was well. Sorta.
The air in the garage eased as I warmed to her company. For an easy half-hour we played with the details of the bike by installing nut caps and front axle caps which I snugged down against a coating of silicon to prevent vibration.
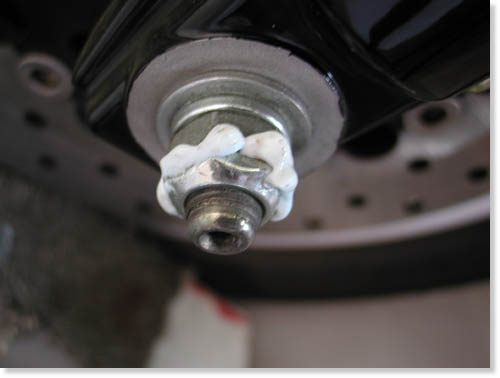
Some silicone on the axle nut will prevent vibration that may loosen the cap.
I discovered that the front chrome caliper caps stuck directly against the existing tin insignia. I took one off and cleaned the area thoroughly with electrical cleaner then the self-sticking surface didn’t reach the base.
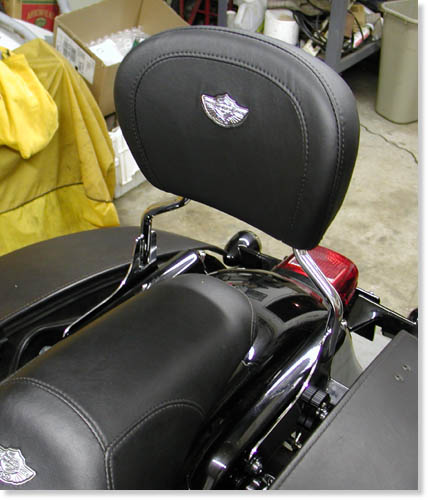
Here’s the 100th Anniversary backrest that will not fit on the short back rest bracket. We sent the short unit to Custom Powder Coating, in Dallas, for a coating of black.
Note that there are various pads and various fasteners and spacers for different applications. Don’t try using common sense.
I ended up with 1/2 pint can of Rust-oleum paint and a small brush for touch-up details. I sent Sin Wu in the house to prepare for the ride. That meant striping out of her threads and waiting for me in bed. It’s the code. We must workout before we ride.
–Bandit
Editor’s note: I’m sniveling through this, but I’m sure with some experience this would have been a breeze. I suppose that’s what dealerships are for.
Road King 4/15/09
By Robin Technologies | | General Posts
We decided to take a run at an electrical article, since about 90 percent of problems and breakdowns come from the electrical component. Besides, it’s riding season and we all need to check our electrical connections before we ride off into the sunset. This is especially true of bikes stored in moist or seaside climates. Besides, I’m riding the King to Laughlin and need to check it out. It’s been awhile. Here’s the lastest upgrade to the king: King Meets Zippers and D&D
This article will cover some basic electrical checks, since being forced to charge your battery indicates deficiencies in your charging, or wiring system–or you left the goddamn lights on.
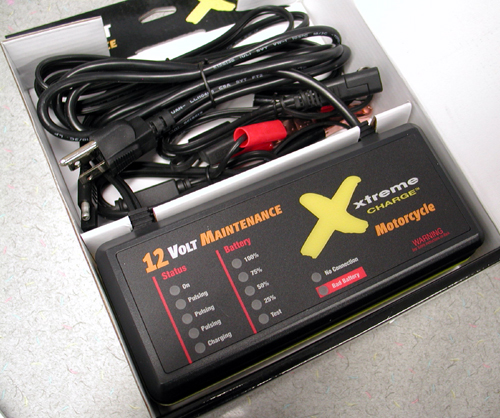
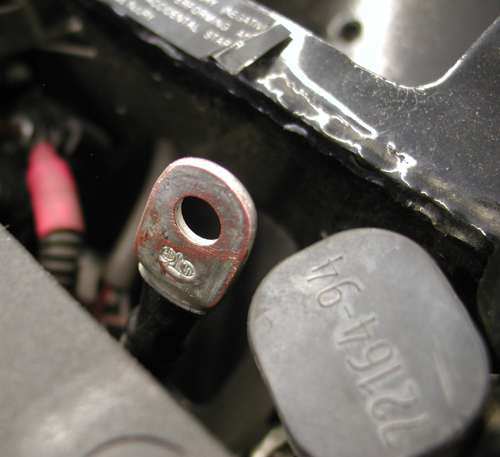
This rambling will also cover all the aspects of the latest battery charger from Biker’s Choice, the Xtreme 12-Volt battery maintenance charger. If you find it necessary to charge your battery, take it out of the bike and place in on a wood or fabric surface, not steel or concrete (draws battery charge). Make sure the terminals are clean. A loose or corroded terminal will prevent the battery from accepting a charge. No shit, just that will leave you along side the road.
Corrosion, or bad grounds cause most electrical problems, especially in dense humidity climates. Check your grounds annually; clean the connectors and the ground surface.
Batteries are nasty dangerous bastards. Make sure to protect yourself around them. Don’t mess with a battery near flame, extreme heat or next to your custom painted Ferrari. If the bastard explodes, you could lose your eyesight and that $5,000 paint job. And that acid crap is super nasty. Don’t get it on anything. There is a cure. Mix some baking soda and water and have it standing by to clean anything with battery acid splashed on it. This is no jive. If you get battery acid on anything, it’s toast. Believe me. I have a number of holy shirts from acid meetings.
Wear eye protection and don’t fuckin’ smoke around batteries. Fortunately, for incased batteries, we don’t have to mess with acid as much anymore, but I’m still building choppers and using bullshit little batteries with acid requirements. Whatta mess. Make sure the area used for charging is clean and well ventilated. Okay, enough for the safety procedures. The Xtreme Charger comes with complete safety warnings.
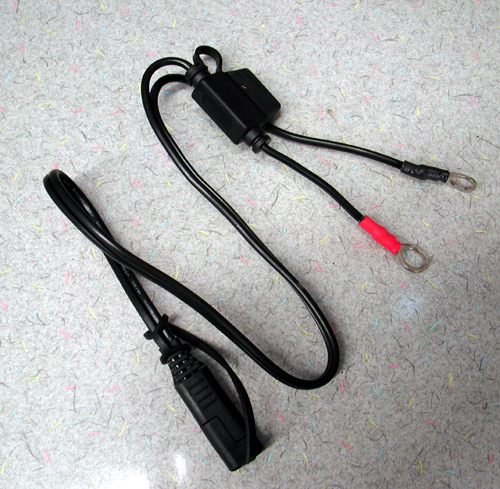
For years I liked Battery Tenders, because they monitored the charging process and dropped the charge level automatically, when the battery was completely charges. If the charge level dropped, the automatically kick into gear again. This Xtreme charge handles those tasks and more to keep your battery strong and charged. Below is the full description of the Xtreme capabilities. The kits also come with a lead set you can bolt directly to the battery for easy access at anytime. Check this out, then we’ll give you some testing, trouble shooting electrical tips:
The Xtreme Charge is ideally suited for AGM and Maintenance-Free Batteries. The combination of PulseTech’s patented pulse technology and proprietary charging algorithm allows it to charge these high-performance batteries more fully while maintaining a safe charge profile for traditional batteries.
The Xtreme Charge Battery Maintenance charger comes in variety of colors, which may suite a particular need. If your looking for the best battery maintenance charger for use on any 12v battery rated from under 10Ah to over 150Ah, pick your color, and get one today.Includes fuse-protected quick-disconnect battery clamps and lugs, Important Safety Instructions and Quick-Start Guide. The Xtreme Charge is fuse-protected, spark-proof, and is UL and CE certified.
Comes with a Five-Year Warranty
Xtreme Charge Maintenance and Charging
The Xtreme Charge is a microprocessor controlled maintenance and bulk charger for any type of 12-V lead-acid battery. It features PulseTech’s intelligent circuitry, which imposes only the correct amount of charge rate as determined by the continual evaluation of the battery’s condition. By using only the appropriate amount of charge rate, the battery is maintained safely at its proper operating voltage indefinitely. Conversely, if the charger is connected to a discharged battery, its bulk charge capability (2.5A actual/5A effective) will re-charge the battery rapidly and safely so it can be put back into service quickly. Charge rates may be as minimal as 0.2A during typical float up to the full 2.5A for more deeply discharged batteries. This variable float charge ensures optimal charge rate is applied to the battery at all times.
PulseTech’s unique and patented PULSE technology increases the duty and life cycles of your battery by minimizing the size of the lead sulfate crystals. This allows a battery to accept as much charge as possible. PULSE technology helps ensure that your new batteries will stay in like-new condition while improving older batteries dramatically. Duty cycles are typically extended from three to five times for all types of lead-acid batteries!
PulseTech’s ReNew-It Pulse Technology
Twelve years ago, PulseTech applied its technology to a full line of innovative and unique products designed to make batteries stronger so they will work harder and last longer than ever before.
To get an idea of exactly how important PulseTech’s technology is to the performance of all your powersport toys, consider this: The main cause of vehicle failure is battery failure. The main cause of battery failure is sulfation buildup on the battery plates. And ReNew-IT Pulse Technology prevents sulfation buildup.
When it comes to a dead battery, chances are it is still good. You just can’t reach the energy due to sulfate buildup. That means you have to buy another battery even though the one you have may still be useable. Xtreme Charge helps prevent this problem.
How Renew-IT Pulse Technology Makes Batteries Stronger
PulseTech’s Xtreme Charge connects directly to the battery. The Xtreme Charge emits a pulsating DC current that removes the sulfate deposits from the plates and returns them to the battery acid as active electrolyte.
Here is how it works:
1. Lead-Acid batteries work by releasing energy through an interaction that occurs between the positive and negative lead plates and the lead sulfates in the electrolyte.
2, Sulfation buildup occurs as lead sulfates form on the battery plates during the normal charge/discharge cycles. During this process, some of the sulfates enlarge to the point where they won’t accept energy so they stay on the plate. Over time these sulfates can build up until efficiency is reduced and finally the battery dies.
3. ReNew-IT Pulse Technology works to prevent sulfation buildup by removing the sulfate deposits from the plates through a unique Ion Transfer process.
4. The lead sulfates then return to the battery acid as active electrolyte. When connected on a regular basis, our battery maintenance systems will also keep the sulfates from building up again.
Get True Battery Power
PulseTech’s technology works with all types of lead-acid batteries including sealed, gel cell & AGM. By keeping the plates “clean”, batteries charge faster and deeper so they work harder and last longer than you ever thought possible. They also have greater charge acceptance so your battery will recharge faster and release all of its stored energy. With more available energy so your vehicles last longer between recharges and your electronic accessories work better. You get the true power of your batteries.
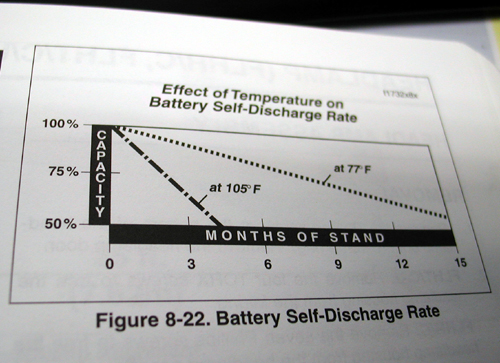
Some of our patented products also prevent the normal loss of battery power on stored vehicles and equipment no matter how long they sit unused—even months at a time.
They even help protect the environment. Since batteries last longer, it reduces the danger of contamination caused by lead and sulfuric acid dumped from prematurely discarded batteries.
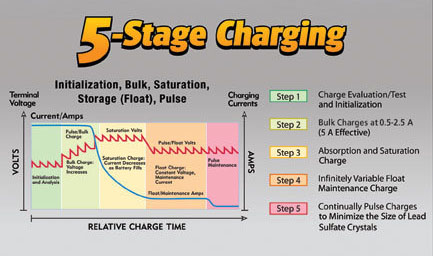
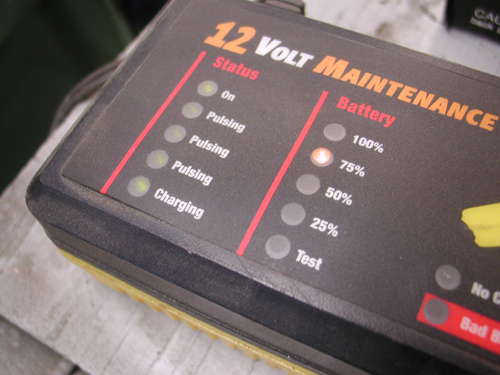
Xtreme Charge 5 Stages of Charging
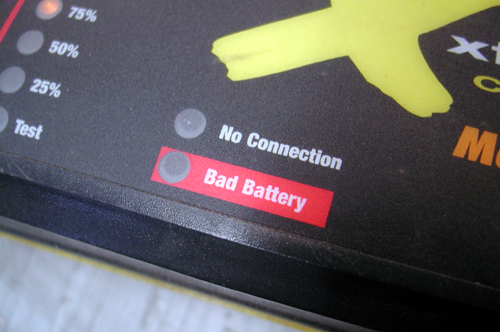
1. Initialization: Xtreme Charge’s unique test feature evaluates the battery thoroughly during initial connection to determine the appropriate charge rate based on its size and condition. It tests the battery continually for as long as it its connected to the charger to maintain the optimal bulk or float charge rate. This test step incorporates a “Bad Battery” indication if it determines the battery is faulty and can not be charged.
2. Saturation: A proprietary computer-integrated technology measures both the voltage and current to determine the appropriate amount of charge the battery is able to accept at any given time. As the pulse and saturation charges improve the battery’s condition, the charge rate is increased safely to an optimal level. This proprietary algorithm protects the battery from the risk of damage due to overcharging.
3. Storage(Float)
4. Pulse(De-Sulfation)
Testing Tips
I reached into a couple of Harley manuals and to Pablo, our Bikernet Harley factory trained technician for additional info. If you suspect a problem with your charging, you’re experiencing sparking when you hit the starter, or the battery needs to be charges, here’s some tips.
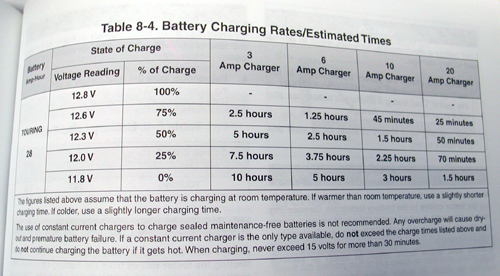
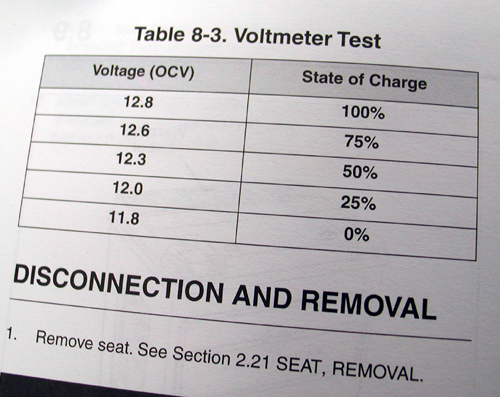
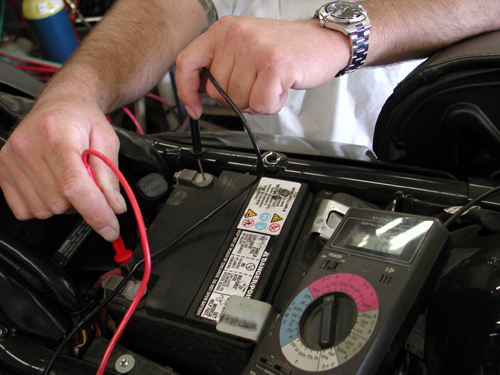
First, check all your grounds and battery posts for connection and cleanliness. Then take a voltmeter and run it across the batter whiled the bike is idling. It should indicate 12 volts (see chart). Now run the throttle up to about 2,500-3,000 rpms. The indication should jump above 14.1 volts, indicating that the charging system is working.
Before you toss the regulator and replace it, you need to check the connections with the alternator. Make sure you haven’t lost a ground or run over a speed bump and ripped through a wire running along the bottom of your frame, which is against the code of the west. Don’t run wires under frame rails. Keep them up and out of harms way.
To check the alternator, here are a couple of tips. Pablo suggests that you take an old regulator plug, with the wires and create a testing lead. If you check the resistance to ground on each lead, they should be open. “But if you take the derby off your primary and run into that burnt electrical smell,” Pablo said, “the alternator is toast.” There’s also an AC test. Start the bike and run it up to 3000 rpms. Attach your alligator clips to your alternator leads and it should read over 40 volts or 16-20 volts per 1000 rpms.
“With the newer models, we have seen some issues with the bikes having batteries going dead after a couple of days,” Pablo said. “A milliamp draw test and total current draw test is the first things you check in the H-D flow charts. Corrosion on the system relay on some models can cause this.”

“The service manual, including the electrical diagnostic manual are a must on the new models. You basically have to be a Circuit Head to work on these things nowadays. The H-D Digital Tech we use at the dealership also helps with the serious hard to find electrical gremlins.”
“Fuck, I’m just a old Seabee resistant to change. Man invented technology to frustrate himself you know. Just look at what we have done to a motorcycle over the years. Seriously though, one can, with a cheap DVM (Digital Volt Meter) do allot of trouble shooting on the H-D charging system. Like checking the stator for AC volts output. A grounded stator, continuity checks, etc.”
One more addition from Pablo: DC Voltage output at the battery with the bike running is also a quick check. The system should be putting out over 14 volts but not more than 15 volts at 3000 RPM. Usually, you will see like 14.1 to 14.4 volts or so, that is if the regulator is good and shunting excess voltage to ground.
So, with the Xtreme Charger and a volt meter, you can check your battery, the charging system, the alternator and check for bad grounds and busted wires. That’s all you’re gonna get from the Bikernet tech staff today. Let’s go to the Cantina for a beer.
Road King 4/18/03
By Robin Technologies | | General Posts

The King stripped for powder coating.
The plan was to strip the bike of all the brackets, tabs and accessories we could get our hands on and have them black powder coated by Custom Powder Coating in Dallas a Bikernet Sponsor.
We ordered additional accessories to enhance the clean black effect. First we ordered the Harley-Davidson black mag wheels and floating rotors with black centers. We pondered the front fender and trying to black out all the trim. During research we discovered, in the Winter P&A catalog, brackets to allow a Fatboy fender to be bolted in the King front end. The Fatboy fender is a cleaner unit, but it still has rivets and ribs. We opted for a solid black Street Stalker fender that’s clean as a whistle and light as a feather.
We also decided to switch the rear turnsignals out for the new Screamin’ Eagle teardrops and the narrower light bar. When they arrived we had to tear the lights down. We cut the two plug wires in a staggered fashion. The light bulb was then removed and we used a coat hanger tool to hook the plastic base and pull it out of the shell. Lastly we ordered the Harley-Davidson fender, license plate mount.
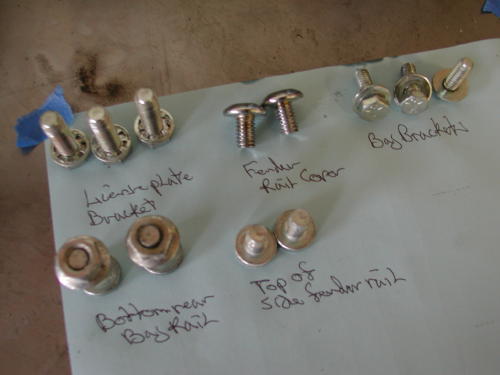
The first thing we did was to clear off our bench and tape down a couple of large sheets of paper. We organized every nut and bolt, screw and spring.
I ordered the billet seat tab from the catalog in the Multi-fit area. When I ordered a slim seat it didn’t come with a tab so I had to move the tab each time I switched seats. I powder coated both for more simple assembly in the future.
Nuttboy and I started the process removing the bags. I began the process of removing all the bag brackets and roll bars. Each time we removed a fastener we set it on the sheet of paper and wrote a description.

We had to pop the plastic side panel loose and take the seat off to get at the roll bar fasteners.

This shows one of the bag bracket fasteners that are inserted into the bag rails. I thought about pulling them for fear that the heat from the powder coating process would weaken the spring tension. We tested the theory by leaving some in place. We didn’t have a problem, either way.
On the left side I had to remove the passenger footboard to take the derby cover off. With each note on the sheet of paper we listed the number of fasteners for each application. The more information the better. I had to remove the seat and the King side panels to take the bag roll bars off. Many of these items were held on with Torx bolts. It’s a good notion to buy a set.
This footboard had to go to reach the derby fastener.
I started to remove the shift levers and discovered that I had to remove the footboard to reach the inspection cover Torx fasteners. I wasn’t sure if the footboards would have black in their future. At first I reviewed the area of the black board that would show, just the rim. Then we turned the board over and studied the way the rubber suspended pads were installed. We discovered that the pads are removed easily with a punch to the edges of the bottom protruding rubber lips. The boards went into the box for powder.
This was a simple process to tapping the edges of the rubber with a large tap and rubber hammer. We tried driving them out with the tap first, through the center. That didn’t work.
The mechanic’s law calls for one screw or fastener to seize every time. We had to drill out one of the inspection cover screws.
I tried to take off the kickstand the old fashioned way by removing the tooth then pivoting the arm forward. The spring wouldn’t come loose. I had to remove all the fasteners.
Metric fasteners haunted me from time to time, including the red Loctite touched horn fasteners which were #10 metric sockets. The Showa front end was covered with metric 12 point fasteners. It forced us to hit a commercial tool shop for 12-point metric sockets.
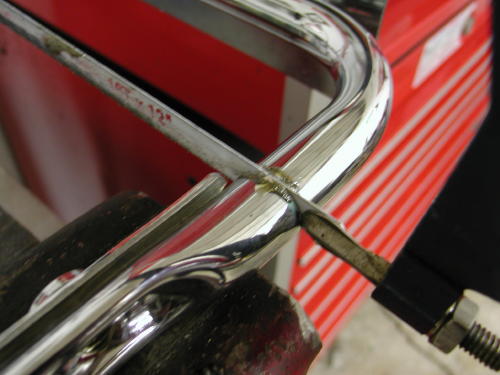
As the last of the fender rail parts came off we marked the loop that carried the license plate. We planned to replace the license plate holder with a fender-mounted job that attached below the taillight. We cut off the existing license plate loop, then I brazed washers and nuts so we could screw small orange reflectors in place.
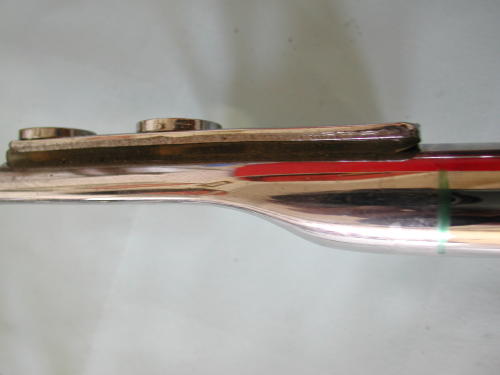
We marked the old license plate rail with a felt pen so the cut would fall just under the fender rail cover.

We didn’t use these reflectors. We were looking for Harley orange reflectors with steel backs.
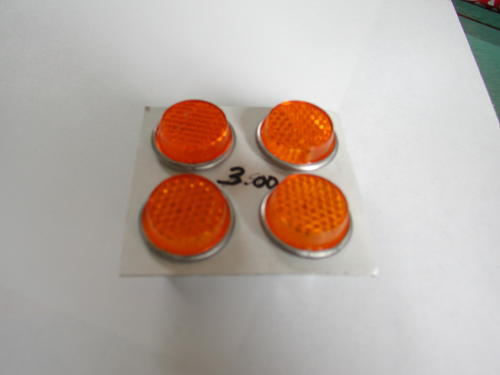
After a swapmeet run we had the right stuff for the job.

Sin Wu wandered into the garage just as I turned off the torch. She shuts down productive activity wherever she goes. She had a couple of alloy knitting needles that she offered us. I discovered in short order that the long alloy knitting needle worked perfectly for removing the hard-to-reach cotter key behind the brake pedal.
I had the toughest time retracting the clevis pin from of the pedal that hinged on the master cylinder piston. Finally it was removed with a punch from under the frame. The brake pedal caused me so much pain it didn’t make it into the powdercoating box. We painted it with a rattle can after prepping.

Continued On Page 2
1928 Shovelhead Project Part V
By Robin Technologies | | General Posts


The pressure is on. Lena Fairless, a 15-year-old bubbly Texas beauty, is after Bandit. This hell bent young woman plans to become his sixth wife. To lure the big bastard from the coast, Easyriders of Dallas has been working hard on his Shovelhead under Lena’s strict direction.
Even this article was investigated while the shop fabricator was sick in bed awaiting surgery. Lena’s wrath reached him bed side. “Keep the project moving,” she screamed into the phone, “we’ve sent out the wedding invitations.” We couldn’t find Bandit for comment.
At this point the motorcycle is almost ready for paint, powder and chrome. According to Jim, who coughed up blood as we forced him to speak clearly into our failing 20-year-old tape recorder, “Since the bike is designed to be reminiscent of the ’20s vintage motorcycles, instead of lots of chrome we’re going with a matching powdercoat on the rims and rear legs of the front end.
“We have finished much of the detail in the form of the handmade Milwaukee Iron handlebars by Randy Simpson with the internal throttle control from Pat Kennedy, which I installed just before the ambulance came to get me. As they attempted to load me from the concrete floor onto the gurney, Lena asked if I could finish the exhaust system.
“We ordered the material and the flanges from Paughco, the one company that devotes most of its energy to building retro parts. I welded the 1 3/4-inch tubing to the Paughco flanges as the EMT tried to insert an IV into my right arm. We designed the rear of the pipe to be adjustable. The kicked-out cap is removable, along with the mounting bracket, so that the baffle can be removed and adjusted for tuning. The pipes will be finished with Jet Hot coating to avoid the problems of chrome and give the pipes a lasting, even finish.” Jim mumbled the words then passed out.
Lena moved quickly to the portable refrigerator that rattled in the corner of Jim’s small mobile home on the edge of the Texas plains. She’d told him that he had to continue to work despite his illness, but without pay because she didn’t want to risk a workman’s compensation claim. Tough broad. As they wheeled him out of the 107-degree shop without so much as a fan, Lena slapped Jim until he returned to consciousness and explained the seat mounting assembly to me. He machined and welded a piece of tubing into the seat downtube, then welded it in place. From there he machined a piece of solid stock that the seat clamps to. It was designed to move the seat to the rear to enhance the leg room for Bandit and prevent the seat from lingering over the tank. It too will be powdercoated.

The final panel over the tank hides the oil line connections on the left side. The gas stays in the right side. It also hides most of the electrical components, including the regulator and ignition module. Jim made the oil lines from seamless cold pulled stainless tubing.
As you look at the photos, you’ll notice how the taillight and license plate are mounted off the turned brake caliper bracket. Bandit, under a great deal of pressure from his next wife, was asked what he thought of the progress of his custom scoot. Thinking quickly, he reviewed his options while complimenting Jim’s workmanship. But he knew that if the bike was torn and shipped to paint soon that he would be facing life-changing stress–another marriage. Could he actually move to Texas and face another marriage? He reviewed his options as he watched the battered craftsman slip in and out of consciousness. A trickle of blood ran from the corner of his eye. His skin was as white as the lines on the highways running out of town and it took three able-bodied men to shore him up to even a sitting position to face his employer’s daughter.
Bandit succumbed to his own pressure and complained of the flap-like license plate, asking to move it. I was astounded by Jim’s reaction. His artistry came first over his failing heart and the aneurysm creeping steadily toward his brain. He admitted that he too was unsure of the appearance of the license and could possibly conjure up something different. Just then the skies opened up and a summer thunderstorm struck, rattling windows throughout the region. That was nothing compared to the blistering reaction by the 15-year-old high school student.
She ditched school and forced Jim, who was hospitalized at the time, to come up with an award-winning taillight concept and license plate bracket and illustrate it. This is the illustration, and the entire staff concurs that it is brilliant. The taillight will be hand fabricated into the reproduction ’20s fender with LED lights for illumination. The license plate will be mounted to the frame and the rear of the inner primary with steel brackets to avoid any semblance of billet aluminum. The slim, contoured assembly housing the lights will contain 10 running LEDs with an additional six for braking. The license plate bracket will also contain several white LEDs for illumination of the plate. Jim passed out shortly after this illustration was finished and we scurried from his room to avoid the temptress, Lena, who dragged several nurses down the hall to demand more work from Jim.
This machine will ring the wedding bell or break more than just Jim’s back. Rumor has it that Bandit is going to Texas, but avoiding Dallas, to board the tramp freighter “Leon” for his escape from the country. Another report will be forthcoming.
–Wrench
1928 Shovelhead Part VI – Coming To Life
By Robin Technologies | | General Posts


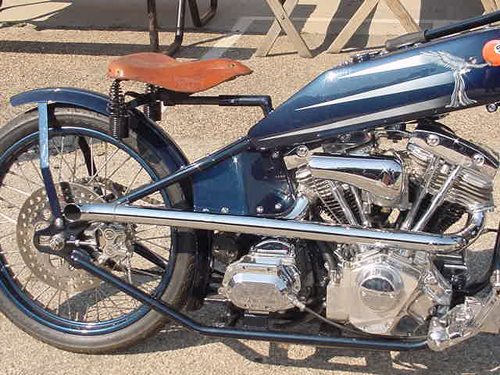
Just when you thought a project slipped off the lift, the paint arrived. Harold Pontarelli of H-D Performance, in Vacaville, California, made this puppy sing. It’s now mighty close to pavement miles. What started as a 1984 Mexican Police bike was transformed into a 1928 Shovelhead.

All the Compu-fire electrics possible were stashed on brackets built into the frame backbone, under the split halves, of the gas tanks. The finish on the frame, front end, brackets and wheel rims came from Custom Powder Coating in Dallas. The drive to finish the bike came from Lena, the lovely daughter of Rick Fairless, the owner of Strokers Dallas, formerly Easyriders of Dallas.
The magazine publisher determined that the 30-odd Easyriders stores around the country were not sending him enough bags of gold and pulled his name from their stores. Whatta shame, but Rick and many of the other store owners have bargained with supportive companies such as HOT BIKE and Big Dog. Some have chosen one of those names to stand behind, others, like Rick and Myron Larabbee, in Scottsdale, Arizona headed in their own directions. We’ll see what happens next.

This scooter is reminiscent of kits now being manufactured by Arlen Ness and Randy Simpson of Milwaukee Iron in Lynchburg, Virginia. Both of these talented builders are developing rolling chassis kits to house the driveline of your choice. Check with them if you have an engine and transmission around that’s dying for a nostalgic rejunivation.

This particular 1928 Shovelhead was built with scraps and components from as far away as England. Parts were ordered from sources that actually remanufacturer fenders, tanks and seats for old Harley restorations. Additional components were scavenged from a shop closing in Van Nuys, California, but the final creation, fabrication and assembly was handled by a couple of talented builders at Strokers in Dallas. JR started the project then escaped the country for four years, while Jim Stultz took over. Jim has since opened his own shop and JR returned to the fold for final assembly.

JR slicked the welds before anything was powdered or chromed and cut spacers for the rear 21-inch wheel. They ran into one problem with the battery box configuration. The battery wouldn’t fit. With some quick adjustments, a super strong Spyke gel battery slipped into place and kicked the scoot right off. The oil is housed in a portion of the gas tanks, so the box above the transmission handles only the battery and the ignition switch, with some wiring.

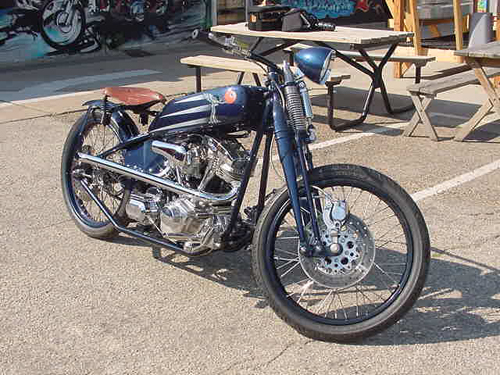
“When we build bikes,” JR said, “We completely mock them up before chrome and paint, but we don’t juice and start them. That creates too much of a mess to deal with before chrome and paint.” I rode through the final joining of parts with JR for tips that you could use. When the majority of the chrome and paint was in hand he began assembly. “First we had to send the wheels out to be relaced, trued and balanced,” JR explained. Since we went the extra mile to powdercoat the rims, the wheels had to be torn down, then re-assembled once the painted rims were returned. Note that the front 21 matches the 21 on the rear for that spindly, early look.

JR put the bike up with the front end, rear fender (it had tight clearances, so they mounted the fender before the wheel) rear wheel and front wheel, so it was a rolling chassis. Then the engine was installed (after the powder was shaved away from the mounting areas) and the transmission in that order. Before the driveline was tightened, he mounted the inner primary to insure proper alignment. Then the battery box was installed.

Next the electrical components were installed so that the wiring could be run between the gas tanks and hidden from view. Then the gas tanks/oil tank was installed on the backbone of the frame. Jim originally bent solid tubing oil lines, but they leaked some and tight bends were threatening oil flow. “I was concerned,” JR said, “Shovels and Pans need a lot of lubrication, quick. If I could, I’d pour the oil in through a big funnel. He was concerned about the myriad of hard bends and the small I.D. of the tubing. “I chose to use a larger diameter rubber tubing.”

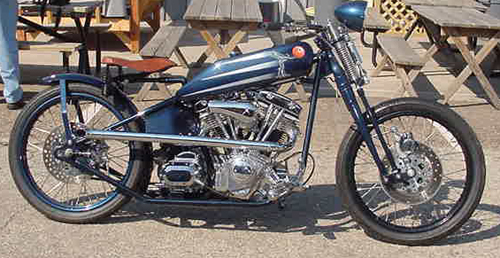
Then JR mounted the brakes, which were both disc and mostly Performance Machine components. Final components followed including the primary drive, the handlebars, headlight and internal throttle to the S&S carb. Note the lack of controls on the bars.

“The engine fired off the first time,” JR said smiling. “We planned to Jet Hot coat the handmade exhaust pipes, but the boss, Rick Fairless, voted for chrome.” After the bike was fired and tested they yanked the pipes for dipping.

If you’ve read the previous installments, you caught the sixth wife threat looming over Bandit’s head. After five wives he has a deadly code, “No more wives”. So he drug his cowboy boots in a dire effort to stay out of Texas. He’s hoping his tactic worked, that the lovely Lena Fairless has grown and lost her desire to chain Bandit down one more time. She’s almost of age and being sought after by a line-up of young Dallas riders. Hopefully, one will sweep her off her dainty feet.

Bandit remains in California and awaits the arrival of the 1928 Shovelhead via a Truck from American Iron Horse, the custom bike manufacturer in Dallas. Then we’ll road test the scoot ourselves and take the photos needed for a full feature on Bikernet and in a bike magazine. Hopefully soon it will rumble down the old streets of San Pedro, its home.
–Wrench

1928 Shovelhead Runs Part VII
By Robin Technologies | | General Posts
Here’s the deal. The 1928 project was recently completed except for a stylish exhaust system. The antique notion was based on racers from the ’20s, something way off the pavement, open and short.
JR, the service director of Strokers, explained the steps, “They were cut and pasted together. Bits and pieces from the scrap yard, combined with pre-bent 1 3/4-inch diameter 16-gauge tubing, which is similar to stock. We also used stock exhaust manifold chunks off scrapped systems.”
He hung up, and I sat back in my chair perplexed. I was faced with the same daunting task when we built the Amazing Shrunken FXR pipes. I had a myriad of questions and called back.
“Hold on JR,” I said trying to capture his attention while he was carb tuning a running, 100-inch, RevTech motor.
“What the hell do you want?” he said in a Texas gunslinger drawl.
“Do the pipes have baffles? I asked holding the phone like you grasp a girl you don’t want to lose.
“Nope,” JR said.
“Are there any brackets other than the exhaust manifolds?” I rattled the question rapid-fire quick, hoping that he wouldn’t hang up.
“One,” he said, “anything else?”
“Yep,” I barked.
“I gotta go,” JR fumbled and the straight-pipe, 100-incher roared.
“Wait,” I begged.
He hung up. I looked at the phone as if someone sliced the wires leading to the pole, and the died. The next day I called back. JR was off on Tuesday. I called Wednesday and the receptionist fed me to the service department. The service writer was courteous, told me JR was in but couldn’t find him.
I called the next day. He was on the premises but unavailable. I called the following day, still no JR. I was growing a complex. I called everyday for a week, no luck. I went around him to his boss, the magnificent Rick Fairless, the mastermind behind Strokers of Dallas with Strokers Ice House, one of the most happening biker bars in the South. An e-mail sprang back. JR suffered a heat stroke after road testing a new Big Dog, for two hours in 102 degrees, then helping his daughter move to college. I felt like shit.
Apparently heat strokes are notorious and can become an annual nightmare. This was his third devastating attack. We finally hooked up again, and he coughed up his exhaust pipe making secrets. Strokers is noted for their customs, which rock from old school radical choppers to hand-fabricated marvels. JR is learning more and more fabrication techniques to expand the shop’s capabilities.
“We’ve been performing sheet metal functions, with hammers, successfully,” JR said, “but with an English wheel and Yoder hammer machine, we can speed up the process. I’m taking classes.”
They don’t manufacture many exhaust systems, and when they do it’s by hand.
“You can buy exhaust pipe segments, 1 3/4-inch to 2 1/2 inches in diameter, from hot rod shops, and piece any pipe together,” JR explained. “We buy “U”, “S” shaped bends and straight chunks.”
Since I also faced the delicate job of trying to hold two chunks perfectly in line and tacking them, I asked JR how he handled the task.

“We discovered magnet clamps for holding chunks of pipe,” JR said, “they’re available from Harbor Freight Tool Supply. I made flat clamp brackets in dissimilar lengths from 3 to 6 inches long with a variety of holes drilled in them in an arch. There are two “C” clamps attached, on at either end. I welded bolts to the clamps so I can move them from hole to hole, on the bracket, or change the angle.
I asked a final nervous question about the allowable gaps when tacking pipes.
“I try to make the fit as close and precise as possible,” Jr explained. We continue to grind the edge of the pipe with a 90-degree, die grinder and a 2-inch 3M sanding disc. We also have a band saw with a tilt-able head for slicing exhaust at just the right angle.”
“The pipes haven’t blued,” I said looking at the shots.
“Yeah,” JR said. “We use three coats of Blue Shield by Kreeme, the guys who make the tank sealant.”
“So how loud are these puppies?” I asked holding my breath. They looked like window breakers.
“Not bad,” He muttered looking at the shop clock. I was burnin’ daylight in Dallas. “They’re loud enough that ya know what ya got.”
“That’s it,” I said. “I won’t darken your phone again.”
“It’s happy hour at Strokers,” JR barked, and I could sense that I was losing him.
“It’s party time,” were his final words.
