It’s been awhile, but I haven’t dawdled. I’ve been working hard on various projects. That guy in Deadwood, who was once 45 John bought a 1960 Panhead roller/basket case and I’ve been helping with the reconstruction. I rebuilt or built and trans from a case and a sketchy box of parts. With Fab Kevin we built a front disc brake. John rebuilt the rear star hub and I helped with fitment and the rear brake.

I now have my son’s ’58 Chevy Belair and drove it to Spearfish the other day to the third mechanic. I have a good feeling about this one. He has a slick operation and was recommended to me by the TNT crew. It looks like the Carb may need to be replaced and or overhauled. I walked through the snow carefully into a large Antique barn and found a Rochester GM carb, amazing. I may see major progress in the future.


I sent the seat pan several months ago to the famous leather tooling expert Howard Knight. Howard is a master and the seat arrived just as the paint was completed. But I had a few more leather straps I needed make and one day, while cruising through Sturgis with the bros, we stumbled into Sturgis Leather. We met the longtime owner, fabricator, patch sewing maniac, seamstress, leather shirt maker, and metal artists extraordinaire Ron Hall. He’s been around a minute, part owner of a couple of bars and a bike riding fool.
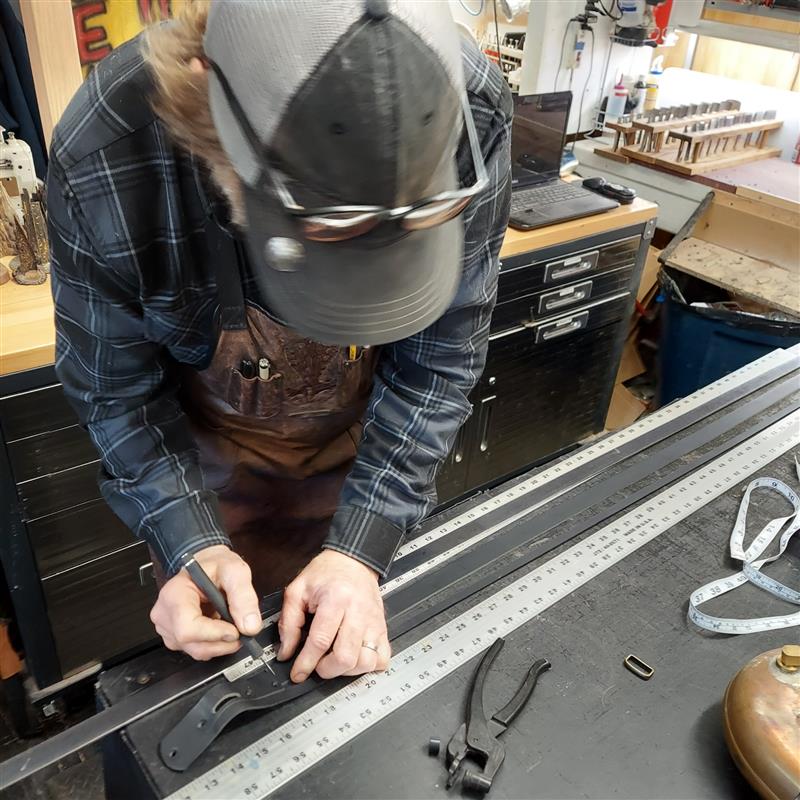
I took him my strap projects for the oil tank and battery and he performed his leather magic on the spot, making suggestions and hand fabricating each piece. Bada bing, I had a completed battery strap.


I’m concerned about the battery. It’s not quite 200 cranking amps, and I’m not sure it’s enough to turn over a new, tight, 93-inch S&S Knucklehead engine. I’m thinking about a back-up Shorai or Anti-gravity lithium battery. Lithium batteries are dangerous. If your lithium battery gets wet and or catches fire you’re fucked and so is your garage, be careful.

My plan would be to keep the battery stored away from my home. We’ll see about that down the road.

I received my frame back from Tim at flat earth, but I wanted some additional pinstriping. As you can see above with Atomic Bob’s concept drawing, we initially considered a cream tank and fender with orange graphics, but somewhere in the mix I shifted. Let me know what you think.
Tim from Flat Earth has a process for giving the pinstriping a patina effect, as if it was pinstriped a long time ago. With TNT Paint, Tim and Nikki we discussed making the cream flat and the orange glossy. That worked for awhile, then we decided to flat everything, which had a major quirk.


Here’s a bunch of shots from their stellar shop.


“Don’t touch the flat clear,” Tim said. “It will go shiny. Don’t get anything on the paint, it will turn glossy.”
I sorta freaked. It’s a motorcycle frame and everything is open. I’m touching shit constantly and I’m not going to wear plastic gloves throughout the process. I tried, but then the gloves get greasy…

I cleaned and prepped my shop for the final assembly, painted my lift and the top of a couple of rusting benches with Valspar rust preventive paint. Travis at A&J Welding supply recommended it, but he said they don’t make it anymore. This stuff is the shit. It’s tough, thick and glossy. It was even fun to apply. I mixed white with black to get the gray I wanted.


As soon as the bike paint arrived completed, I anxiously greased my Timken neck bearings and installed the springer onto the lift and the frame onto the neck stem.


With the frame on the front end but still bare sitting on a pad I wanted to install the engine. John came over to guide the left side as I lifted the heavy engine off the engine stand. Before it could go into the frame, I needed to sand the paint off the motormounts.

Irish Rich modified this frame and he helped me modify the XA springer front end I got from Matt at Carl’s, with fork stops built into the bearing cups.

We slid in the engine after I stumbled. I used the rear axle and a flat lift jack to jack up the bike, so I could block it, remove the jack and start to install the 5-speed trans in a 4-speed S&S case. The trans didn’t want to go so I filed and ground all the paint out of the 4-speed slots and the slot I made and welded for the 5th stud on the right. I even had to grind the rear tab on the trans case more for additional clearance.
I couldn’t run an old school 4-speed trans for a couple of reasons. It’s an alternator S&S engine and I wanted it to be electric start.
I faced the toughest aspect of this build at this moment, the driveline alignment. If you followed this build, we’ve made several adjustments because of the alternator engine and VL frame configuration. Fortunately, I ran a very narrow rear Black Bike wheel and tire. The sprotor rear brake was also an issue.

With the engine bolted in place, and the transmission setting in the frame with maybe ¾ inch of adjustment, I needed to grapple with the front, Tech Cycle, single-row chain. The chain fit with the transmission moved as forward as possible. I punched the master link in place after adding the O-rings and additional white grease. Paul Cox coached me on the rivet-styled O-ring chain.
I was careful not to crush the O-rings anymore than any of the other plates had. Then I looked for a punch to do the rivet job. I didn’t beat it to death, but just a couple of solid smacks at a time with a heavy ballpeen hammer. The punch can’t be too sharp or I wouldn’t splay the head but just drive against the center.

Paul Cox said he used a sharp flat punch to make cuts into the rivets across it at 90 degrees to give the head four slices. Then he punched the head and could see how the rivet split and splayed. Interesting suggestion.

At first, I was very concerned about setting the masterlink. What if I had to remove it to remove the chain. As it turned out I could remove the whole drive line by removing the nut on the engine sprocket, the left-handed nut on the transmission and pulling the entire system free. I had to do this a few times, machine a washer perfect alignment, etc. I will need to remove it once more to install a Paughco tin primary piece as a chain guard.
Then I shifted to the rear wheel. I’ve installed and re-installed this bastard 20-some times. Everything changed, but ultimately for the better.
Everything was a struggle with the Sprotor brake system, so I shifted to the same thinking as the front brake on John’s Panhead. I bored out the hefty brake bracket to 1 1/8 inch. Amazing, I had a drill bit that came super close, then some grinding and sanding finished the job. Now spacing became a more direct operation and the caliper could adjust itself to the rotor for more efficient operation, I hope.
On the other side I found one spacer that worked but I didn’t like the outside diameter to the frame. I went with a shorter spacer and a 1/8 thick washer on the frame side. Everything seemed happy until I tried to mount the sissybar.

Keep in mind, everything was fine in mock-up, but during final assembly shit shifted. Now the rotor mounting bolts hit the machined carriage bolt even after I machined the head down. I was forced to take the wheel off again to install this machined carriage bolt. The hardware store didn’t have the 1 ¾ 7/16 coarse bolt I wanted. I ended up with a 3-inch bolts. I had to machine the carriage aspect off, cut the bolts to size and die-cut additional threads.
Even with all these efforts, the 12-point rotor bolts still hit the head of the sissybar mounting bold. I considered my alternatives and thought about replacing the rotor bolts with domed Allens. I thought for sure the bolts were 3/8 coarse bolts and dug into my fastener bins. No problem. I had what I needed and exchanged them with the chromed 12-points. Nice, lots of clearance.
Just as I was about to shut the shop down for the whiskey night, I picked up one of the 12-pointers and discovered it was a 7/16 coarse bolt. Un-fucking real. I immediately loosened the 3/8 bolts and reached out to McMaster Carr for more bolts—WTF. The wheel is coming off again. Then it came off to mount the fender twice.

Then I tried to install a rear chain. It was fine, but two short and my half-link wouldn’t fit, why. I ordered another standard chain a D.I.D job. Nothing is standard anymore. You can buy a 530 chain for as low as 37 bucks, all the way to a $150 for a chromed O-ring chain. Beware, they make standard chains, heavy-duty chains, O-ring chains, heavy-duty O-ring chains. They keep getting wider.

I’m going to compare the chain I have with the new one when it arrives. As you know, I have a serious issue with the width of the chain and my transmission case because the sprocket is reversed.


Next, I moved the wheel back to the center of the travel because I couldn’t get the Tech Cycle starter in place. I did, and it slipped into place. Remember we went through several changes to the clutch housing, sprocket placement, ring gear location and the engine sprocket. We moved the engine sprocket out another ¼-inch and we moved the clutch sprocket in about a ½-inch. They were close, but it messed with the pinion shaft housing on the starter.

I thought about using my Smithy to machine a notch in it. I would have need to create a mounting plate to clamp the cone into the milling machine. I chose the old school way by using my new grinding wheels to do the job, then the Scotchbrite wheel to smooth it and ultimately my Eastman buffing wheel to polish the piece. I did this several times until I had about 1/6th of an inch clearance above the chain. I’m going to keep a close eye on this during the warm-up and break-in stage.

I started to install my controls. I have them a light coat of Rust-o-leum satin black paint, making sure some rust was still exposed. I dipped and painted the handles with flex seal for a rubber-like grip.
Today, master cylinder, pipes, petcock, oil tank, oil lines, sparkplug wires and gas lines. Hang on. Hopefully, the toughest installation elements are over.
Ride Free Forever,
Bandit

My grandson is building a classic Panhead and asked me about gas tanks. Here’s what he said, “I wanted to be period-correct for the ‘60s outlaw look.” Sounded like Dominic talking, his mom’s boyfriend who builds classic chops. He’s a celebrated builder at Born Free every year.

It’s a kick. There are builders out there like Micah McCloskey, Paul Wheeler and Dominic who are religious and specific about how they build choppers. They are precise and follow the classic code.
It’s sorta funny. The whole notion of outlaws and choppers thumbs their middle fingers at any rules. Build whatever you want and fuck anyone who doesn’t like it. There’s the code of the west in a tumbler of Jack Daniels on the edge of a bar fight over nothing.
SOURCES:

Atomic Dice
Clauser’s Machine Shop
Spearfish, SD
Dakota V-Twin
Spearfish, SD
www.dakotavtwin.com
JIMS Machine
McMaster Carr
www.mcmastercarr.com
Paughco
Shamrocks Customs
Sturgis, SD
S&S
TechCycle
www.techcycle.com
Terry Components
Check on J&P Cycles
Nash Motorcycles
Colony
www.colonymachine.com
Black Bike Wheels
www.blackbikewheels.com
Custom Chrome
www.customchrome.com
Barnett’s clutch and cable
Dennis Kirk![]()
Flat Earth Paint
Spearfish, SD
605-645-7192

TNT Collision and Glass
Tim and Nikki
605-641-8602
Sturgis Leather
Sturgis, SD
Carl’s Motorcycles